Are you getting the Minecraft VR “Windows update must be enabled” error message repetitively while trying to launch Minecraft? Well, you are not alone! Ever since the last update, people are facing lots of trouble while launching the Windows 10 version of the game in VR. Don’t worry as you make it to the right place. Here we have shared a few workarounds that can fix the ‘Minecraft VR Windows update must be enabled’ error on your computer. Have a look below!
Table of Contents
How to Fix ‘Minecraft VR Windows update must be enabled’ Error on Windows 10?
Starting from an outdated Windows 10 version to corrupted game files, there can be several reasons you face the error. No matter the reason, follow each of the resolutions that we have mentioned here and quickly fix the problem.
Method 1: Re-download the Game from Microsoft Store
In many cases, the users who have downloaded the game from the Oculus Store are facing the error. If you have also done the same, it’s time that you download and install the game from the official Microsoft store all over again.
Method 2: Update Graphics Card Driver
Has it been some time that you have updated your graphics card driver? Well, if your answer is yes, then an outdated graphics card driver can be the reason you are getting the Minecraft VR error. You can use third party tools like Driver Easy to one click update drivers or follow the simple steps we have shared below to update your graphics card driver on Windows 10.
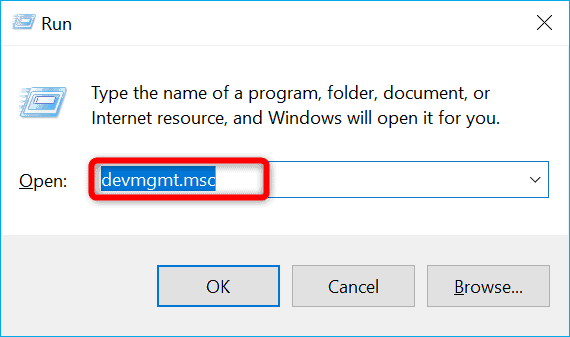
Step 1: Firstly, press the Windows key and R on your keyboard to open the Run command box
Step 2: Now, on the search field, type devmgmt.msc and hit the Enter button
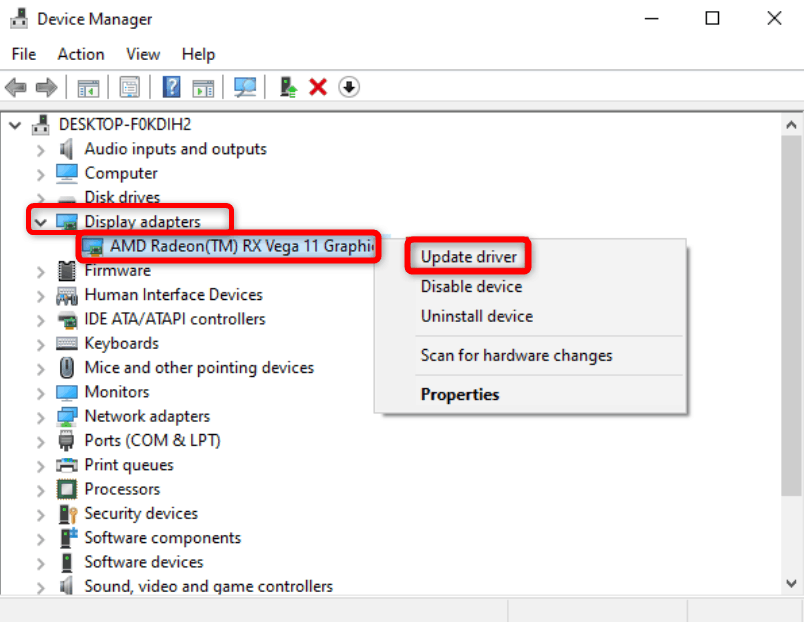
Step 3: As the ‘Device Manager’ opens, locate the ‘Display adapters’ tab from the list
Step 4: Then, double-click on the ‘Display Adapters’ to expand the menu
Step 5: Now, right-click on your Graphics Card name and select the ‘Update driver’ option
Step 6: As a new window opens, select the option ‘Search automatically for drivers’
Step 7: Then, wait until Windows completes its search for the latest driver for your graphics card
Step 8: Finally, download and install the latest driver by following the simple on-screen instructions
Once you are done with the installation of the latest graphics card driver, the problem should get resolved. But for many users, the ‘Minecraft VR Windows update must be enabled’ error message does not stop popping up even after updating the graphics card driver to the latest version. If that’s the case for you as well, don’t get disappointed this early!
We have some more workarounds which might work for you. Try all the resolutions now.
Method 3: Install Latest Windows Update
An outdated operating system can be the reason why you are facing the ‘Minecraft VR Windows update must be enabled’ error on your computer. Download and install the latest Windows 10 update and check if that resolves the issue. Follow the steps below to update your operating system.
Step 1: At first press the Windows logo key on your keyboard
Step 2: Now, from the left pane, click on the ‘Settings’ button
Step 3: Select Update & Security from the Settings window
Step 4: Then, click on the Windows Update tab on the sidebar and click on the ‘Check for updates’ button from the left
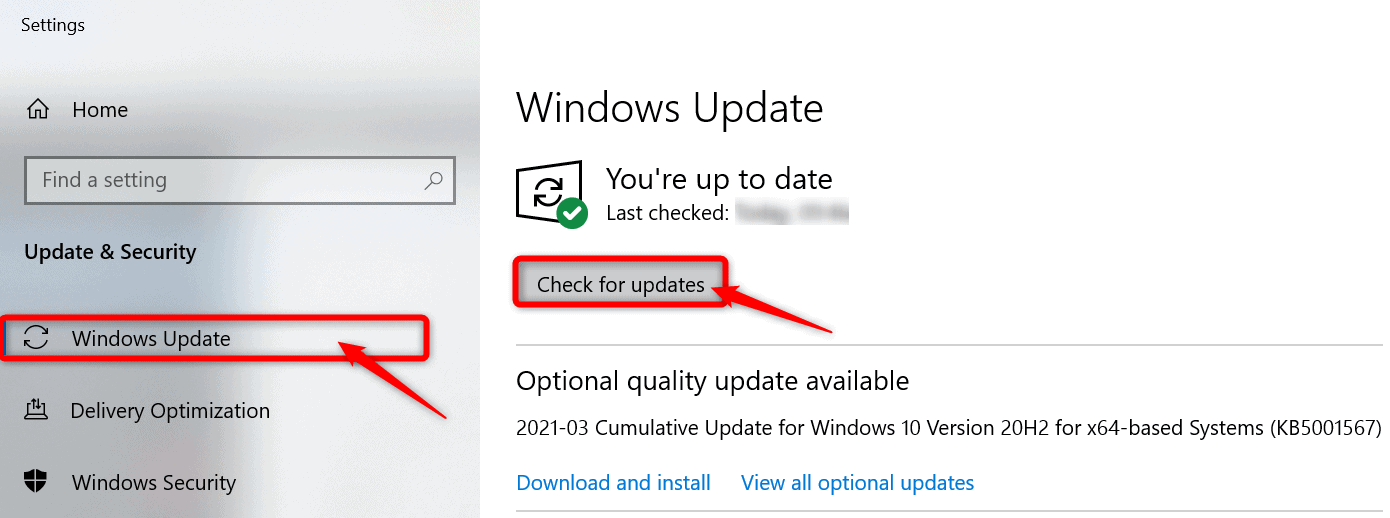
Step 5: Wait until Windows completes the check for available update
If any update is available, Windows will automatically download that on your system, and you will get a notification to install them.
After completing the update process, run the game again. If you still face the problem, try the fourth solution below.
Method 4: Enable Auto Update For Minecraft with Windows Update
Windows update comes with a useful feature, enabling which will ensure update for all the other Microsoft products installed on your PC alongside the Windows 10. Enabling the auto-update of Minecraft while updating Windows 10 will definitely resolve the error. Follow the steps that we have mentioned below and get the job done easily.
Step 1: Firstly, press the Windows Key and type Windows Update Settings on the search box
Step 2: Now, from the list of options, open Windows Update Settings
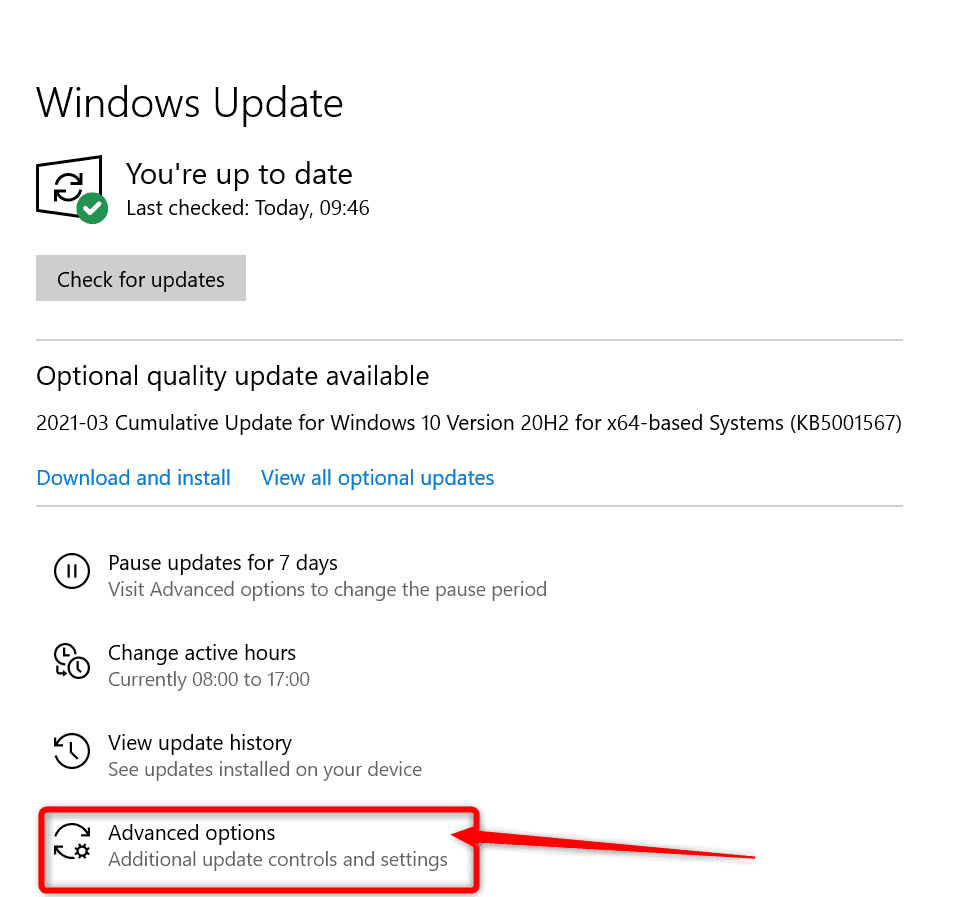
Step 3: Then, from the Windows Update window, locate the ‘Advanced options’ tab
Step 4: Click on ‘Advanced options’ to open advanced update settings on your Windows 10 PC
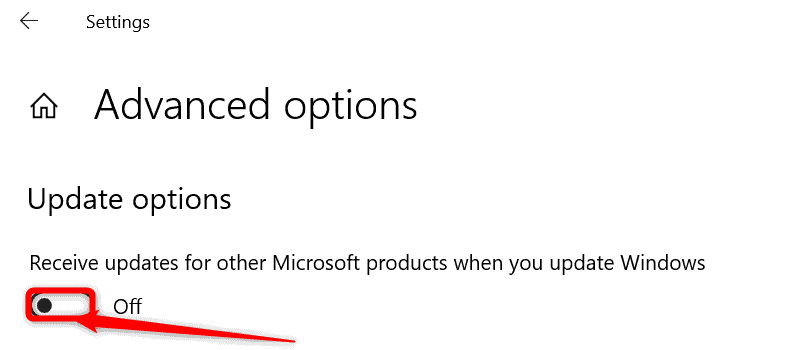
Step 5: Finally, under the Update options tab, turn the toggle on below the option ‘Receive updates for other Microsoft products when you update Windows’
Conclusion
That’s all, guys! Once you try all the solutions, you must not face the ‘Minecraft VR windows update must be enabled’ error anymore on your computer. We hope you find the article useful. If you face any hindrance trying any of the steps above, feel free to comment on the box below for further assistance. Check out our other articles on resolving different Minecraft related errors.

