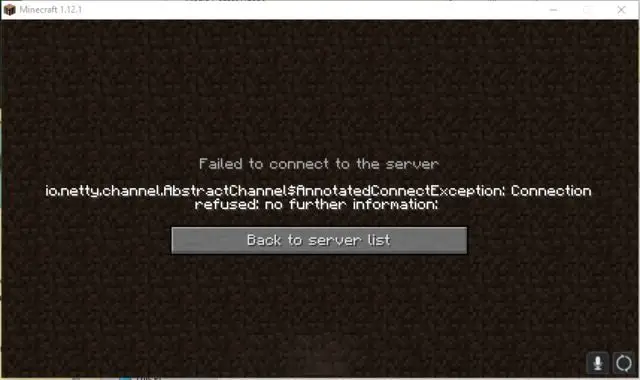
Minecraft is the most popular sandbox game developed by Manjong. It has a huge player count, and the players base is increasing every day. And recently many players have reported about a reoccurring connection error in the game – “io.netty.channel.AbstractChannel$AnnotatedConnectException Connection refused no further information” across both the single and all servers. Let us look deep into what is the meaning of this error, and why does this occur. Along with it, let us see the best solutions on how to resolve this error.
The Error – “io.netty.channel.AbstractChannel$AnnotatedConnectException Connection refused no further information ” basically means that the connection to the Minecraft server is interrupted, lost or refused due to more than one reason. The various reasons leading to this connection refused error are – a firewall block, a bad connection to the server, or a wrong Minecraft client version, or an outdated Java version, or due to an incompatible software installed in the system preventing its proper function.
Table of Contents
What Cause Minecraft Connection Refused Error?
If you are facing the error – “io.netty.channel.AbstractChannel$AnnotatedConnectException Connection refused no further information”
Firstly you need to check and verify to see if the issue persists only with your game or with all the players in your network. You can ask any other person in the same network as yours to connect to the server using the IP address and Port number of your server. If the other person is able to connect from their system to your network, then probably it is only you who is facing the problem of connectivity. Thus the issue may be due to Firewall settings or other cases where it may have happened due to incompatible software installed in your system or an outdated version of Java.
Sometimes, the issue is not limited to a single server but all the servers and hence no one will be able to get connected and may get the error – “io.netty.channel.AbstractChannel$AnnotatedConnectException Connection refused no further information“, this may happen due to the dynamic IP address. In these cases, manually adding the IP address and port number to the Minecraft server properties may solve this issue.
At other times the error may be caused due to a bad internet connection, which needs the connection to be reset.
“io.netty.channel.AbstractChannel$AnnotatedConnectException Connection refused no further information”
- IP address conflict :
In some cases, the connection refused error is caused due to the wrong IP address and port number listed while connecting to a server. This happens if your IP address is dynamic (changing) and not static (standard), where multiple users may be allocated the same IP address, and hence the conflict occurs. Therefore we need to input our current IP address to the server properties to avoid this error.
- Firewall Issue :
The Windows firewall may block our connection to the server and thus causing the connection refused error. In this case, we need to add exceptions to the Firewall settings by adding the java file and the game directory to the windows firewall exclusion list.
- Incompatible Software :
This means that any of the software installed in our system may not be compatible with the Minecraft and may cause the issue. In this case, you need to uninstall the software to continue using the Minecraft. The Minecraft developers have provided a list of software that is incompatible with the game on their official website. Click here – to view the list of incompatible applications or software.
- An outdated version of Java :
If you have failed to update the Java version in your system, then this may not work with the updated launcher. Both the game launcher and the Java software needs to be of the same version in order for the game to work smoothly. Thus ensuring both the Java and the Minecraft are updated to the latest versions regularly will avoid any errors.
How to Fix Minecraft Connection Refused No Further Information
Guide to fix “io.netty.channel.AbstractChannel$AnnotatedConnectException Connection refused no further information” occurring in the Minecraft :
1. Resolve an IP Address Conflict :
The IP address one uses is not a static one, meaning that it keeps changing once in every couple of days or whenever the internet is reset. Therefore to ensure that we input a correct IP address and the port number to the Minecraft launcher, we will check for the details from the command prompt window.
Steps to find the system’s IP address and Port number :
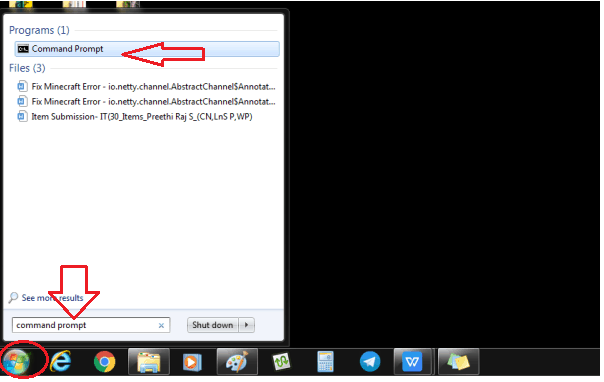
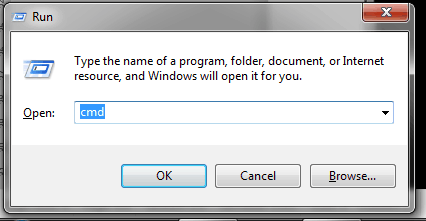
- Click on the ‘Windows’ key and in the search bar type “Command Prompt”, or alternatively you can use the shortcut Windows key + ‘R’ key and open the Run pop-up window and in the open tab type “cmd” and click OK or press enter key.
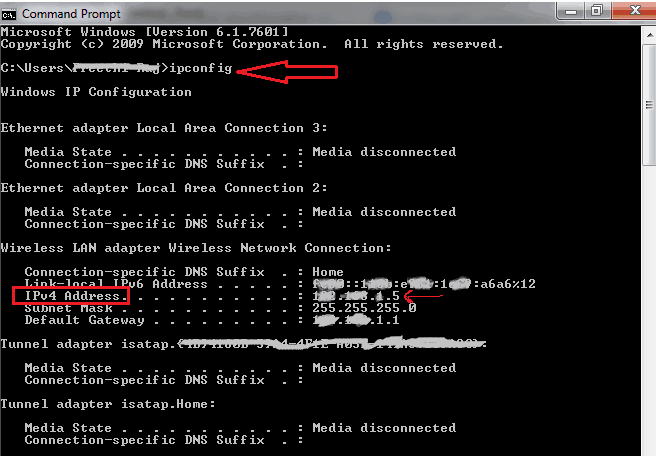
- The Command Prompt window will open, as shown below.
- Here you have to type the command ‘ipconfig’ and press ‘Enter’ key. Make sure you are following the above steps when logged in as an administrator. It may throw an error ‘Access Denied’ if you don’t have administrator access.

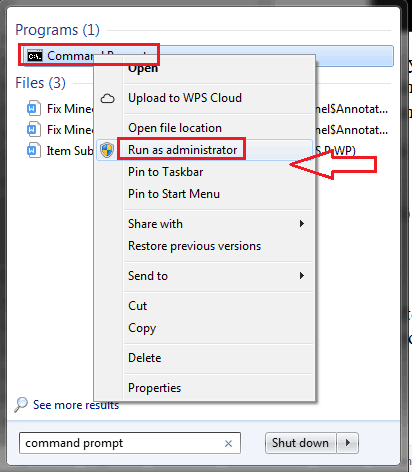
- If you don’t know whether the account with which you have logged into the system has administrator access, you can follow the below steps to make sure that you use command prompt with administrator access
- Press the ‘Windows’ key in the keyboard and in the search bar type ‘Command Prompt.’
- Right-click on the ‘Command Prompt’ icon and select ‘Run as administrator.’
- After you type ‘ipconfig’ and press enter, it will display the connection details, and you can note down the ‘IPV4 Address’ from here.
- Then go to the ‘Minecraft > Minecraft Servers Folder> Maxwell****** (**** – denotes some random number)> MinecraftServer’ folder and find the ‘Server Properties’ file, this file will be a text document and the file type would be mentioned as ‘PROPERTIES File.’
- Open the ‘Server Properties’ file and note down the ‘Server Port’ listed here, this is the Port number.
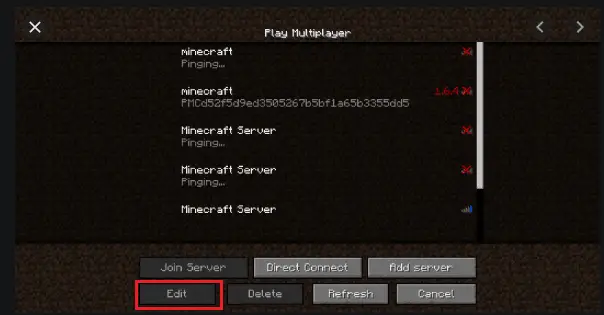
- Finally, to enter these details in the Minecraft server, open the Minecraft and navigate to ‘Play Multiplayer’ option.
- Select any one of the servers listed by clicking on it and in the options listed at the bottom of the page select ‘Edit’ option.
- In the next window, the Server name can be edited according to our wish or can be left as such, as this won’t create any problem.
- Make sure the data displayed in the ‘Server Address’ bar is matching with the one we have noted from our command prompt window; if not, kindly input the correct IPV4 address into the text box.
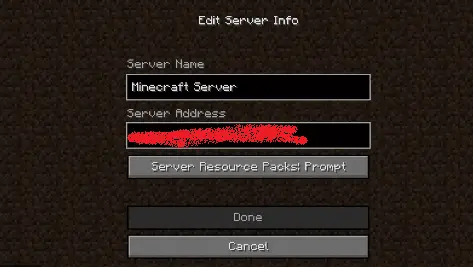
- Also, check the Port number, the port number will be the last five digit of the IPV4 address, i.e., – xxx.xxx.x.x:***** (*****- denotes our port number and should match with the one noted from Minecraft server file earlier), usually the port number is ‘25565’. If the Port number is different, then edit it.
- Click on ‘Done’ and then ‘Refresh’ to see if the details are updated.
2. Resolving Firewall Issues :
We will see how to add exceptions to the Windows Firewall for some of the executable variables in the Minecraft folder. These may be causing the connection issue as they are not able to get direct access to the internet.
Follow these steps for Windows 7 :
- Click on Start Menu and select Control Panel.

- In the settings window, select Windows Firewall.
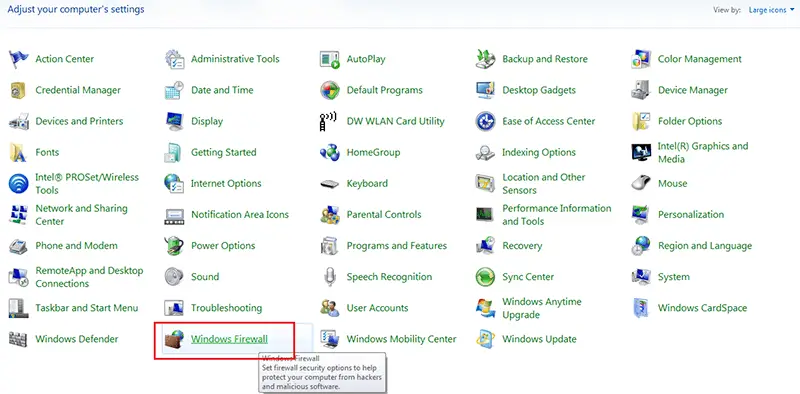
- Here click on “Allow a Program or feature through Windows Firewall”.
- Click Change Settings and then on ‘Allow Another Program’ and click on ‘Browse’.
- Now go to the path where the Game Installation files are located and select the launcher ‘.exe’ file of the game.
- Repeat step 4, and now you have to navigate to the path where the Minecraft Servers are installed.
- In that server directory open ‘Maxwell’ folder and inside that go to the folder ‘MineCraftServer’.
- Look for the Java variables inside the folder and select those.
- Now repeat the steps 1 to 3, and then instead of ‘Allow another Program’ scroll down and select all the available private and public networks of ‘Java Platform SE Binary’ option.
Follow these steps for Windows 10 :
- Click on the Start menu or the Windows key on the keyboard.
- Select the control panel or settings icon.
- Select the ‘Windows Security’ in the left pane and in that select the ‘Firewall Network and Protection’ option.
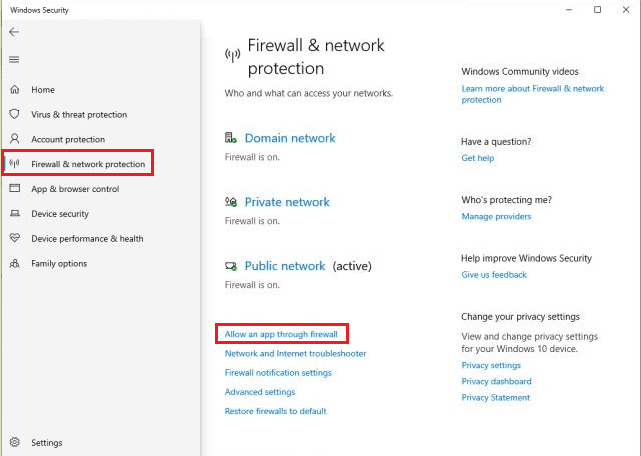
- Click on ‘Change Settings’ and click ‘Yes’ on the prompt window.
- In the options displayed, select ‘Allow another app’ and click on ‘Browse’.
- Now go to the path where the Game Installation files are located and select the launcher ‘.exe’ file of the game.
- Repeat step 5, and now you have to navigate to the path where the Minecraft Servers are installed.
- In that server directory open ‘Maxwell’ folder and inside that go to the folder ‘MineCraftServer’.
- Look for the Java variables inside the folder and select those.
- Now repeat the steps 1 to 4, and then instead of ‘Allow another App’ scroll down and select all the available private and public networks of ‘Java Platform SE Binary’ option.
- Thus all the necessary files are added to the firewall exception list, now open Minecraft Launcher and check if the issue is resolved.
2. Updating the Java Software
- Go to start menu or click the windows key in the keyboard
- Go to Control Panel and set the ‘View by’ to “Small Icons” if it is set to a different type.
- Look for Java(32-bit) in the list. It will have a ‘coffee cup with steam’ symbol.
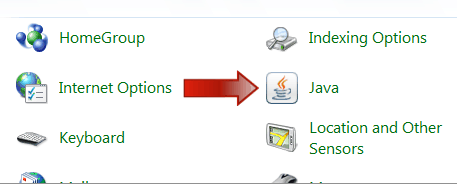
- Click on it, then click the Update tab and select “Update Now” button.
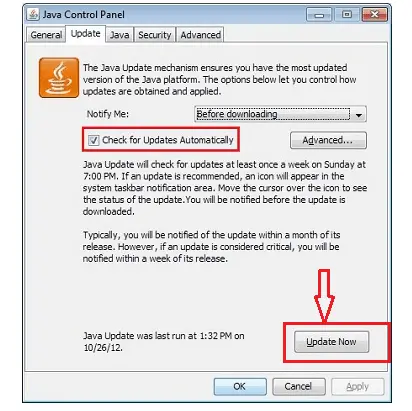
- In the pop-up, click on “yes” to allow the changes.
- Then download and install the update following the instructions and clicking OK, ‘Yes’ and ‘Install’ as prompted.
- Make sure that you have unchecked the install ‘Ask Toolbar’ option when prompted and select only the Java update to be installed.
- In case you have the latest version then after the Step-5, you will get a pop-up saying that your Java settings are up-to-date and no action will be taken.
- If in case you haven’t installed Java settings in your system, then follow the below steps to download and install the Java settings.
- Go to the Java Manual Download Page – https://java.com/en/download/manual.jsp
- Click on Windows Online option, a pop-up asking to Run or Save will appear.
- Select Run to install it immediately or Save if you are planning to install it later.
- Once the file is saved, double-click on the file to start the installation process and click on Install.
- Follow the instructions in the Installation window and complete the installation process.
- Once the Java settings are updated, try logging into the Minecraft and see if the issue was resolved.
3. Uninstall Incompatible Apps:
- First, make sure to check the list of incompatible software with Minecraft – Check for it in this link.
- If you are using Windows 10, Open Start Menu and click on settings and select ‘System’ option. In the next window, select ‘Apps & Features’ from the left pane.
- If you are using windows 7, then in the Start Menu, select the ‘Control Panel’ and select ‘Programs and Features’ option.
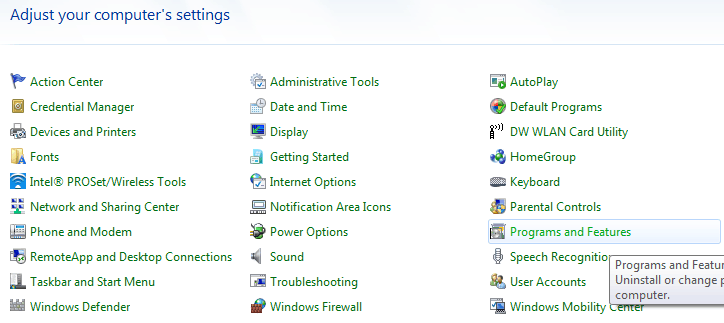
- The above steps will open the list of programs installed in the system.
- From this list, select the program/app that is incompatible with Minecraft and is causing the problem and click the ‘Uninstall’ button and wait till the program is uninstalled.
- If there is more than one program/app to be removed, then select and uninstall the program/app one at a time.
- Follow the instructions in the pop-up window and complete the uninstallation process.
- Finally, after all the incompatible programs are removed, reboot the system and then try logging into the Minecraft and see if the issue is solved.
5. Resetting the Internet Settings :
In a few instances, it will be merely a bad internet connection causing the error, thus resetting it may solve the issue.
- To reset the internet settings and clear the DNS cache, you have to disconnect the router from the power source and wait for 2-3 minutes.
- Then reconnect the router to a power source and turn on the power button, this will reset the router settings.
- Now login to the Minecraft and see if the issue is resolved.
If you know the root cause of the issue causing the server error in Minecraft, then try any one of the solutions mentioned above according to the root cause. If the root cause is unknown, then kindly try the solutions detailed above one by one and any of the mentioned solutions will definitely solve the Connection error – “io.netty.channel.AbstractChannel$AnnotatedConnectException Connection refused no further information ” occurring in the Minecraft game. These solutions have been tried by different users on different occasion and have proven to resolve the issue.

