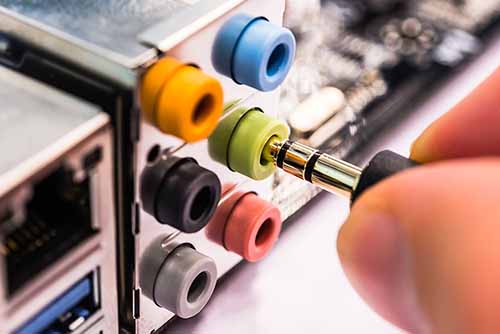
Are your rear speakers not working on Windows 10? Here are the top 3 troubleshooting methods to fix the issue. Scroll down to know everything in detail.
A number of users have faced this problem after upgrading their systems to Windows 10. Well, if you’ve also recently installed Windows 10 OS on your computer, then your rear speakers are not working because of the system compatibility error. It’s quite obvious that your previous drivers will come into a conflict with your latest operating system version; hence the problem occurs.
However, Realtek 5.1 sound card users have faced this problem most as it is working fine in Windows 7, 8, 8.1, and RT, but not in Windows 10. That’s why most of the users have reached out to Microsoft for a permanent solution, but there is no update on it yet. Though some users said their front speakers are working properly, just no sound from rear speakers Windows 10.
Instead of waiting for the Microsoft support personnel rolling out a solution, try these workarounds given below to fix rear speakers not working.
Table of Contents
3 Easy Ways to Fix Rear Speakers Not Working [Windows 10]
After doing extensive research on this surround sound problem, we’ve come up with these 3 below-mentioned methods. Different users have tried different workarounds, but these 3 seem to offer the ultimate solution. So, have a look below.
Method 1: Uninstall the Default Audio Driver
As we already mentioned, driver compatibility is the main reason behind this error. Hence, uninstalling and reinstalling the compatible and latest audio drivers will help. Also, in case your driver has got corrupted, installing the latest version will eliminate the issue. Here is how to do that-
Step 1: Press the Windows logo key + X button together on your keyboard and select Device Manager from the menu
![How to Fix Rear Speakers Not Working [Windows 10]](https://www.blogsdna.com/wp-content/uploads/2021/03/Device_Manager.jpg)
Step 2: In the Device Manager window, expand the Audio input and outputs section
![Fix Rear Speakers Not Working [Windows 10]](https://www.blogsdna.com/wp-content/uploads/2021/03/Audio_inputs_and_outputs.jpg)
Step 3: Now, right-click on the Windows default audio driver and select Uninstall
Step 4: In the Uninstall Device pop-up window, click Uninstall again to confirm
Step 5: Now, go to the Action tab on the top and click on Scan for hardware changes
![Rear Speakers Not Working [Windows 10]](https://www.blogsdna.com/wp-content/uploads/2021/03/Scan_for_hardware_changes.jpg)
Step 6: On doing this, a pop-up window will open; click Search automatically for updated driver software
![Fix Rear Speakers Not Working [Windows 10]](https://www.blogsdna.com/wp-content/uploads/2021/03/Search_for_updated_driver_software.jpg)
Step 7: Finally, the audio driver will reinstall and re-appear again in the list.
In situations, where Windows 10 does not download and install the default audio driver automatically, you would need to download the driver from the onboard sound card manufacturer website and then install it.
Now, the rear speakers should be working normally. If you’re still facing the rear speakers not working issue, then probably your audio driver is not the source. To identify and eliminate the exact reason, follow the next methods.
Method 2: Enable Speaker Fill
This method is applicable for those Windows 10 users who are particularly struggling with the 5.1 channel issues. Enabling enhancements and Speaker Fill will allow you to use all your connected speakers. Though the overall sound quality will degrade, you can still go for this method if you want great sound-effects while gaming or playing music. Yes, it’s because, instead of creating the full audio spectrum through all the channels, the rear speakers will create a surround-sound-like effect using virtualization. Let’s see how to enable the ‘speaker fill’ now.
Step 1: Press the Win + R shortcut key to open the Run dialogue box
Step 2: Now, type “mmsys.cpl” in the empty space and hit OK

Step 3: In the Sound Control Panel, navigate to the Playback tab and select the default audio device
Step 4: Now, click on Properties at the bottom right corner
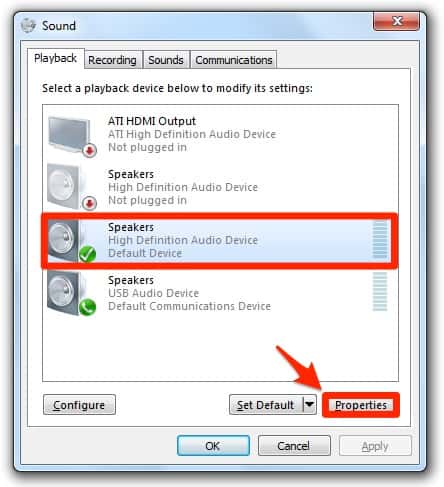
Step 5: In the Speaker Properties window, go to the Enhancement tab and uncheck the box right beside Disable all sound effects
Step 6: Next, you will see a list of options, scroll through and check the box next to Speaker Fill, and click OK next
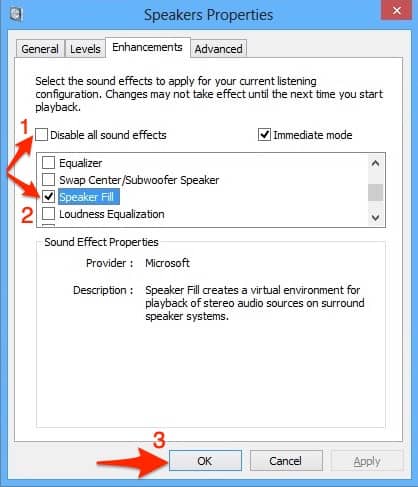
Step 7: Now, reboot your PC
The sound system feature should be working fine after this and you should be able to hear the sound from the rear speakers now.
Method 3: Change the Default Audio Format to 24/96
This method works best if your audio output comes through S/PDIF. It’s because you’ll change the bit and Hz by performing this method. Some users could enable the 5.1 surround sound system after changing the audio output format into 24 bit, 96000Hz. Even if you’re having trouble enabling Dolby Direct Live, this method will help you.
Step 1: First, press the Windows logo key + R button to open the Run box
Step 2: In the Run search box, type “mmsys.cpl” and hit Enter

Step 3: It opens the Sound Control Panel. Now, under the Playback tab, right-click on the default sound device of your system and select Properties
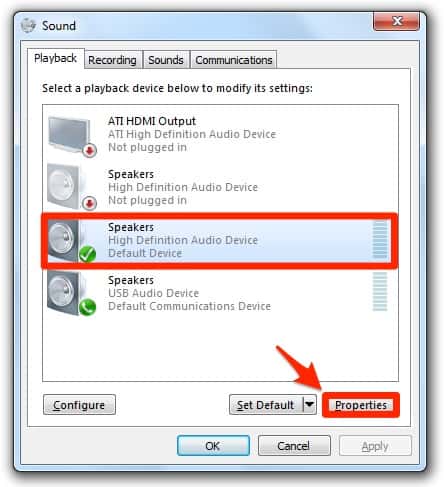
Step 4: In the Properties window, select the Advanced tab and go to the Default Format section
Step 5: Now, select 24 bit, 96000 Hz(Studio Quality) from the drop-down and click on Test to check if it’s working
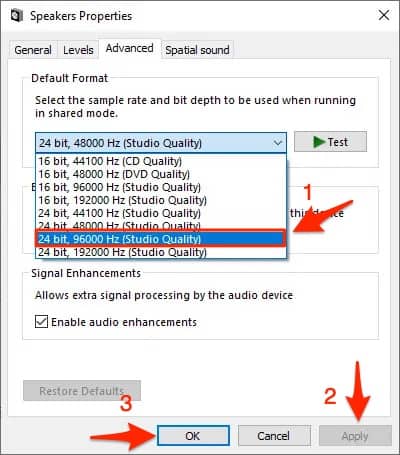
Step 6: Once done, click Apply and then OK to save the changes and exit.
Now, restart your system and the rear speakers should be working fine.
However, if none of the above methods work, the only option left would be to invest in the latest technology-based speaker (possibly based on Atmos or Sonic), or purchase a 5.1 sound card that’s compatible with Windows 10. But, if all fails, all you can do now is to roll back your Windows 10 to Windows 8.1 or Windows 7 build or wait for Microsoft to address the issue officially. That’s all!
Check out similar articles

