Microsoft has been regularly updating its operating system “Windows 10” ever since it was released. Due to this, Windows 10 is quite secure and user-friendly as an operating system. It’s important for the user to update the Windows 10 as soon as the new updates are released.
Table of Contents
Windows Update Stuck at 0%
![Windows Update Stuck at 0% [Windows 10]](https://www.blogsdna.com/wp-content/uploads/2019/06/Windows-Update-Stuck-at-0-Windows-10.jpg)
When you click the “Check for Updates” button, the system will automatically search for new updates. If there are new updates, it will start downloading the update files and will display the process of downloading updates. Mostly, this process will happen in the background and you will not even notice any interruption in your daily usage. But, sometimes the user faces the problem “Windows update stuck at 0%”. Sometimes, it may get stuck at a different progression such as 34%, 83%, 99%, 100%, etc. Nevertheless, the update will not be completed unless the problem is resolved. If you close the process and restart to download the update, it will stop downloading again at a certain point, and if you leave it for an hour or two, it will retain the same number. Therefore your Windows 10 update cannot be completed.
Check out our articles on how to fix other Windows update issues like, Windows Update currently cannot check for update, 0x8024a105, 0x800705b4, 0x80004005 Windows Update Error.
Reasons Behind Windows Update Stuck at 0%
Windows updates are stuck when checking for updates, usually caused by incorrectly configured system settings or irregular entries in the Windows registry. It is important to always run a system diagnostic scan when Windows updates cannot download or install to determine the root cause of the problem. Microsoft has updated the update process in the latest versions of Windows. However, this does not mean that update errors are completely eliminated, especially with problems related to compatibility. Hence, this can also be the culprit behind the problem.
Guide to fix Potential Windows Update Database Error Detected.
How to Fix Windows 10 stuck at 0%
Seeing an error message when working on your computer is not an instant cause of panic. For a computer, problems often arise. But this is not a reason to allow it to be and not to investigate errors. Windows errors are problems that can be fixed with solutions depending on what might have caused them in the first place. Some may only need a quick fix to repair the system, while others may need in-depth technical assistance. It is imperative that you respond to signals on the screen and investigate the problem before trying to fix it.
Whenever you see a window error on the screen, the easiest and safest way to fix it is to restart the computer. A quick reboot can update your programs and provide the computer with a clean slate to start a new venture. It is also ideal to shut down the computer at least once a week to completely disable all unused programs. However, when the reboot no longer works, you can proceed forward with more sophisticated Windows error correction solutions.
Following are some proven solution for the “Windows 10 stuck at 0%”. Please read the steps provided in each solution carefully to resolve the error successfully.
Fix Windows Update Assistant Stuck at 99%.
1. Restart the Windows Update service
Turning off a windows service and then turning it back on works as a reboot for that particular service. All the cached files of the service will be automatically removed when you turn off the service and regenerated when you turn it back on. In easy words, Restarting the update service might resolve this problem.
To do so, follow these steps:
- Type cmd in the windows search box. It will display “command prompt” in the results. Right click on it and select “Run as administrator”.
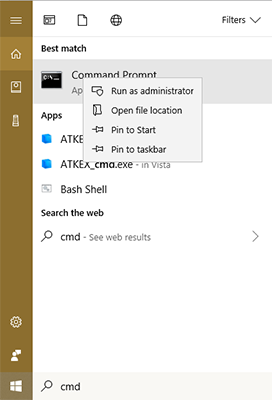
- After that, you will be taken to the Administrator Command Prompt window. If you see C:\windows\system32 before the command line, you can assure that the command prompt is launched with admin privileges.
- In the command prompt, Type net stop wuauserv and press Enter.
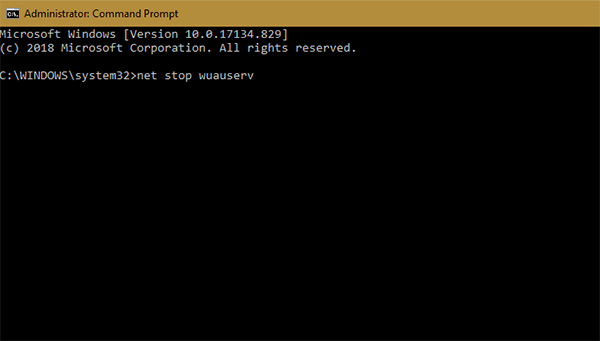
- When you return to the Check for Updates window, you will see that the update process has now stopped.
- Now, To enable the update service again, just type net start wuauserv and press Enter.
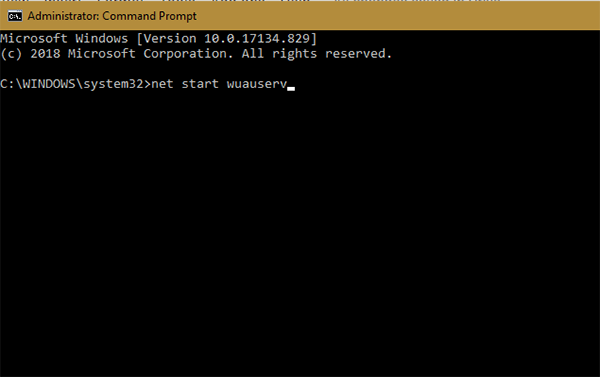
- After that, the system will enable the Windows Update Service. Check the update status by clicking “Retry” in the update section.
2. Clear the Cached Update Files
Now, Because there are several update files which have been downloaded already, and some files may not be completely downloaded/corrupt, it is necessary to delete all cached files.
To delete cached files, follow these steps:
- Open the command prompt as mention in the above step.
- Type rd / s SoftwareDistribution and press Enter.
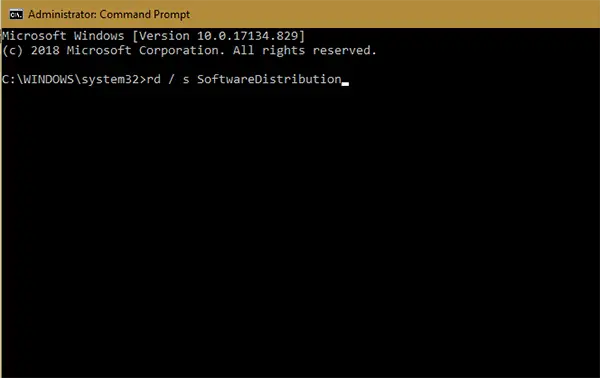
- Then under the SoftwareDistribution section, the command prompt will ask you “are you sure (yes/no)?” Type Y and press Enter.
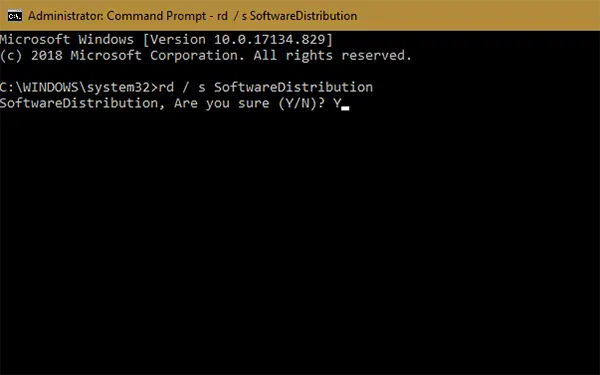
- It will show the respective folder and you can delete all the files manually.
- Some files may not be deleted right away but don’t worry, Just restart your computer. After restarting your computer, follow the steps again to delete these remaining files.
3. Troubleshooting Windows Updates To Solve Update Stuck at 0%
As mentioned above, There is a built-in troubleshooter provided in Windows 10. You can use the troubleshooter to let the system automatically detect the flaws in the Windows update process and repair it.
To use the troubleshooter to resolve the problem, follow these steps:
- Go to “Windows Settings” by pressing “Windows key + I”.
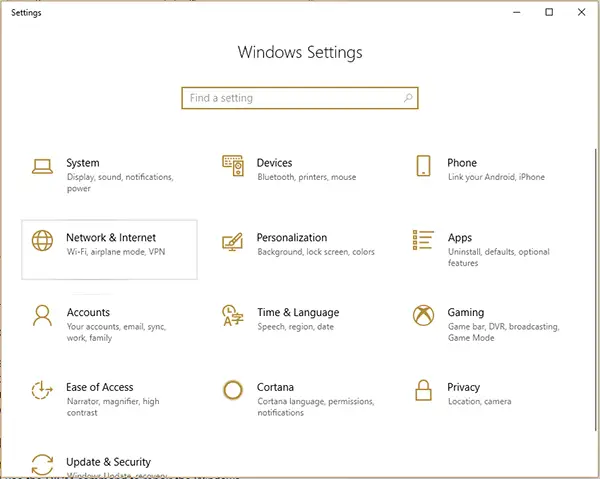
- Now head over to the “Updates and Security” section.
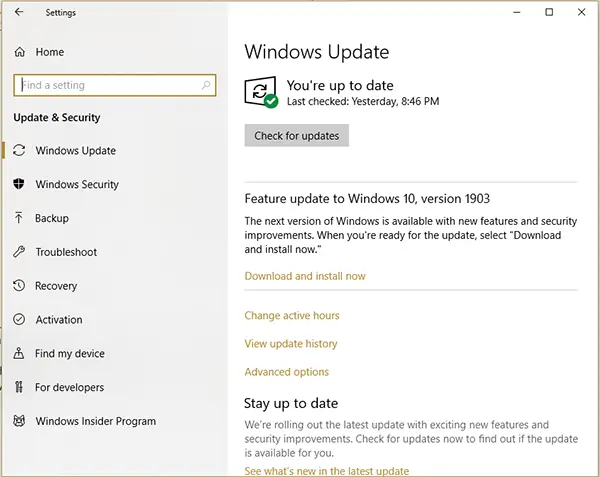
- Here, you will notice the “Troubleshoot” option on the right side of the screen. Click that to open the Troubleshooting window.
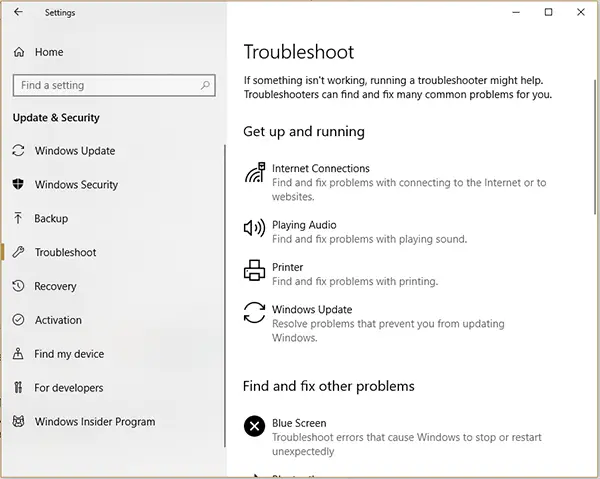
- Here, Microsoft has provided many general errors which are faced by many users such as Blue screen (BSOD). As we have a problem regarding Windows update click on the “Windows update”.
- A new option will pop up as “Run Troubleshooter”. Click on it to run the troubleshooter.
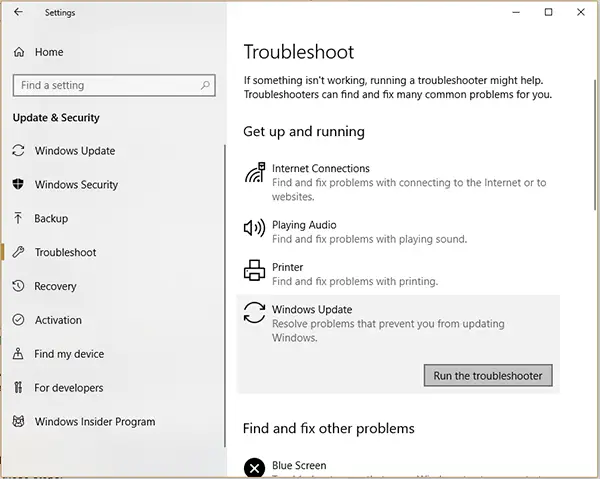
- Now, let the troubleshooter run. It will detect the problem regarding Windows update and display it. Follow the on-screen steps to repair the problem.
4. Reset Network To Fix Update Stuck at 0%
Sometimes, the update related errors can occur due to some problem with your network configuration. If that is the case, Resetting the network settings can definitely help to resolve the problem. To reset network settings, follow these steps:
- Press “Windows key + I” to open Windows settings.
- Now select “Network and internet” option to open network related settings.
- Here, you will see the status of your current Network. Scroll below to find the option “Network reset”.
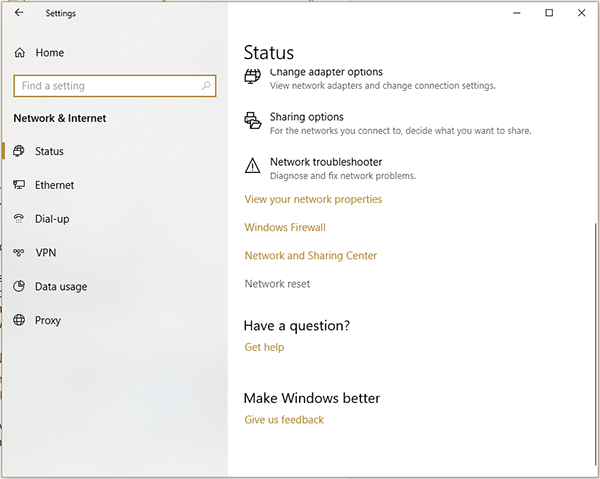 Click on “Network reset”. This will open another window where you have to confirm the operation. Click on “Reset now” to confirm.
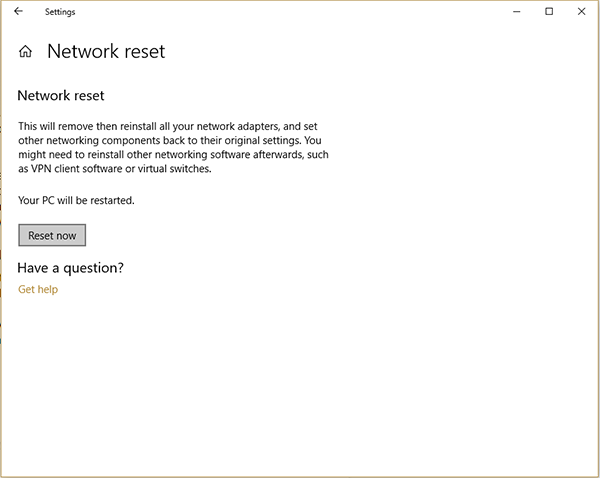
- Keep in mind that Windows will restart to finish the Network Reset. So don’t leave any unfinished or unsaved work behind to prevent loss of data.
- Once the computer is restarted, check the status of your Network. If the network is up and running, check the status of Windows update.
5. Repair the Windows Update Component with DISM command
Downloading the update progress stuck at 0% may be caused by damage to the Windows update component. In this method, we will use the DISM command to repair the Windows update component.
The DISM tool is a deployment image service and management tool. When a Windows image is not available, you can use the Deployment Image Servicing and Management (DISM) tool to update files and correct problems. In fact, you can also repair a corrupted Windows image using the DISM tool. To repair windows update problem by using DISM command, follow these steps:
- Type cmd in the windows search box. It will display “command prompt” in the results. Right click on it and select “Run as administrator”.
- Once the command prompt is opened, type in the command DISM.exe /Online /Cleanup-image /Scanhealth and press Enter.
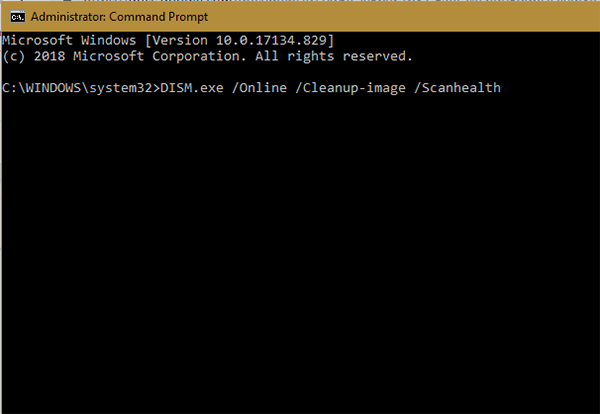
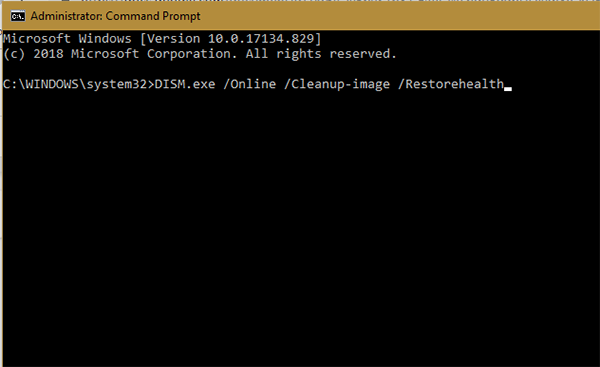
- After the execution of the first command, put DISM.exe /Online /Cleanup-image /Restorehealth and press Enter to execute it.
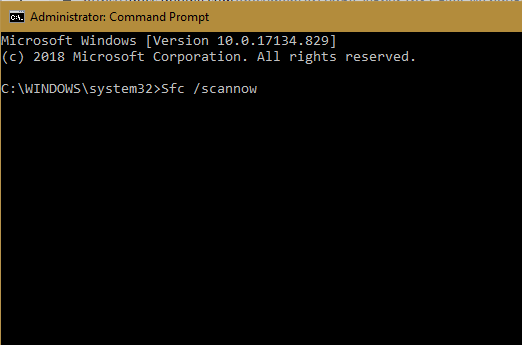
- Lastly, type Sfc /scannow and press Enter.
- After successful execution of these three commands, DISM scan can be said to be completed.
- Try to download the Windows update again to check whether the problem persists or not.
6. Turn ON Windows Defender firewall
In order to ensure the security of your system, you need to turn on the Windows Defender firewall to connect to the Microsoft server. If the above methods are invalid, you can check whether the Windows Defender firewall is turned on or not.
To do so, follow these steps:
- Open windows settings by pressing “Windows key+I” and select “Update and Security” option.
- Then click on “Windows security” option on the left side.
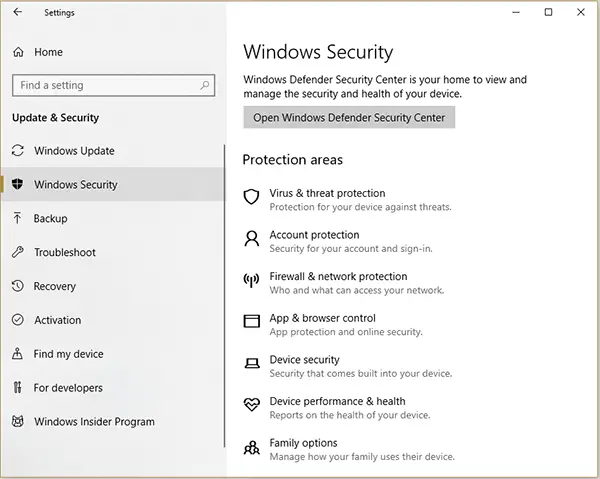
- This will open the windows security center. Here, Click on “Virus and threat protection”.
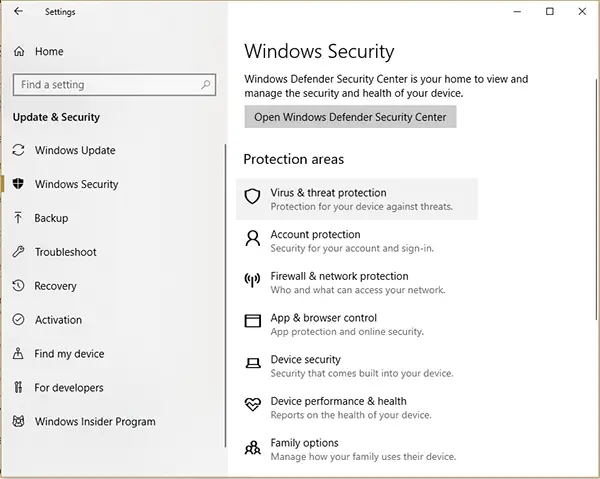
- This will open another window. Click on “Virus & Threat protection settings” again to open defender options.
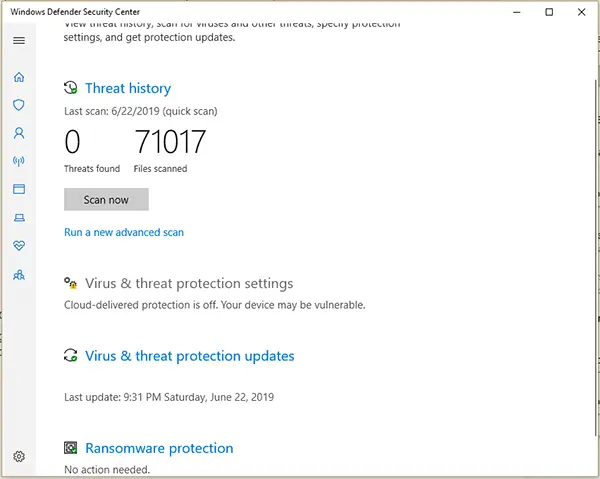
- Here, make sure that “Real-time protection” is turned on.
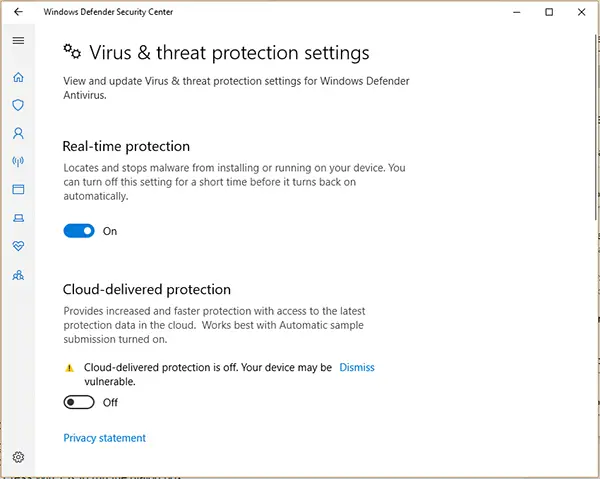
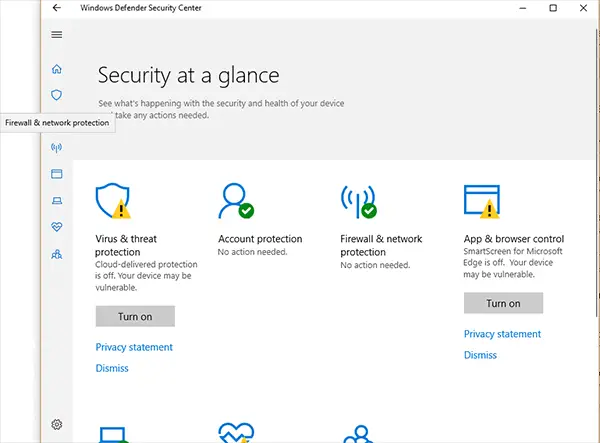
- Now, go back a step and select a tiny network icon on the right.
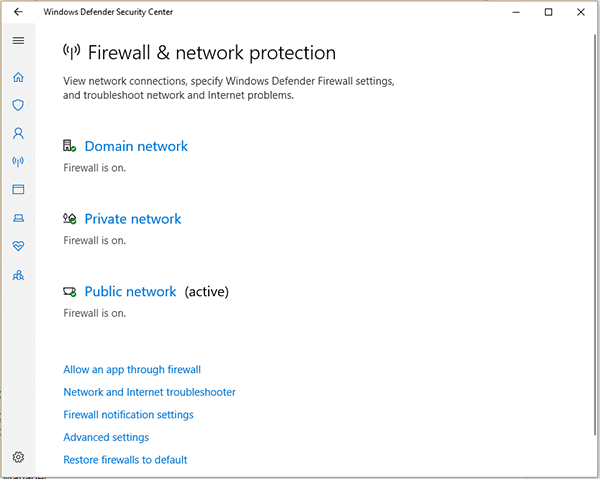
- In this page, make sure that “Domain network”, “Private network” and “Public network” firewall are turned on.
- Now, restart the system for changes to take effect.
- After the restart, check the status of the problem.
7. Update Missing Drivers To Fix Windows Update Stuck
Missing drivers can also cause errors when upgrading the operating system. You can check if some drivers are missing and then reinstall.
- Press Win + R to run the dialog box.
- Type the keyword devmgmt.msc in the box and click the OK button to open Device Manager.
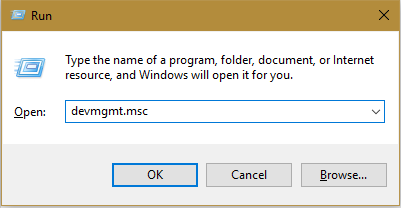
- You can see the exclamation point in the yellow triangle notification next to the device logo in the list. If so, right click on the device and select Update Driver.
- Drivers can be found on the manufacturer’s website. So, find the computer model and Windows version you are using to find out which version of the driver you are looking for.
8. Download and Install the Windows Update Offline Update Package
If the above methods are not working, and if you are updating the Windows 10 semi-annual update, then you can download the Windows 10 update ISO image from official Windows website and install it manually offline. Maybe after upgrading to the new version of Windows 10, the problem will be solved automatically. To install the update manually, you will require the “Media creation tool”. It a software provided by Microsoft for such instances.
- Download the tool from www.Microsft.com
- After the installation is complete, you’ll get the shortcut of the application on the desktop. Double-click the shortcut to launch the application.

- Let the application load and configure the setup. This will automatically download windows update database which will consume around 4 to 5 Gigabytes of data.
- After the application has configured, the following window will show up. Select “Create Installation Media” option and click next.
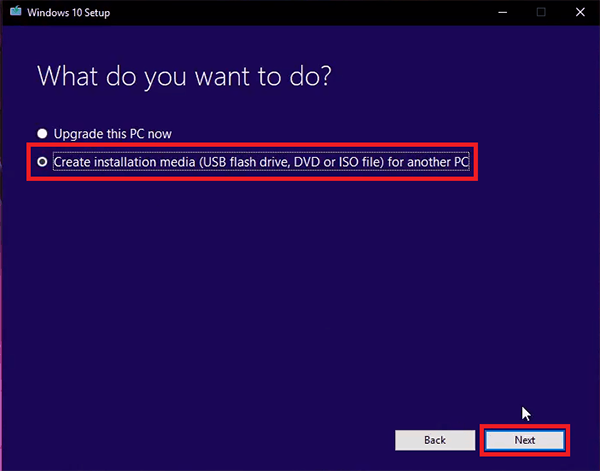
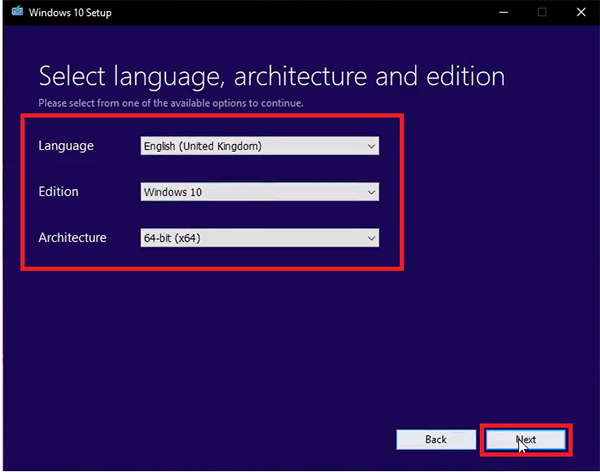
- After this, the software will ask you some personalization preferences. Select your desired settings and click “Next”.
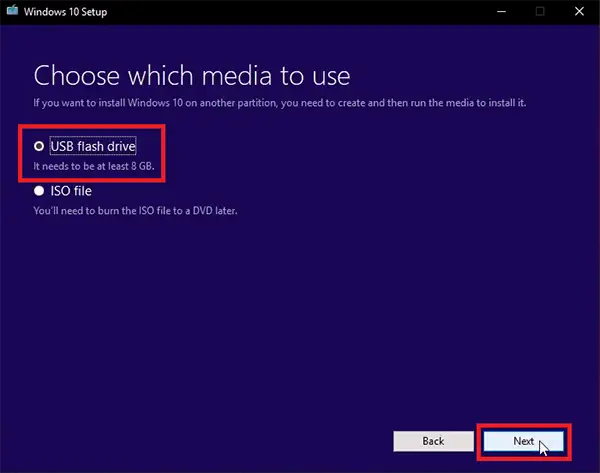
- After that, The software will ask you whether you want to download an ISO image or do you want to create a bootable USB flash drive. Make sure your flash drive (At least 8 GB) is plugged in the system. Select “USB flash drive” option and click next.
- Now, the software will prompt you to select your flash drive from the list of all connected flash drives. If you have only one drive inserted in the system, the software will display that drive. Select the drive and press “Next”.
- After you click next, the software will download the Windows 10 image file from the internet and create a bootable flash drive. This process will take a significant amount of time depending on your internet connection.
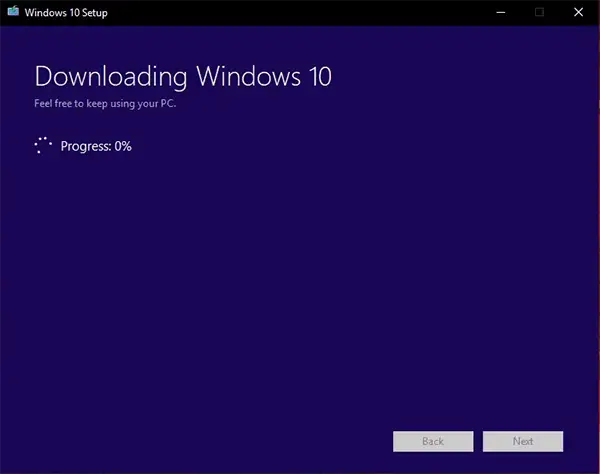
- Now, close the media creation tool window.
- Now, boot the system into your flash drive. To boot the system into your flash drive, simply go to BIOS settings and set the USB flash drive as the boot device.
- After the boot, you will see the Windows installation setup. Follow the steps provided in the installer for windows installation.
- After the successful installation, your system will be reinstalled and updated with the latest available update from Microsoft.


1 thought on “Fix Windows 10 Update Stuck at 0% [10 Best Working Solutions]”
None of this works if you can’t get past the “circling dots” telling you it is “Cleaning Up” and “Do Not Restart Your Computer.” There is only two things you can do when stuck at this screen: 1) wait (and wait); or 2) power down. Nothing else on your computer can be accessed while you are getting this stuck screen. No where in this remedy article does it say to power down your computer (against the warning on the stuck screen) so you can restart and then access all the nice remedies shown in this article.