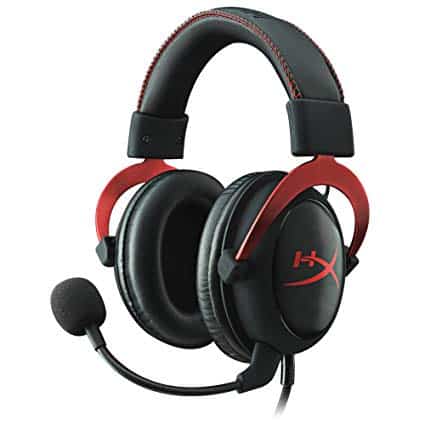
HyperX is one of the most popular brands out there when it comes to gaming products for PC gamers. It is known for its gaming mice, keyboards, headsets, and much more. And almost all of the HyperX offers great value for money along with superb built quality. As a result, there are a lot of PC gamers who use HyperX products while using their computers on a daily basis. While all HyperX products are equally good, one of the most popular HyperX products used by gamers is the HyperX Cloud 2 gaming headset. This headset offers great audio quality for both the headphone as well as the microphone.
Not only that but it also has a metal construction which gives it a premium look and feel. Unfortunately, just like everything else even this headset by HyperX is not perfect. There are many PC gamers out there who have reported issues with the HyperX Cloud 2 Mic not Working. Therefore, today we are here to show you How to Fix HyperX Cloud 2 Mic not Working. You will learn multiple possible reasons in this article which might cause this issue. But most importantly, we have also provided various possible solutions that can get rid of this issue from your HyperX Cloud 2 gaming headset.
See how to fix Realtek HD Audio Manager Not Detecting Headphones. and what is Realtek HD Audio Manager.
Table of Contents
HyperX Cloud 2 Microphone Issue and its Causes
Just like any other headset on the market, the HyperX Cloud 2 has various components which are important for its proper functions. But if any of these components stop working, you might face issues with this HyperX gaming headset. Similarly, there are many things which might cause issues with the Microphone of your HyperX Cloud 2 headset. For example, if the audio drivers installed in your computer are corrupted, then the microphone of the HyperX Cloud 2 might not work. Similarly, improper microphone settings in Windows can also cause issues with the audio input. Apart from that, hardware failure can also result in various issues with any gaming headset out there. In other words, there can be multiple possible causes of the HyperX Cloud 2 Microphone not working on your computer.
Learn how to use Speaker and headphone at the same time. and what is Audio Router on Windows 10.
How to Fix HyperX Cloud 2 Mic Not Working
As mentioned earlier in this article, there can be a number of reasons which might cause issues with the microphone of your HyperX Cloud 2 microphone. Due to this, there is no specific solution which can fix the microphone of your gaming headset. Instead, we have mentioned multiple possible solutions which can help you in successfully fixing the microphone issue of HyperX Cloud 2. Each and every one of the methods mentioned in this article takes a different approach to this issue. As a result, by the end of this article, your microphone issue will be resolved. Therefore, if you are also facing issues with your HyperX Cloud 2 gaming headset, make sure to go through the following solutions one by one:
Download Sades Headset Drivers.
1. Check for Hardware Failure in your Gaming Headset
While there are a lot of things which can go wrong when it comes to the software installed on your PC, you should first check for any possible hardware issues. There are multiple connections in Gaming headset which are present on both the outside as well as the inside of a HyperX Cloud 2. Therefore, make sure that your gaming headset does not have any hardware issues. At first, make sure that the microphone of your HyperX gaming headset is plugged in properly. While the removable microphone feature of this gaming headset is quite useful, it can also cause issues if it is not plugged in properly.
Apart from that cables of this headset can also get damaged if you have been using it for quite some time. Not only that but the microphone itself can also get damaged if the headset has been used carelessly. Last, but not least, if you are using the USB connector along with the HyperX Cloud 2, then it can also have issues. So make sure that all of these things do not have any issues in your HyperX Cloud 2. Otherwise, there is no point in trying to troubleshoot the software side of things.
Check how to fix Windows 10 No Sound Output.
2. Switch Default Microphone in Windows Sounds Settings
Windows is an operating system which offers various advanced features and options to its users. And one such feature found in Windows is the ability to switch the default audio devices. If you have ever opened the sound settings on your computer, then you must know that there are multiple audio output and input devices available on your computer at a time. But most of these are either virtual or belong to a different microphone device. As a result, if you have selected the wrong microphone as the default device on your computer, the microphone of your HyperX Cloud 2 might now work. In such a case, you should try switching the default microphone device in Windows settings. Thankfully, it is quite easy to this in Windows as shown in the following step by step guide:
- First, right-click on the taskbar Sound icon in the bottom right corner of your screen.
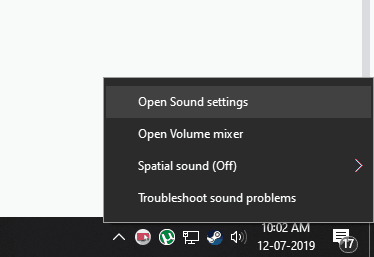
- After that, select Open sound settings which will open Windows Sound Settings.
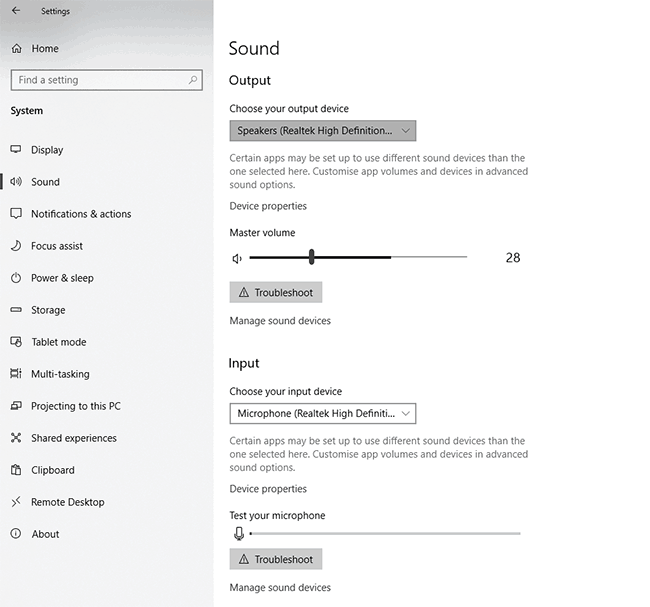
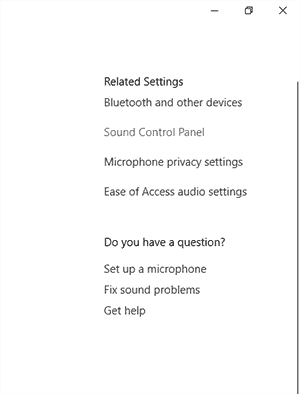
- In here, click on the Sound Control Panel option present on the right-hand side section of the Windows Sound Settings.
- After that, go to the Recording tab where you will find all of the available microphone devices of your computer.
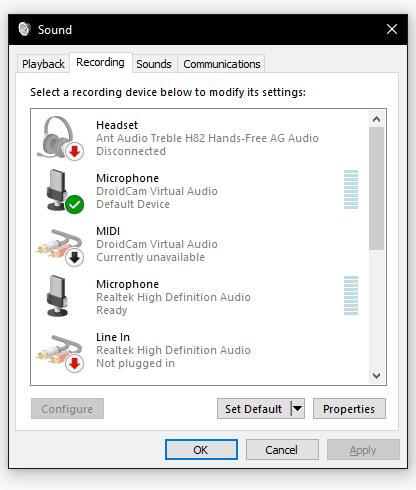
- Finally, select the microphone device of your HyperX Cloud 2 gaming headset and click on the Set Default Doing so will successfully switch the default microphone device of your Windows computer and you will not have any issues with the HyperX gaming headset.
3. Update HyperX Cloud 2 Drivers in Windows via Device Manager
All of the hardware devices installed on your computer come with a driver which is required for its proper functioning. This driver ensures proper communication between the hardware and software application of your computer. But if this driver is either outdated or corrupted, you might start facing issues. In such a case, you should try updating the HyperX Cloud 2 driver installed in your computer. This will fix any issues which you might be facing and thus you will get rid of the microphone issue. Thankfully, it is quite easy to update any device driver in Windows 10 with the help of Device Manager. And you can do the same on your computer as well by following the given steps one by one:
- At first, use the Windows Search option and open Device Manager on your Windows 10 PC.

- In here, you will see a list of all the devices which are currently installed on your computer.

- After that, expand the Audio inputs and outputs devices which contains devices like speakers, headphones, microphones, and other similar audio devices.
- Now, find the microphone device of your HyperX Cloud 2 gaming headset and right-click on it and select Update Driver.

- Doing so will open a new window on your screen where you have to select Search automatically for updated driver software.
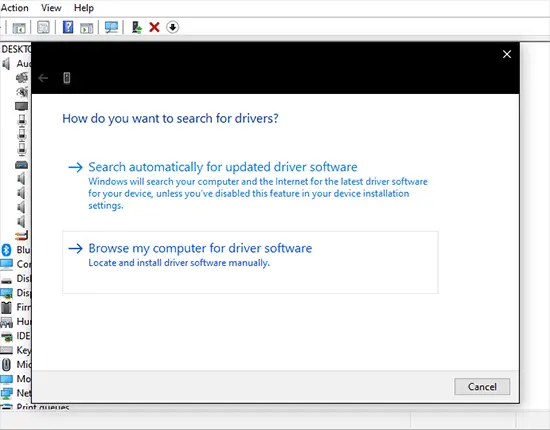
- Once you have done this, Windows 10 will automatically search, download, and install the latest drivers for your HyperX Cloud 2 gaming headset. This will successfully fix any microphone issues that you are facing with your HyperX headset.
4. Contact HyperX Customer Support
If none of the methods mentioned in this article have worked for you in successfully fixing the microphone issue of your gaming headset, then the headphones themselves can be faulty. In such a case you should try getting your headset replaced under HyperX warranty. This can be done by contacting HyperX customer support and asking them for a replacement since your headset has manufacturing defects.

