![Steam Not Opening [Windows]](https://www.blogsdna.com/wp-content/uploads/2019/05/Steam-Not-Opening-Windows.jpg)
Steam is one of the most popular platforms available for Windows PC that allows you to download and play games on your computer. Developed by Valve Corporation, this game store provides a lot of features to its users which enhance your whole gaming experience. Because of all of the feature that Steam offers, almost all PC gamers use Steam as their primary gaming platform. And it even comes with a Steam Client for Windows PC which is much better than some other browser-based solutions. But sometimes you can face issues on your Windows 10 PC while using this client. And today we are here regarding one such issue with this client where Steam will not open on your PC. Therefore, today we are here with the full guide on How to Fix Steam not Opening Windows 10. You will learn about all the possible causes of this error in Windows as well as how you can get rid of them.
Table of Contents
What is Steam Client for Windows 10?
Steam is a service which is highly popular PC gamers as you can use it to download, install and play most of the popular gaming titles available for Windows 10. But it has many useful community features which make it much better than all other alternative solutions. For starters, it allows you to easily add friends on Steam, check their game stats, chat with them, invite them to your multiplayer game, and much more. Apart from that, there is also the Steam market which can be used for either trading or selling and buying in-game items like skins, crates, cases, keys, and much more. Not only that but Steam also offers great support to its users which can be useful if you are facing any issue with your game or any other feature of Steam.
Find where Steam games are stored.
Why Steam Fails to Open in Windows 10?
Apart from the Steam client service itself, Steam uses multiple services in the background to ensure that it is working correctly. It has many services like the Steam bootstrapper which are important for Steam to work properly. And even if one of these processes is not able to start, Steam will not open in your Windows 10 PC. Apart from that if you just installed a bugged Steam update on your Windows computer, then you might face this same issue. Similarly, there are many things that might go wrong in your PC and cause Steam to not open without restarting your PC or reinstalling Steam.
How to Fix Steam Not Opening in Windows 10?
If the Steam Client stops opening or working in Windows 10, you will not be able to play any of the games present in your Steam library. Therefore, getting rid of this error and fixing the Steam client is highly important so that you can start enjoying your favorite gaming titles. But since there are many possible reasons which can cause this issue on your PC, you have to try out different possible fixes. Therefore, we have included some of the best solutions for this issue in this article. And if you are also facing the same issue on your Windows 10, then make sure to go through the following methods one by one to successfully fix the Steam Client:
1. Launch Steam Client as an Administrator in Windows 10
This is one of the easiest solutions available out there and can help you in fixing any application which is not opening on your computer. Similarly, if Steam is not opening on your computer, then you can try out this method on your PC to fix it. While you can launch the Steam Client as an Administrator manually every time, you can also make it launch as an administrator by default. And in this article, we will be doing exactly that so that you do not have to do it manually every time. You can also do this on your Windows 10 by following the given steps one by one:
- Press Windows Key + E on your keyboard to open Windows Explorer on your computer.
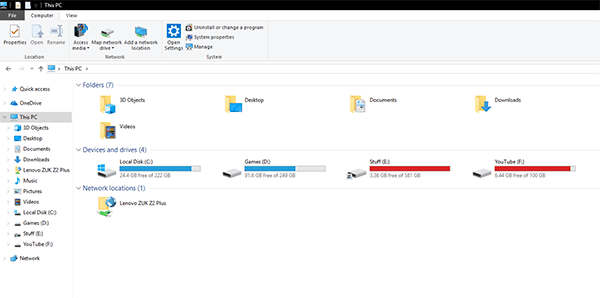
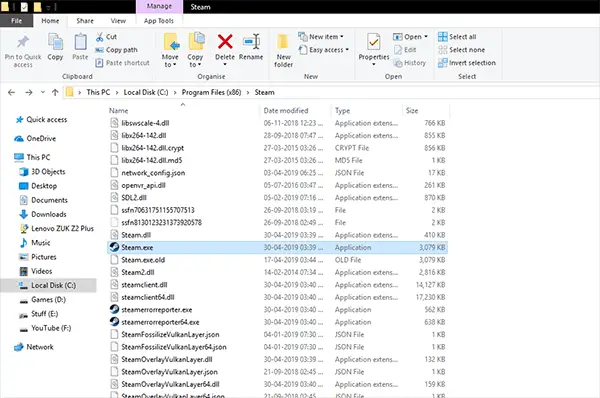
- In here, navigate to C:\Program Files (x86)\Steam and look for the exe application.
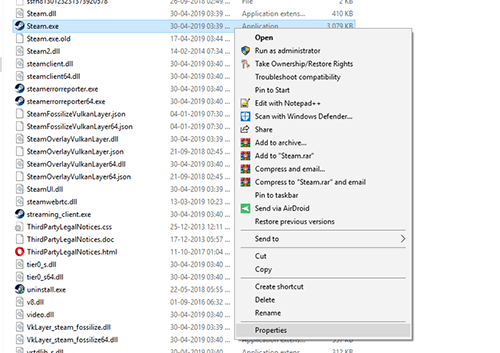
- After that, right-click on Steam and open its Properties and go to the Compatibility
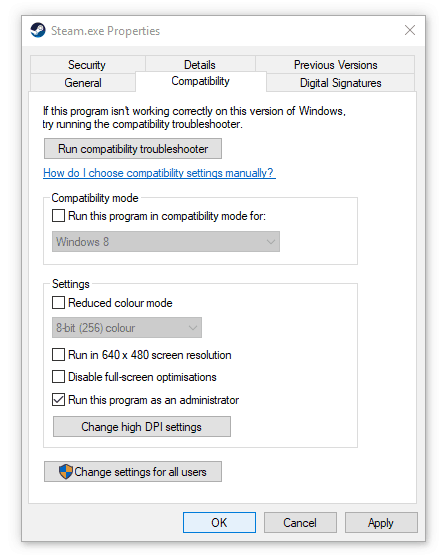
- In here, select the Run this program as an administrator option and click on OK to save your settings.
- Finally, reboot your computer and launch the Steam Client. Once you accept the administrative privilege prompt, it will successfully open in your Windows 10 PC.
Check out our guide to fix LOL wont start on Windows 10 & Fallout 4 crashing on startup.
2. Delete Steam Client Cache and Temporary Files
Just like every other application made for Windows, the Steam Client also stores cache and temporary files in its data folders. These files allow the Steam Client to perform many functions and processes much quicker. But if these files get corrupted or broken, they might also cause a number of issues. It might even cause the Steam Client to not open on your gaming PC. In such a case you can try deleting the cache and temporary files from the Steam Client’s data folder by following the given steps one by one:
- First, use Windows Explorer and navigate to C:\Program Files (x86)\Steam.
- In here, locate the appcache folder which contains all of the cache and temporary files of Steam Client.
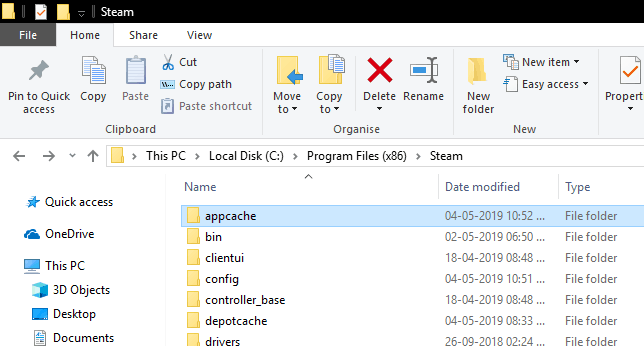
- Now, select this folder and press Shift + Delete on your keyboard and permanently delete this folder.

- After that, right-click on your computer’s taskbar and open up Task Manager.
- Now, locate all the Steam Client processes running in the background, right-click on them and select End task one by one for all of the process.
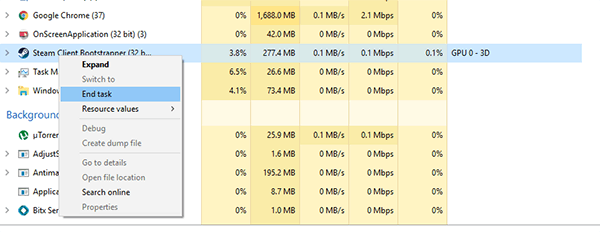
- At last, launch the Steam Client which will not have any issues.
Learn about Steamui.dll error.
3. Reinstall the Steam Client on Windows 10
If none of the above-mentioned solutions have worked for the Steam Client issue in your Windows 10 PC, then you can try reinstalling it. Reinstalling the Steam Client will get rid of all of the issues that you are facing with it in Windows 10. Not only that but the whole reinstall process is quite easy, therefore you should definitely try it out if you are still facing the Steam not opening issue. You can do this in Windows 10 by following the following instructions:
- Open Windows Settings by pressing Windows Key and I on your keyboard at the same time.
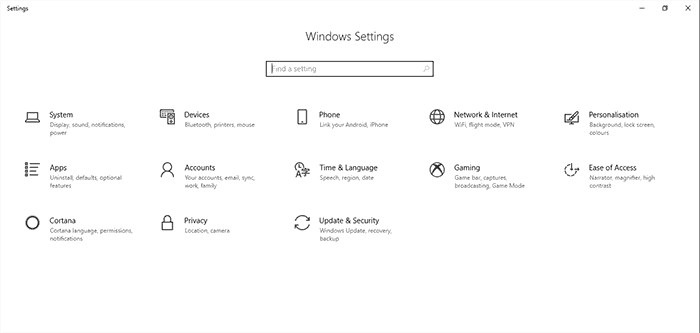
- In here, go to Apps settings which will show you all of the apps installed on your computer.
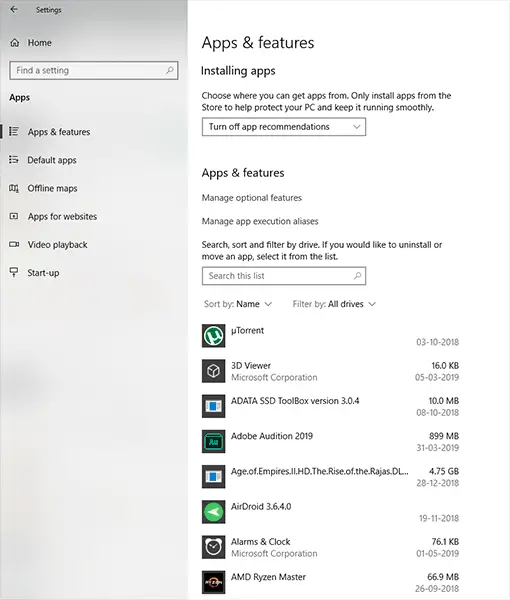
- Now, locate Steam using the search option, click on it and select the Uninstall
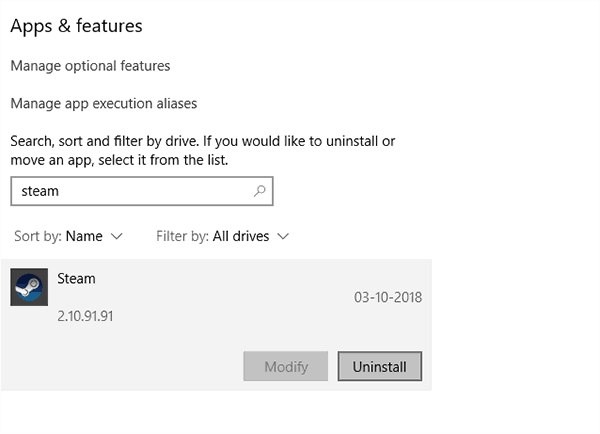
- Finally, proceed with the on-screen instructions to successfully uninstall the Steam Client from your computer.
- Once you have uninstalled it, visit this download link and download Steam installer on your PC.
- At last, use this installer to install Steam once again on your PC which will fix the Steam not Opening issue in Windows 10.

