League of legends a freemium model-based multiplier online battle arena game is hugely popular among teenagers as well as adults. Most of the time this game works flawlessly on Windows and mac os. But that’s not the case with Windows 10. Many users has been reporting troubles while opening or launching Leagues of Legends game on Windows 10.
The most common reported issue is, when a user clicks on the game client to launch it, nothing happens, in a taskbar manager you can see league of legend client exe running in background but cannot bring it front.
Table of Contents
Types of League of Legends Client Issue
- League of Legends Client won’t open – when you open the game, it starts normally with a launcher dialog but when the launcher disappear there will be no client and an error will be shown ‘Client won’t open’.
- League of Legends doesn’t start- This is similar to first case, when you click on the game launcher nothing happens at all.
It is the most common error which appears in the League of Legends game and there is no specific reason for this. There might be any reason behind this and it is difficult to point out the actual reason. But there are some possible reasons listed below which can cause this problem in League of Legends game.
- Server Issues
- Firewalls
- Internet Connection issues
- DNS Settings
- Installation Issues etc.
There are some methods effective to solve this problem in this game. If you are facing this problem too then follow the methods given below step by step.
How to Fix League of Legends Won’t Launch on Windows 10
1. Run the Game from Installation Directory
This is the simplest and basic method to troubleshoot and solve this problem. It might be something wrong with the shortcut itself. So, follow the steps given below and check if the error comes again or not.
- Open the File Explorer and go to the location C:\Riot Games\League of Legends.
- Now find the application file named LeagueClient.exe in the folder and double click on it.
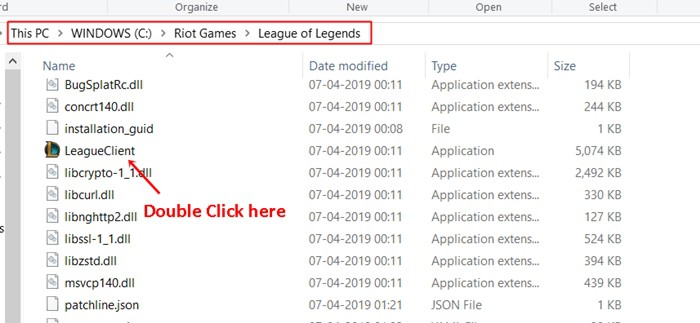
- If the game runs properly without the error then create a shortcut for this file by a right click on it.
Delete the previous shortcut and run the game every time with this new shortcut.
(https://signup.eune.leagueoflegends.com/en/signup/redownload)
Once you Re-Install this game, every file including corrupted or problematic files will be changed and there are more chances that you will not see this issue again.
Check how to fix fail to load steamui.dll error on Windows 10.
2. Use Alternative Launcher
If you are still facing the error then the problem might be in the user.cfg file. You can change its launcher and try to run the game. The detailed guide to do this is given below.
- Go to the League of Legends installation folder and then to this location \RADS\system.

- Go to the cgf file and right-click on it, then click on Open with Notepad
- In the notepad, find leagueClientOptIn=yes to leagueClientOptIn=no.
- Save these changes and Launch the game again
- When the game starts, go to the directory folder again and delete exe file
- Go to the install directory and run launcher.exe by double-clicking on it
- If the game is not starting then try to run launcher.admin.exe
If the problem is still appearing then go to the next method.
3. Force the game to update itself
A corrupted system file due to inappropriate installation process can also cause this problem. You should update your game in this case but there is no direct option to update it. You have to delete some files from its installation directory and force it to update it automatically.
- Go to the game’s installation directory and go to Rads\Projects
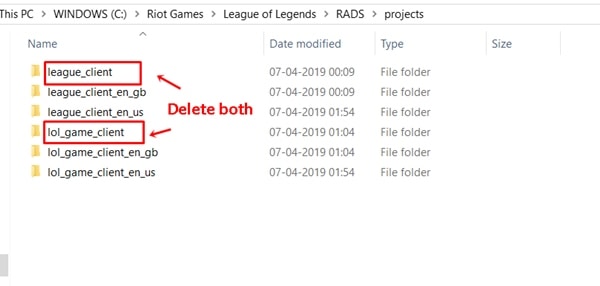
- Delete both lol game client and league clients folders
- Now, go to the solution directory and delete both client folders.
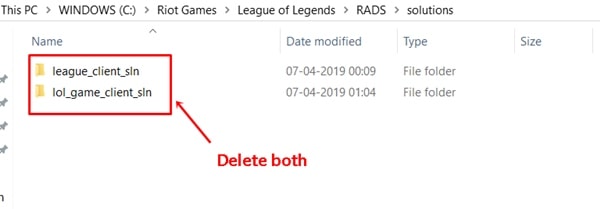
- Restart your pc
After the pc is turned on, launch the game again and it will force the game to update itself. After the update, check for the error and go to the next method if it is still appearing.
Fix Minecraft crashing on Windows 10.
4. Repair the Installation
It might be an issue with the game installation itself. Some corrupted installation files may cause this problem. To repair the installation, follow the steps given below.
- Run League of Legend as an Administrator by right-clicking on it.
- When the launcher opens, click on the Cog wheel option given on the upper right corner.
- Now click on Initiate Full Repair option
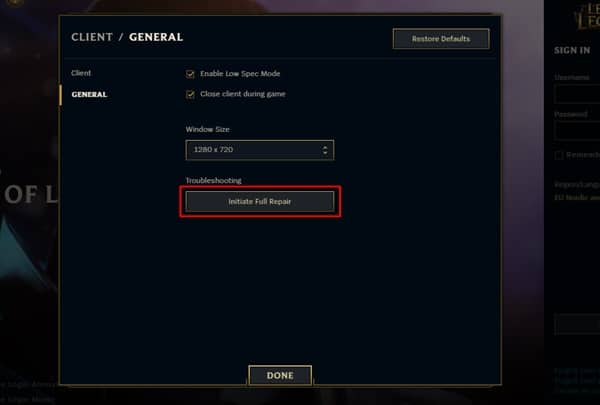
- It will take some time to repair the installation, Restart the game once it is done.
Go to the next method if the problem still appears.
5. Disable all the background League of Legends activities
In some cases, this problem occurs because many background processes of League of Legends keeps running in the background and cause issues to the main game process. You have to turn them off by using the steps listed below.
- Press Ctrl+Shift+Esc to open the Task Manager or right click on the taskbar and click Task Manager.
- Once it is opened, find exe and LoLClient.exe (League of Legends (32 bit)) and End them by a right click on them and then clicking of End Task.
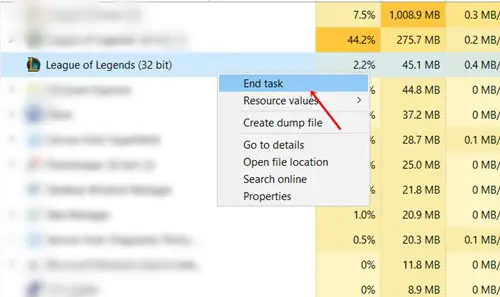
Now, restart the game and the problem is still appearing then go to the next method.
6. Update your Display Driver
Sometimes, problematic graphics can be the root of this problem because the graphics card is the crucial thing to run a game. If your graphics card is outdated or corrupted then updating it might solve the problem. Detailed steps are given below to do it.
- Press Windows+X buttons together and click on Device Manager
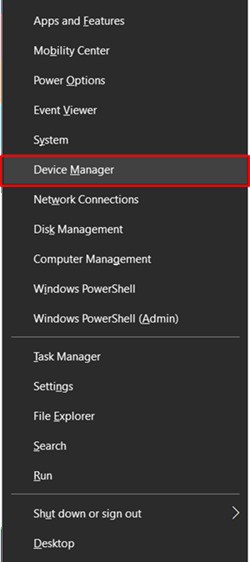
- Then double click on Display Adapters and Right click on your graphics card.
- Click on Update Driver option
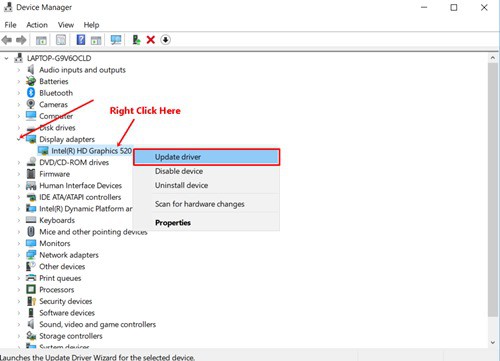
- Now select the option ‘Search Automatically for updated driver software’ and let your system installed the latest graphics card driver.
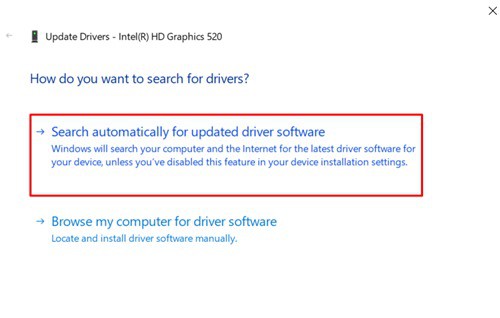
- Restart your pc once the process is complete and launch the game again.
Proceed to the next method if the problem is still appearing.
Fix Unable to connect to Nvidia Server.
7. Close all problematic applications
Some other applications running along with your League of Legends game can result in this error. You should close all these applications before running your game. Some of the problematic applications could be Steam and Razer Synapse which are mostly used by the gamers.
8. Allow the game through Windows Firewall
Windows Firewall can cause lots of problems into any application or game. Try allowing the game through the firewall if it is not. To do this, follow the steps given below.
- Go to the Control Panel and Click on Windows Firewall
- Now click on the option ‘Allow an app or feature through Windows Firewall’
- Now click on the ‘Change Settings’ option.
- Click on League of Legends option and tick all the checkboxes given with it.
Close the window and run the game again. If the problem is still appearing then proceed to the next step.
9. Re-Install the Game
You can try removing the game from your pc and install it again. This is an easy method and you might know the process of removing software from your pc. The detailed guide for this is given below.
- Go to Windows Search Panel and type Control Panel
- Click on Control Panel and Go to Program and Features.
- Now Right click on League of Legends and click on Uninstall/Change.
- Confirm the dialog and it will be uninstalled automatically
- Now, go to its official website and download its installer file or you can do it with the existing installer file if you have in your pc.

