“Last night I was about to enter the player v/s player mode but Destiny 2 crashed out of the blue. I checked my graphics card driver, all seems fine. So, I couldn’t understand the exact reason for this problem. Can anyone tell me how to fix Destiny 2 keeps crashing error so that I can play my favorite game again.”
Are you also facing a tough time while playing Destiny 2 on PC? Is your game crashing randomly on startup or during mid-game? Well, we understand how frustrating it is for a diehard gamer. But nothing to worry, we are here to tell you about the effective methods of troubleshooting Destiny 2 keeps crashing error. Scroll through our rest of the guide to learn the techniques and play the game again.
Table of Contents
What Causes Destiny 2 Keeps Crashing?
Battle.net engine runs this online multiplayer game, Destiny 2. This game was launched in the year 2017 to play it on PC. Since then, the game has grown its user base exponentially. Because of this huge course of use, the server of the game remains busy and triggers some serious problems, which make the gameplay difficult to run on PC.
A number of users have reported that their game crashes mid-way, just after playing for 20 to 30 minutes. This problem is so frequent that Bizzard has acknowledged it officially and published documentation regarding the potential causes. However, after researching through different community platforms, we’ve found a few potential causes which are the ground of this error. Have a look.
- Game Priority: If your game priority isn’t set to enough, the system will face issues while accessing the resources, and that may lead you to Destiny 2 keeps crashing error.
- Overclocking: This is one of the most reported potential causes. Not only overclocking but running CPU or GPU at 90% can also raise the error on your PC.
- Third-party Software: Programs like NVIDIA Ge-Force may come into conflict with the operation of the game. Generally, these type of applications allows in-game overlays. If the game is not capable of handling overlays, it might crash.
- Antivirus: Your existing antivirus may restrict your gameplay. Antivirus applications are designed to keep a tack on each program running on your PC. So, they can detect false positive easily if the game consumes huge resources.
- Misplaced DLL Files: If the DLL files are not placed in the correct location of the game’s directory, your Destiny 2 may crash more often.
- Restricted Administrator Privileges: In case you haven’t provided full administrator privileges to your game, you won’t be able to run it on your PC.
However, these are the common potential causes behind Destiny 2 keeps crashing error. Since you are well aware of the ground, it’s time to know the troubleshooting methods to fix the issue and resume your gameplay.
Top 6 Methods to Fix Destiny 2 Keeps Crashing Error
We have provided 6 troubleshooting methods here to help you in fixing Destiny 2 keeps crashing error. Before you start performing the methods, you must restart your computer first to refresh your operating system and remove corrupted temporary files.
Once you are done, start with the first method and follow each step with great care. Here you go!
Method 1: Change the Priority of the Game
The amount of importance given to an application is its priority. In addition, the priority also decides how much resources and processing power the app will use. Unless it’s a system application, the priority of every software is set to default. You need to change the priority level of Destiny 2 to keep it running on your PC. Follow the below steps to do so.
Step 1: Launch the game on your PC at first
Step 2: Now, press Windows logo key + D button to launch your desktop while the game is running on the background
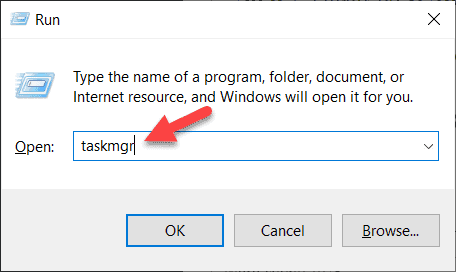
Step 3: Next up, press the Windows logo key + R button to open Run dialogue box, type in “taskmgr”, and hit the OK button
Step 4: After that, click on the Details tab to locate the entries for Destiny 2 and ‘net’
Note: Since Destiny 2 runs in Battle.net, it’s mandatory to change the priority for ‘net’ also.
Step 5: Now, you need to right-click on each entry, hover over the Set priority option and set it to either Above normal or High
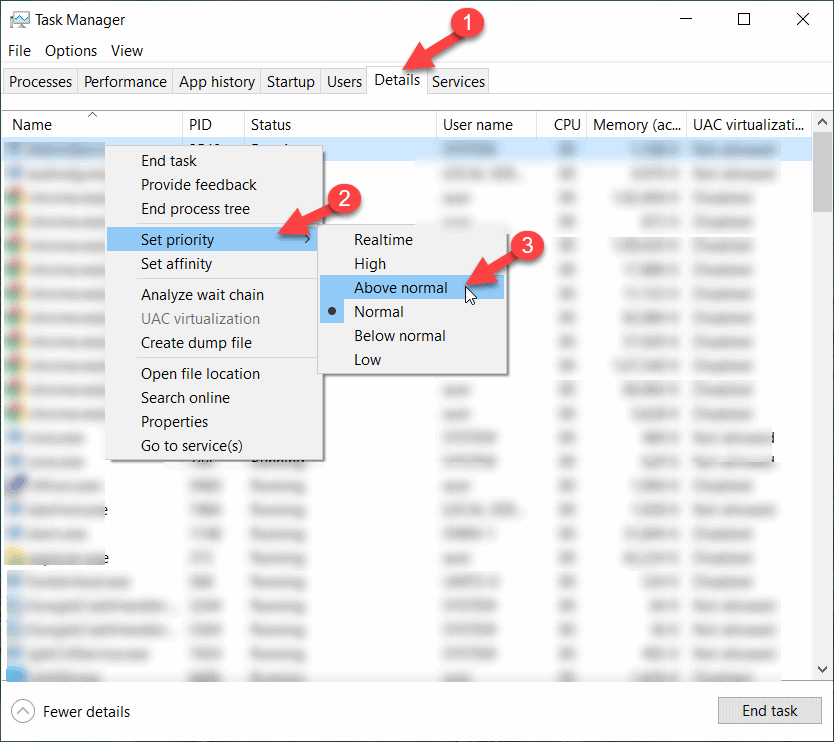
Step 6: Repeat the same for all the entries
Step 7: Finally press Alt + Tab button on your keyboard and start playing the game
These steps should fix the error and let you play your favorite game again. If the issue is still there, you need to follow our next solutions.
Method 2: Disable Overclocking
The latest systems allow users to overclock the devices. Overclocking is meant to run the processor or your graphics hardware at a very high clock speed unless it reaches the maximum threshold temperature. Your PC detects this act and reverts them to their normal temperature. The overclocking starts again when the temperature falls down.
Though this process enhances your PC’s performance, several cases are there where instances of this error have been found because of the overclocking. So you must disable all the overclocking to fix Destiny 2 keeps crashing error.
Method 3: Permit Administrator Access
Here is another method to fix the error. Many users have got benefited from this method. To perform this troubleshooting technique, you need to first grant administrator privileges for Battle.net. And then, do the same for each executable file laying within Destiny 2 and Battle.net directory. Undoubtedly, these types of games need more than just general permissions because of their high computation and resource requirements. However, log in to your system with administrator privileges and follow the steps below to perform the method.
Step 1: At first, you need to find the directory where Battle.net is installed
Note: The directory can be the default location in Program Files in ‘C’ drive or custom made path, which you chose while installing the game.
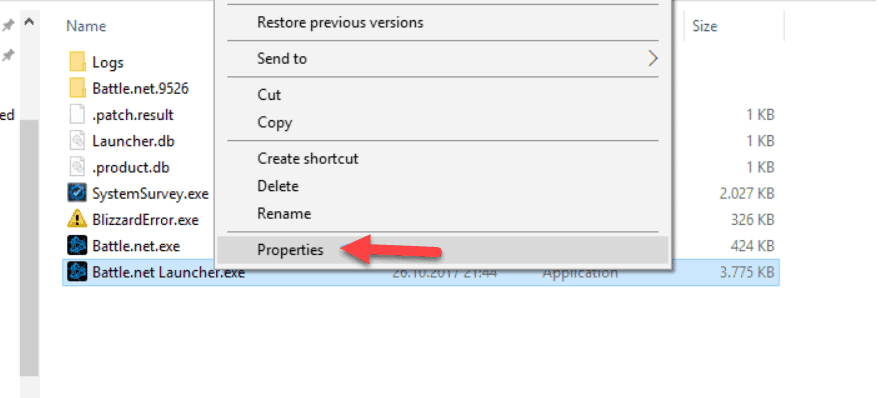
Step 2: Once you enter the directory, navigate to Battle.net Launcher, right-click on it and select Properties
Step 3: Next, on the Properties window, go to the Compatibility tab and check the box before Run this program as an administrator
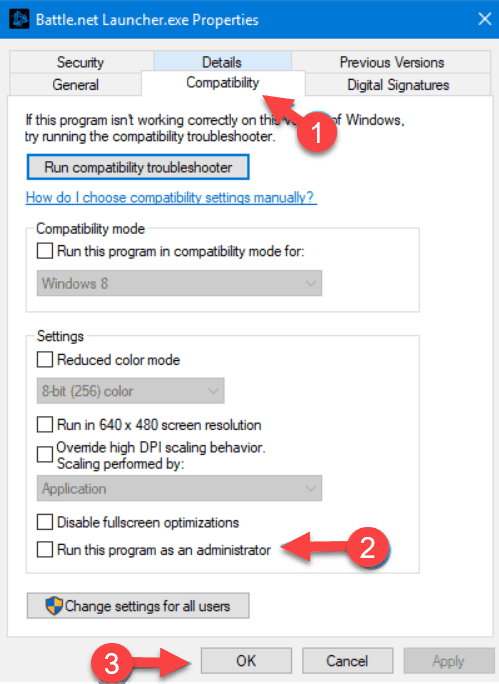
Step 4: After that, click the OK button and finally Apply button
Step 5: Do this for all the entries including Battle.net or .exe file
Step 6: After you finish doing the same for all the entries, save changes, exit, and restart your PC
Now check whether the issue is still there or not. If not, then you’re good to go with your game. In case the error still persists, you must relocate the DLL file, which might be in the wrong directory. The DLL file ‘GFSDK_Aftermath_lib.dll‘ has to be existing in “C:\Program Files\Destiny 2\” instead of the path- “Destiny 2\bin\x64\“. So, you must change the location if you find the file in the wrong place.
If this method also fails to fix the destiny 2 keeps crashing error, you must try our 4th solution.
Method 4: Disable Existing Antivirus Software
You might know, antivirus software generally comes into conflict with the applications which consume huge power and resources. This behavior by antivirus software is known as false positive. However, your antivirus software takes this extensive consumption as unnecessary and reduces the allocated resources, which in turn, crashes your game.
To fix the problem, you must disable your antivirus temporarily. If the issue is still there, even after disabling your antivirus, you must move to our next solution.
Method 5: Uninstall or Disable All Third-Party Programs
Is there any third-party program like NVIDIA Geforce Experience or Discord existing on your PC? If yes, you must uninstall it as soon as possible. Wondering why? Well, these programs have overlays, which permit them to stay integrated with the game. This incorporation allows gamers to change settings or values within the game. But you must know that all applications don’t sit well with these overlays, and Destiny 2 is one such example.
You have to disable all third-party applications running in the background before launching the game. Either find these programs in your Task Manager or from the taskbar. Once you disable such applications or close all the running ones, launch Destiny 2 and check whether the issue is still there or not. If the issue persists, try our final workaround to fix it.
Method 6: Repair the Game and Update Graphics Drivers
In case all the above methods fail to resolve your issue, you must repair the game using Blizzard’s repair utility tool. Game files can get corrupted anytime because of an incomplete update or by the interference of another software. At the time of repairing, Bizzard will compare each game file with an online manifest, if it finds any module unfit, the tool will replace it. Follow the steps below to do so.
Step 1: First, download, install, and open Blizzard Battle.net desktop app
Step 2: Click on the icon of your Destiny 2 game
Step 3: Next, click on the Settings option placed below the title of your game
Step 4: Now select Scan and Repair from the menu
Step 5: Click on the Begin Scan option
Step 6: Finally, wait for a few minutes to get it fixed
Another thing you can do along with this is updating your graphics drivers on your computer. If your PC is not running with an updated driver, you’re more likely to face the error. Follow the steps below to update your graphics driver.
Note: You must perform these steps for updating your NVIDIA graphics driver. If you are using another graphics card, the steps may vary.
For NVIDIA Graphics Card
Step 1: At first, press the Windows logo key + R button at the same time to open the Run dialogue box
Step 2: Next, you have to type “misconfig” and hit the OK button
Step 3: Once the system configuration opens, click on the Boot tab
Step 4: Under this tab, check Safe boot and then click OK
Step 5: Now you’ll be prompted to restart your PC, click on the Restart option to boot into Safe Mode
Step 6: Next up, navigate to your local hard disk by clicking on This PC and then Local Disk C
Step 7: You can see the NVIDIA folder there, right-click on it and select the Delete option
Step 8: After that, again press the Windows logo key + R button to open Run, type in “devmgmt.msc” and click on the OK button
Step 9: Your Device Manager window will be opened now, expand the Display Adapters part
Note: Here, all existing network adapters will be displayed, including the NVIDIA adapter.
Step 10: Right-click on the NVIDIA adapter you wish to remove and click on the Uninstall option
Step 11: Next, you have to click OK when you’re prompted to uninstall
Note: This step is going to remove the adapter from your list and uninstall the driver.
Step 12: Once you are done, enter the Boot tab by repeating Step 1, Step 2, and Step 3
Step 13: Under the Boot tab, uncheck the Safe boot box and hit OK
Step 14: Next, you’ll be prompted to restart your PC for applying the changes, click Restart
Step 15: Now, click here to download the latest NVIDIA driver for your PC
Step 16: Once your download is finished, run the setup file and follow the on-screen instructions
Step 17: Select the Custom installation option and check all the boxes existing in the same window
Step 18: Next check the box, placed before Perform clean installation
Step 19: Finally, restart your PC and check whether the issue is still there

