![]()
Twitch is one of the biggest, if not the most prominent live video streaming platforms for gamers and viewers alike. Starting mainly as a video game live streaming platform, Twitch streamers have expanded to other categories as well. Twitch now has a variety of different live streams, including talk shows, artwork creation, TV series, and a lot more.
However, many viewers see a black screen trying to load a live stream. Users are mostly facing this issue on the Google Chrome, it seems. If you are facing the same problem and trying to fix it or trying to get a workaround, continue reading this article on how to fix Twitch black screen issue.
Table of Contents
Fix Twitch Black Screen Issue on Google Chrome
1. Update Google Chrome
Always keep your browsers updated as new updates fix a lot of glitches, bugs, and, most importantly, security vulnerabilities.
- Launch Google Chrome from your desktop.
- Now, in the upper right corner, click on the three-dot menu (?).
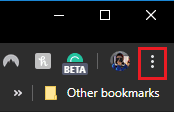
- Select Help from the list of options. Help > About Google Chrome.

- That should get you to the “About Google Chrome” page.
- Let it update. If you have a stable internet connection, it shouldn’t take long. In case it says, “Google Chrome is up to date,” you don’t need to perform the update as you are already using the latest version of Google Chrome. Version 77.0.3865.120 is the most recent official build of Google Chrome at the time of this writing.
- Once it finishes, restart your browser by clicking the relaunch button. Or you can close Google Chrome and reopen it.
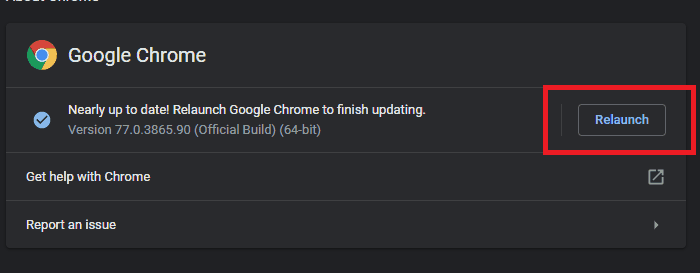
Relaunch button
2. Allow JavaScript
Black screen on Twitch also might appear due to JavaScript being disabled. But, we don’t recommend enabling Flash as most popular modern browsers already integrate capabilities once provided by plugins (like Flash) directly into themselves and are deprecating plugins. In July 2017, Adobe announced that in collaboration with Google, Microsoft, Apple, Facebook, and Mozilla, they are planning to end-of-life Flash by the end of 2020.
- Launch Google Chrome from your desktop.
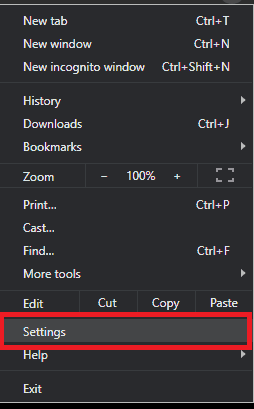
- Now, in the upper right corner, click on the three-dot menu (?) and select Settings from the list of options.
Google Chrome Settings - After that, scroll down and click on ‘Advanced.’
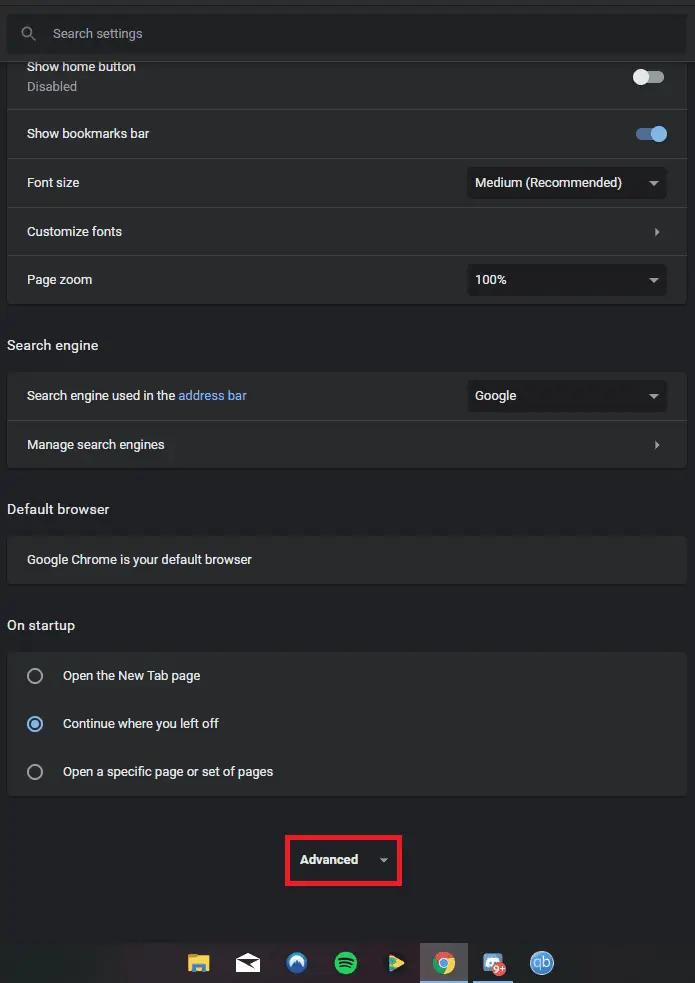
Advanced Settings Tab in Google Chrome’s Settings page - Click on “Site Settings.”
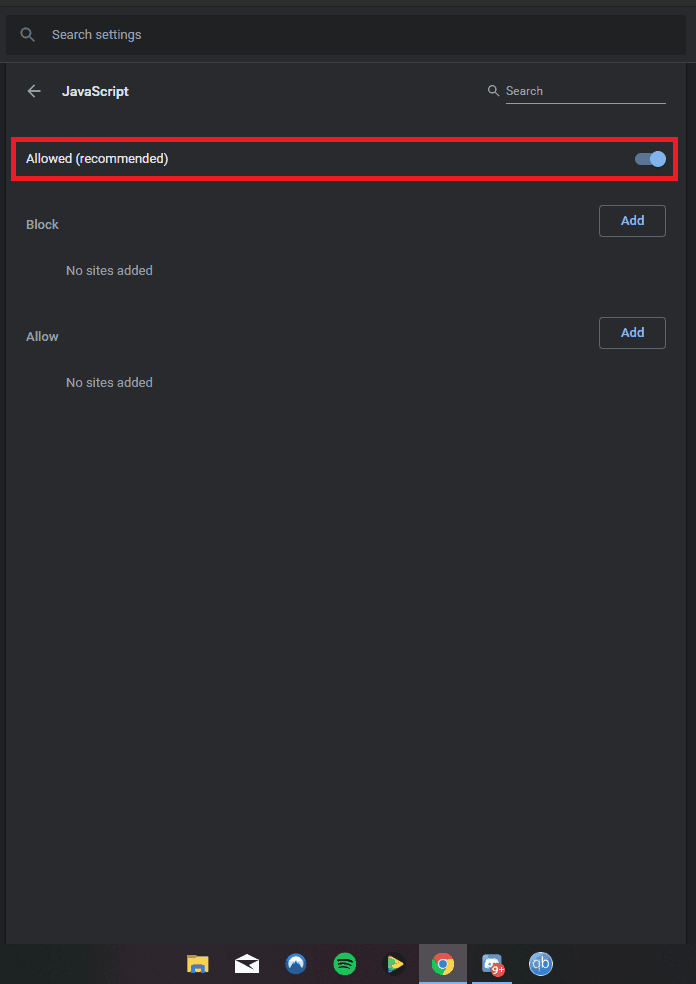
Click on JavaScript. If it is not allowed, toggle it back on.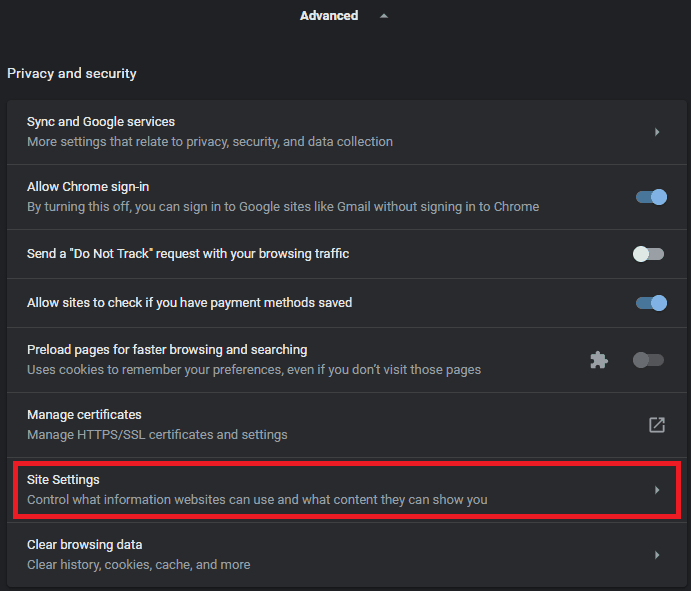
Check out Twitch Streaming Laptops.
3. Flush Your DNS
Flushing DNS is always a good practice as it neither disconnects you nor interrupts you while performing it.
- First of all, click on the Start button.

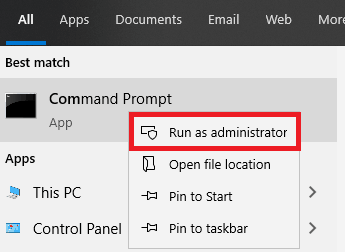
Start button - Then type cmd and right-click on Command Prompt from the list.

Command Prompt - After that, select “Run as administrator.”
Run Command Prompt as administrator - In the newly opened window, type “ipconfig /flushdns” and hit Enter.

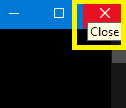
Command Prompt window - When finished, close the window by clicking the close button.
Guide to fix Twitch 2000 Network error or Twitch App not working?
4. Release & Renew IP Address
In this method, you have to release and renew the IP address of your Windows PC. In case that’s something you don’t want to perform, you should avoid this method.
- Open up Command Prompt again as an administrator.
- Now, type “ipconfig /release” and press Enter.
- After it finishes up, type “ipconfig /renew” and press Enter.
- Once it finishes up, close the window by clicking the close button.
Fix Windows 10 black screen with cursor issue.
5. Use Google’s Or Cloudflare’s DNS
If opening Twitch is showing a black screen and not emitting any sound, it may be because Twitch can’t load due to your ISP throttling or even in some cases blocking it. And it can also happen because of incorrect routing on your ISP’s end. Most of the time, contacting your ISP helps. But in case it doesn’t, changing up your DNS might help. If your ISP has its local DNS server, you can try changing it to Google’s or Cloudflare’s DNS. In case you are facing the issue only on your Windows PC, you can change your DNS on it using the following steps.
-
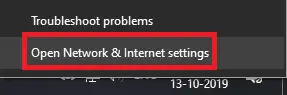
- Right-click on the Network icon on the taskbar.

Network icon on the taskbar - Select “Open Network & Internet settings.”
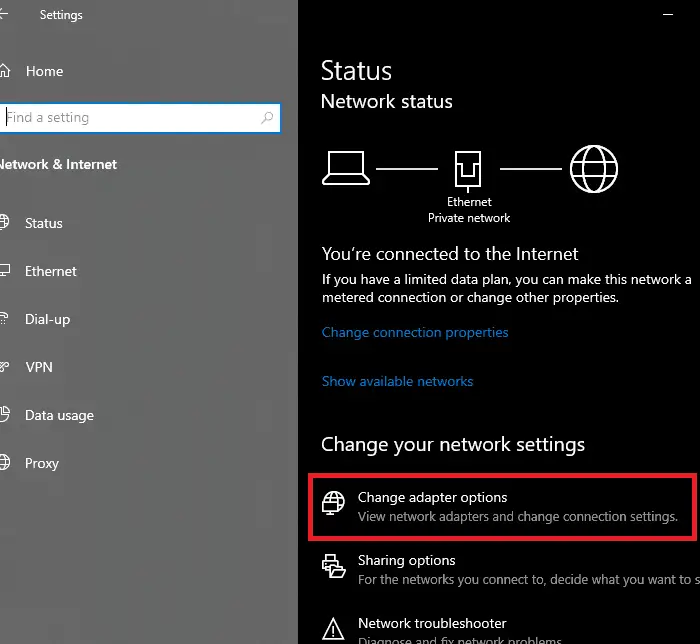
- That should open up a Settings window. Select “Change adapter options.” Doing that should open up the Network Connection tab of Control Panel.
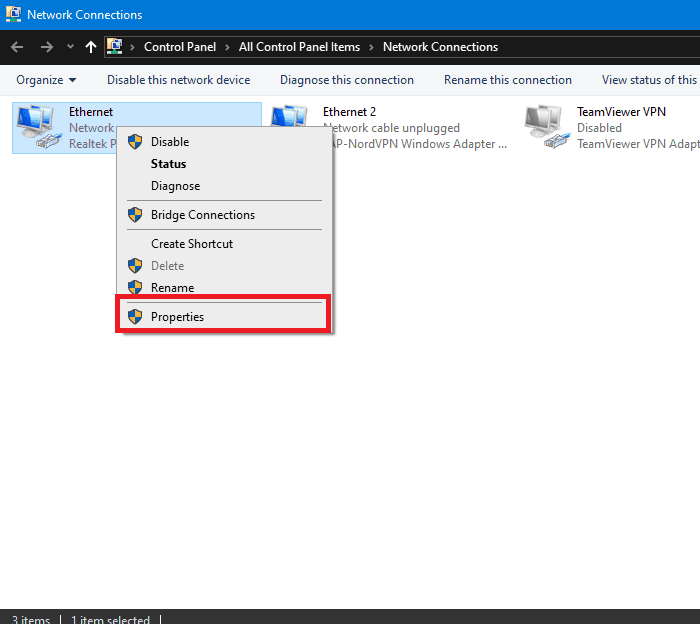
Network & Internet Settings window - Right-click the Wi-Fi or Ethernet adapter that you’re using to connect to the internet and click on ‘Properties‘ from the list of options.
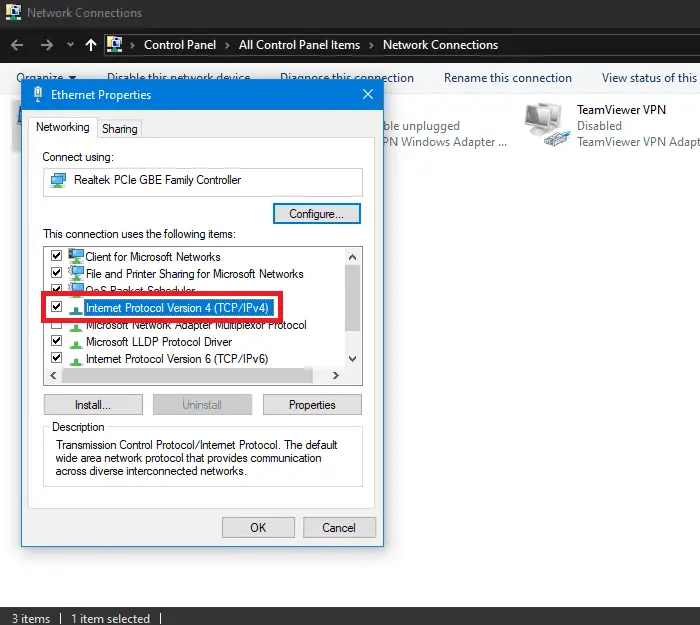
Network Connection tab of Control Panel - Under the ‘Networking‘ tab, double click on the “Internet Protocol Version 4 (TCP/IPv4)” option.
Networking tab of Ethernet Properties - Then select “Use the following DNS server addresses.”

- Type in 8.8.8.8 and 8.8.4.4 in “Preferred DNS server” and “Alternate DNS server” respectively if you want to change it to Google’s DNS.
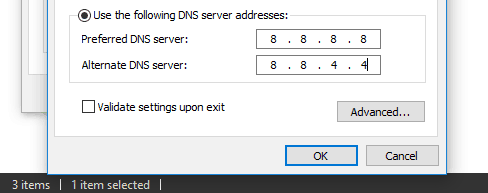
- To change it to Cloudflare’s DNS, change the “Preferred DNS server” and “Alternate DNS server” to 1.1.1.1 and 1.0.0.1, respectively.
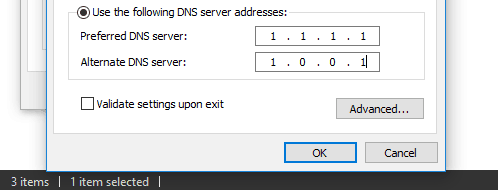
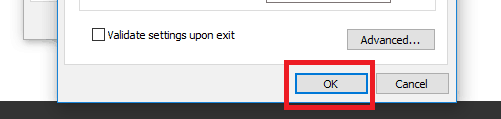
- Click OK.
- Right-click on the Network icon on the taskbar.
List of best DNS benchmarking tools for Windows.
You can also change your DNS on your Android device running Android 9 (Pie) or later. Devices running Android Oreo or older don’t support “DNS-over-TLS” and can’t configure private DNS for all networks. Here’s how to do it.
- Go to your device’s settings and select “Network & Internet.”
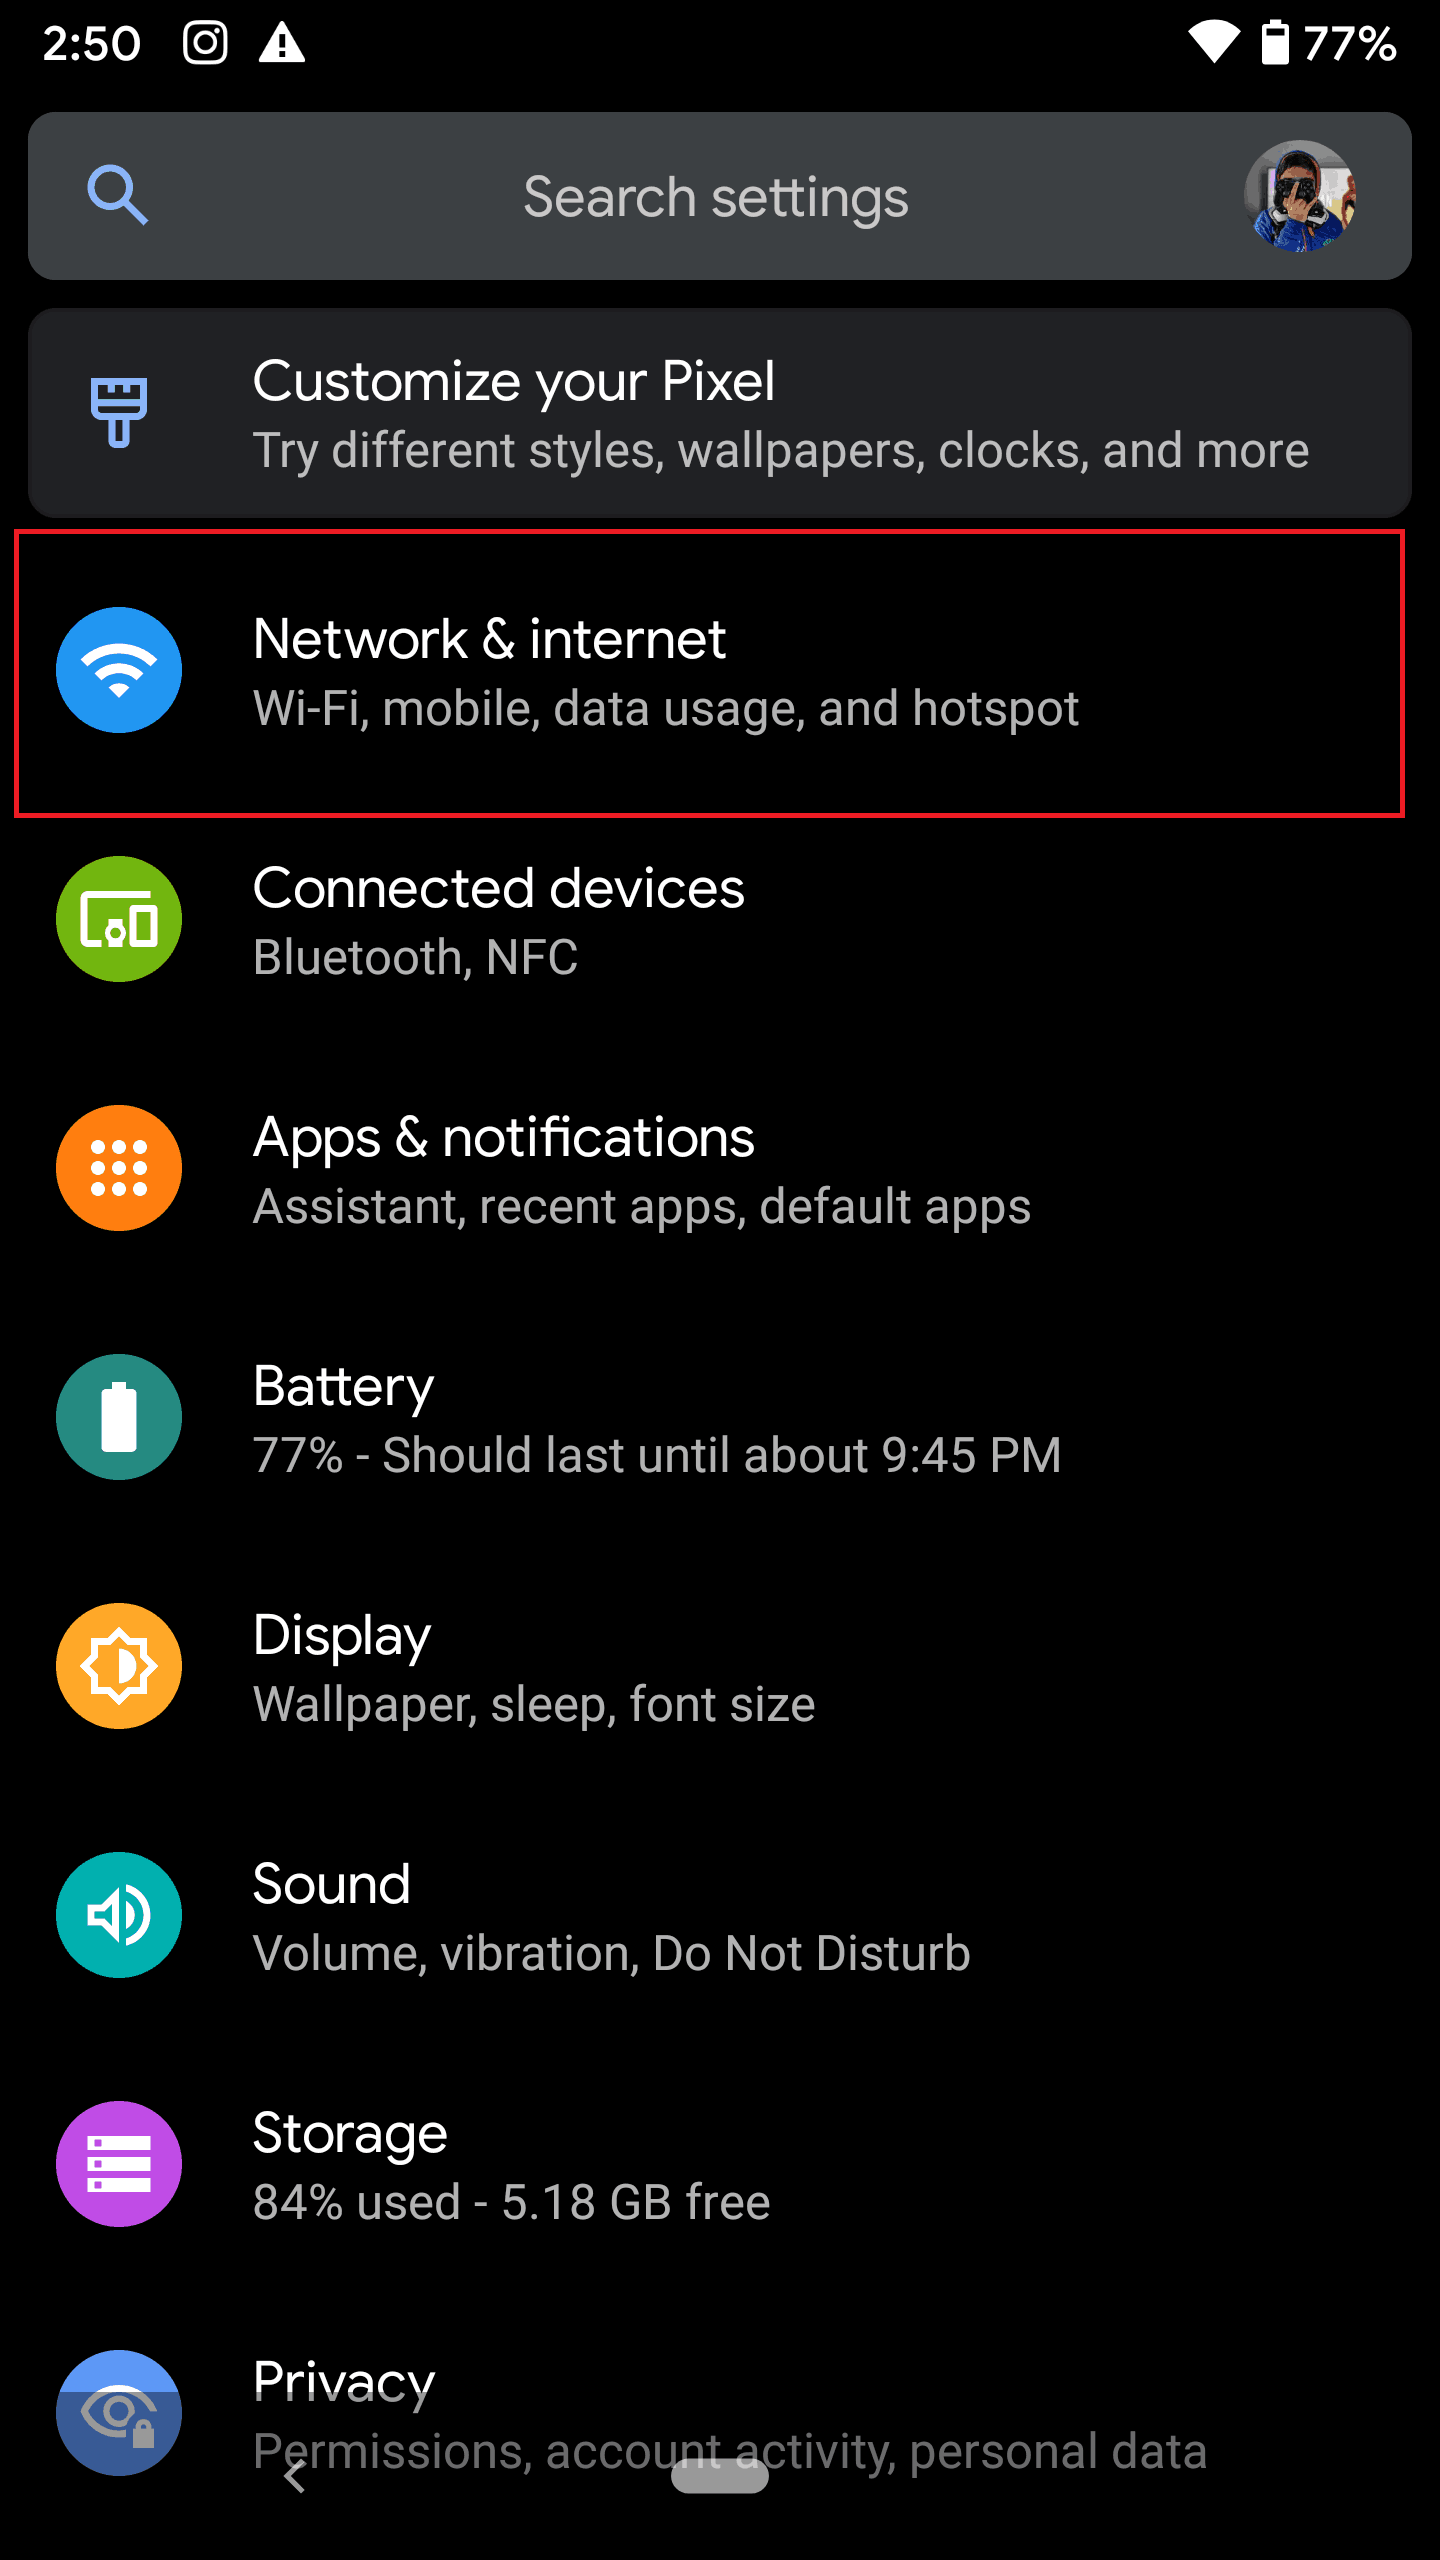
Network & internet - Now, select ‘Advanced.’
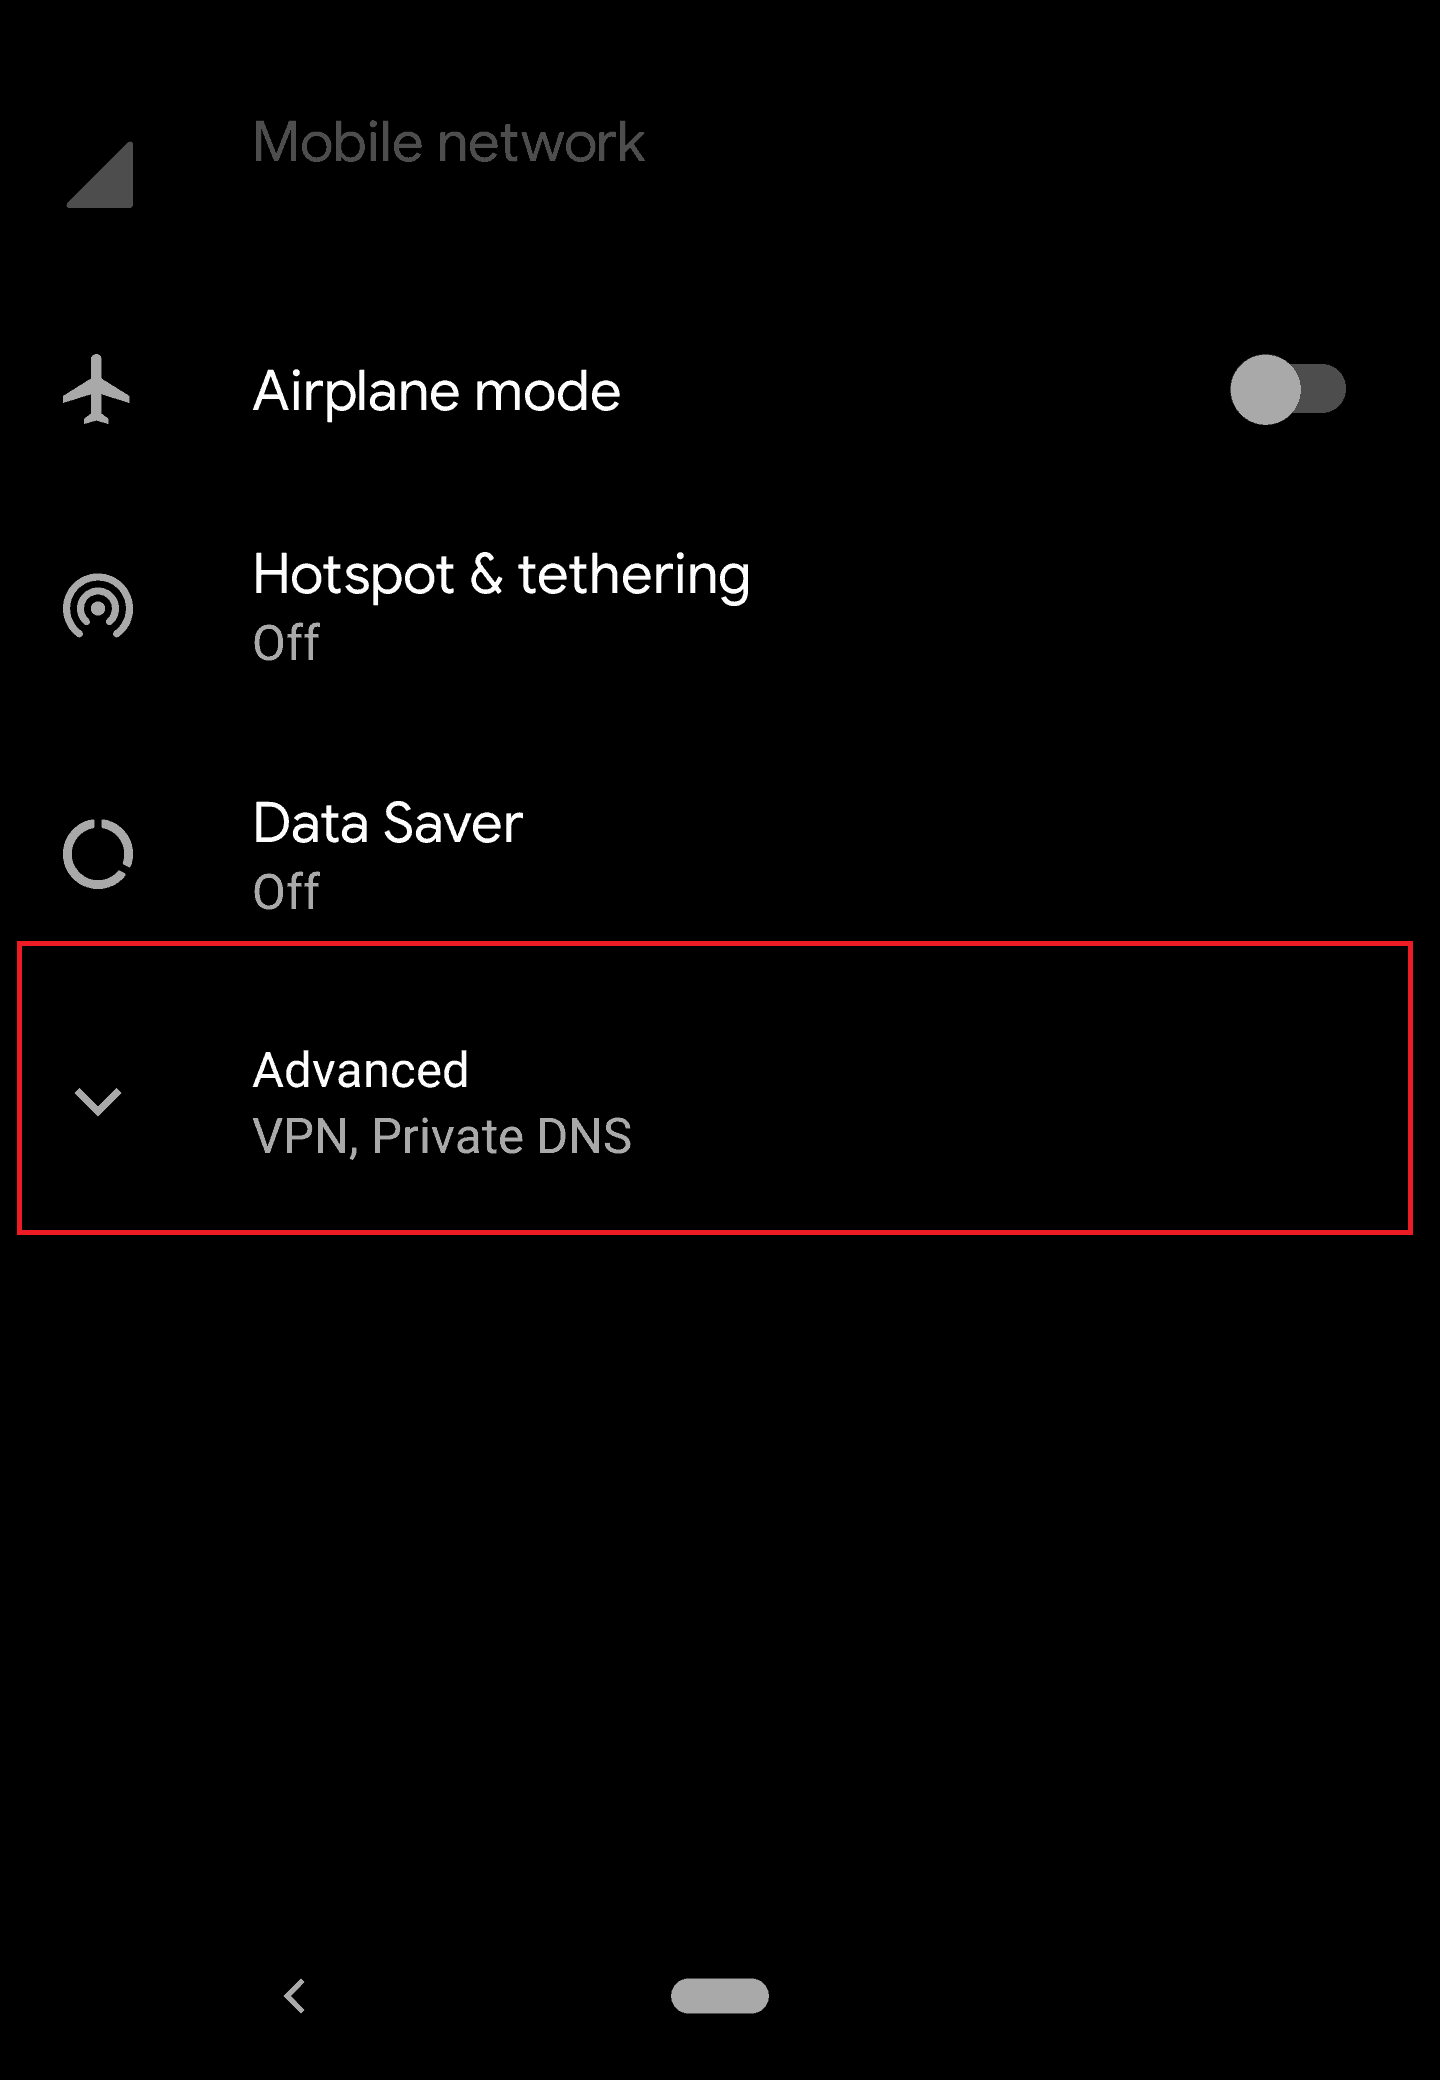
- After that, select “Private DNS.“
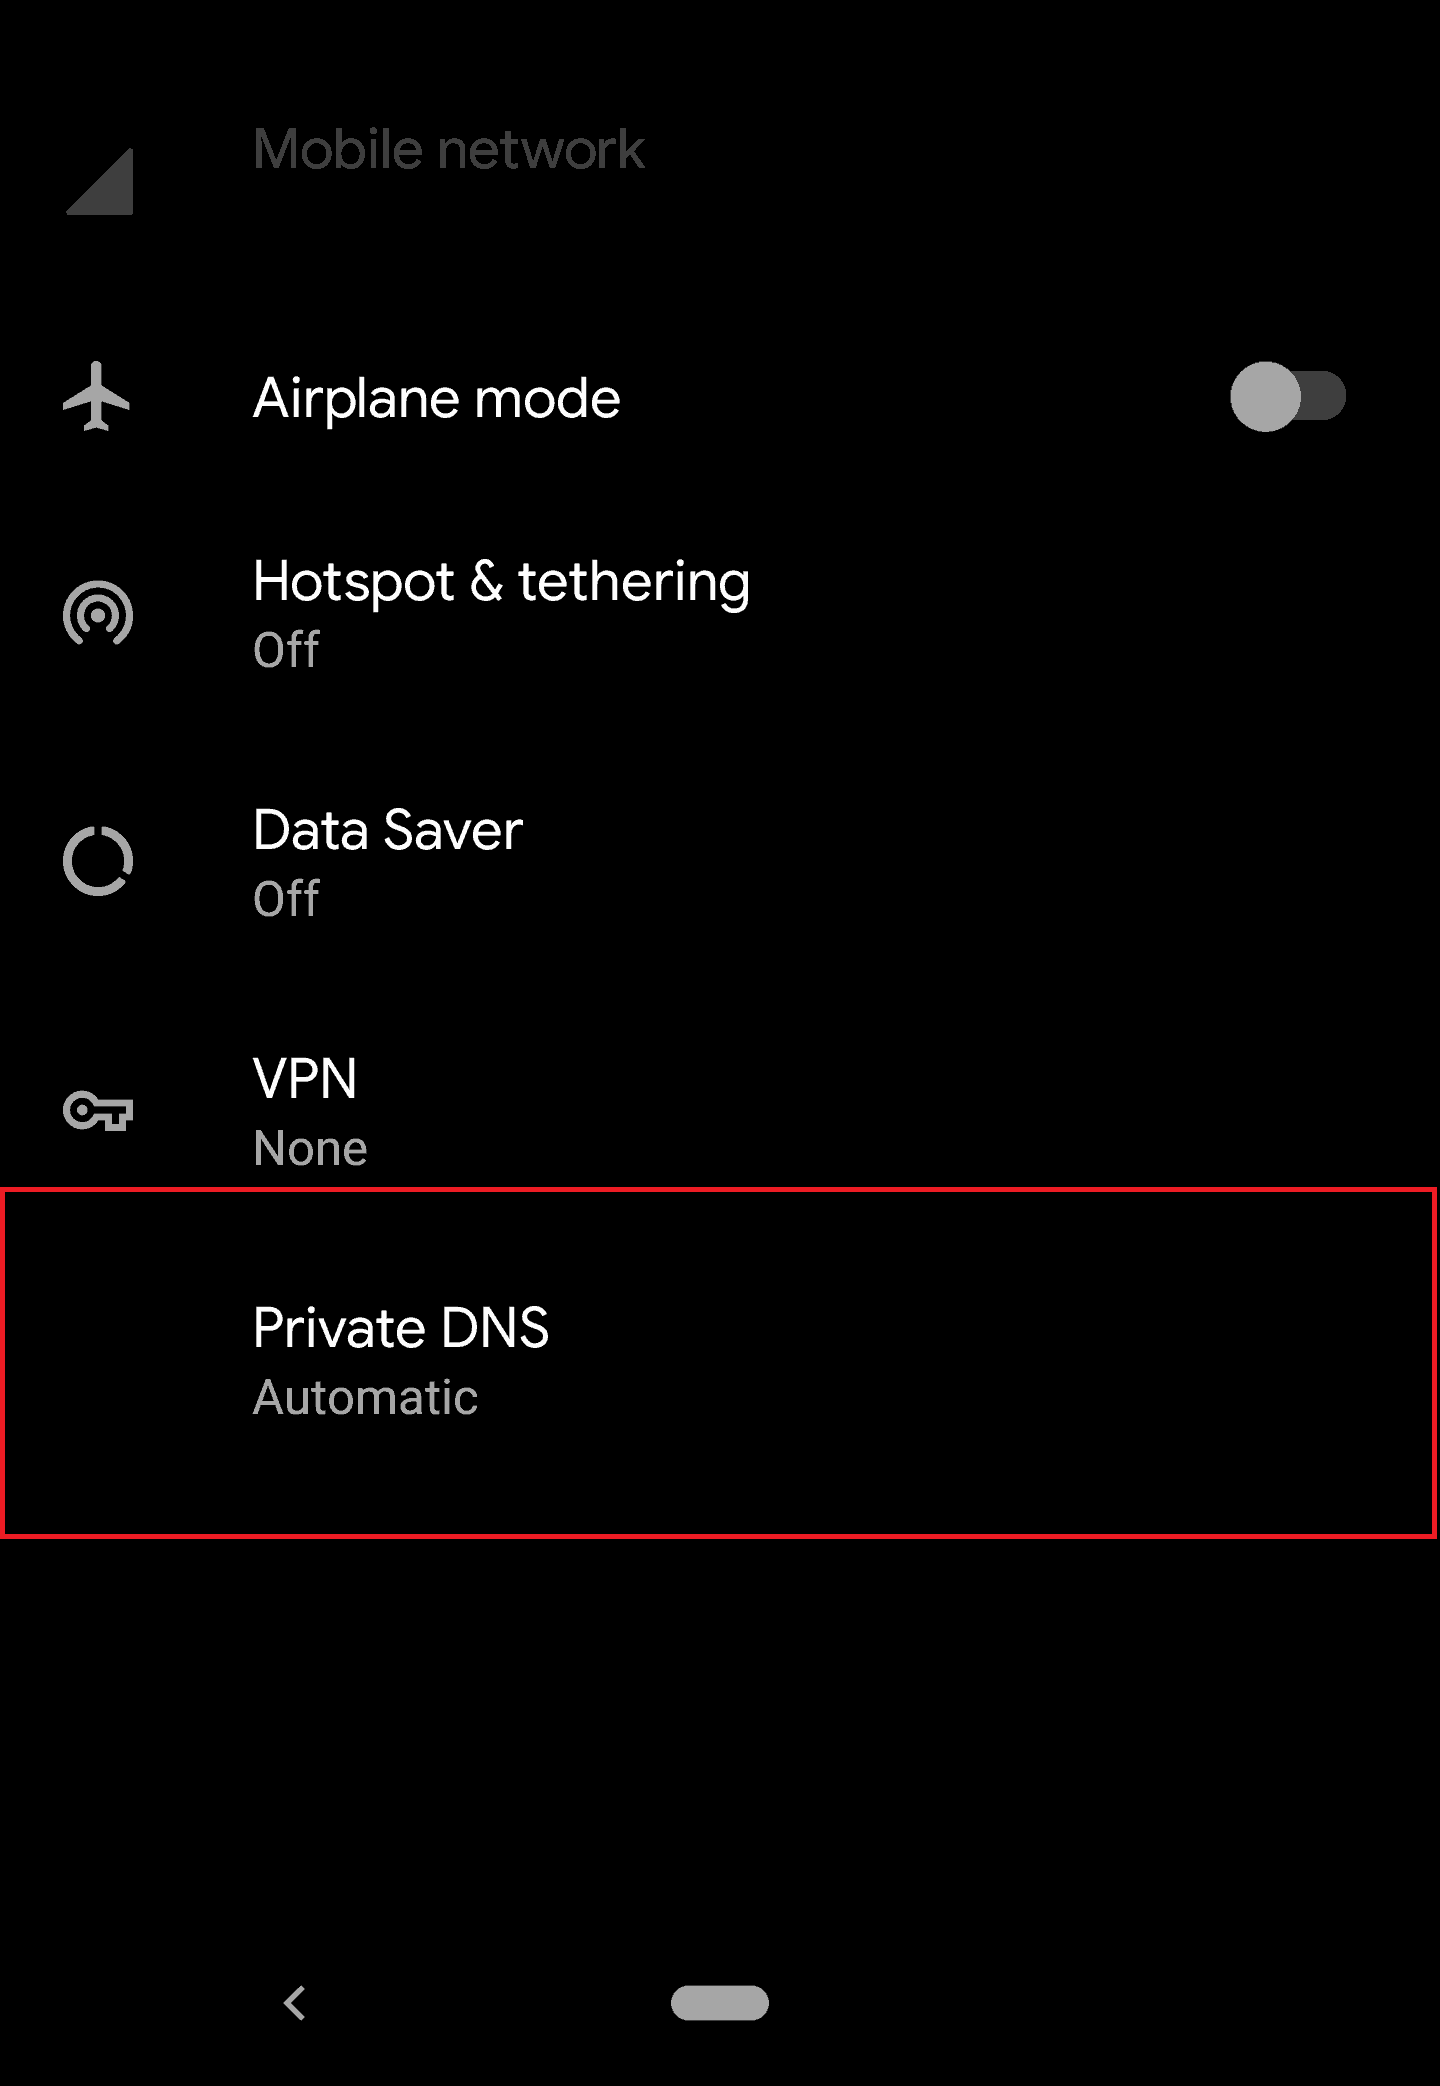
- Now select “Private DNS provider hostname.”
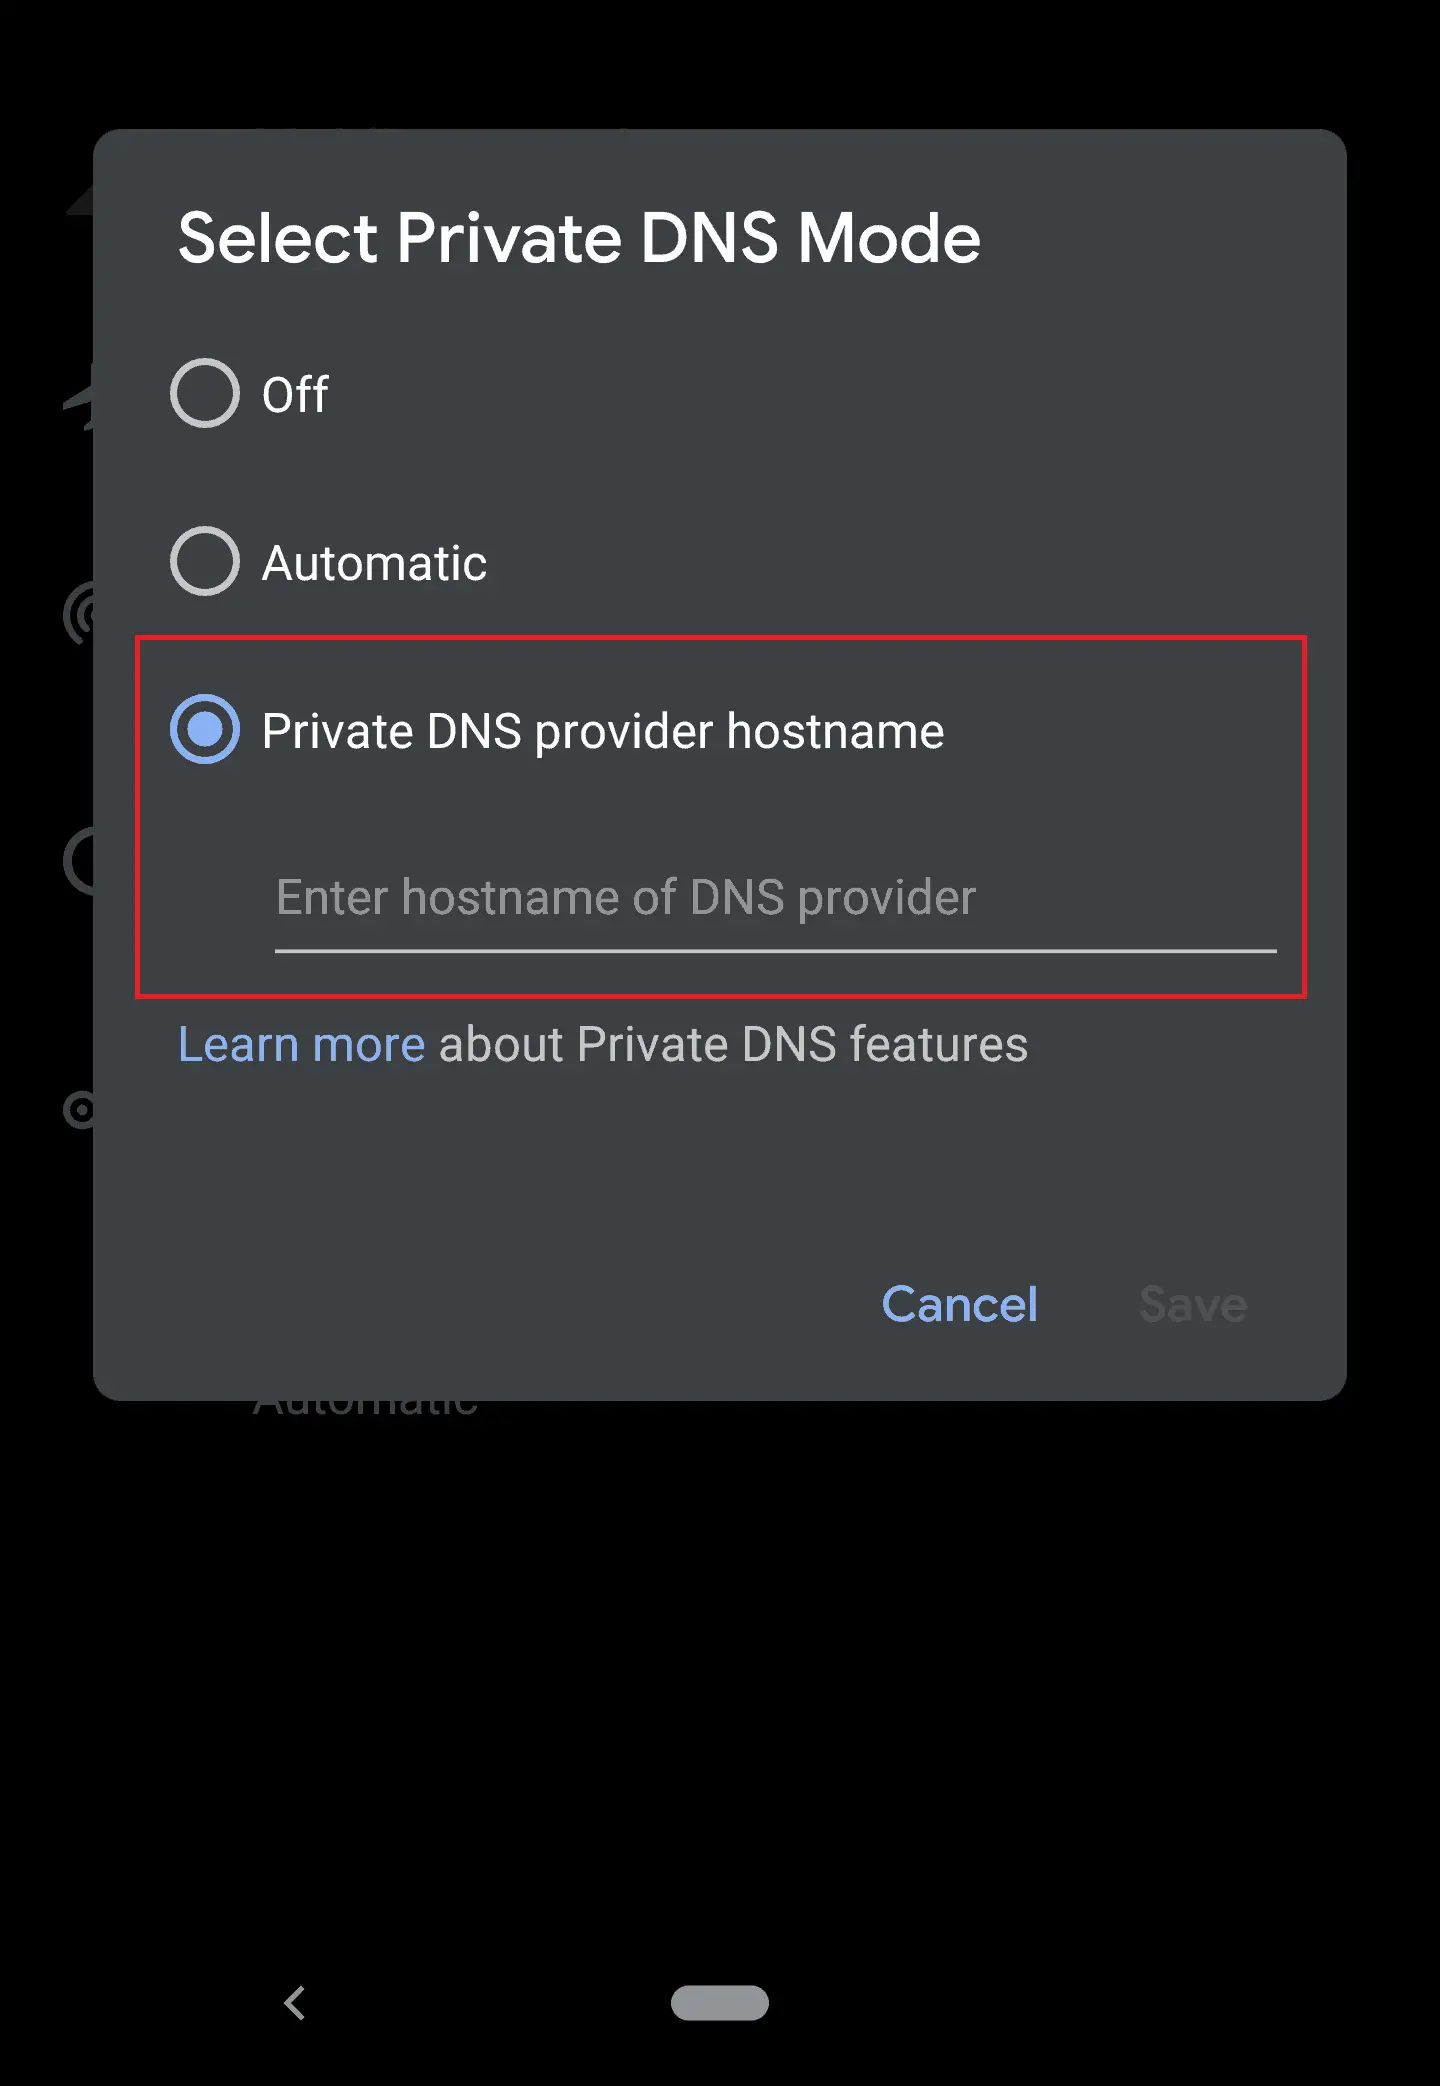
- If you want to change it to Google’s DNS, type in “dns.google.“
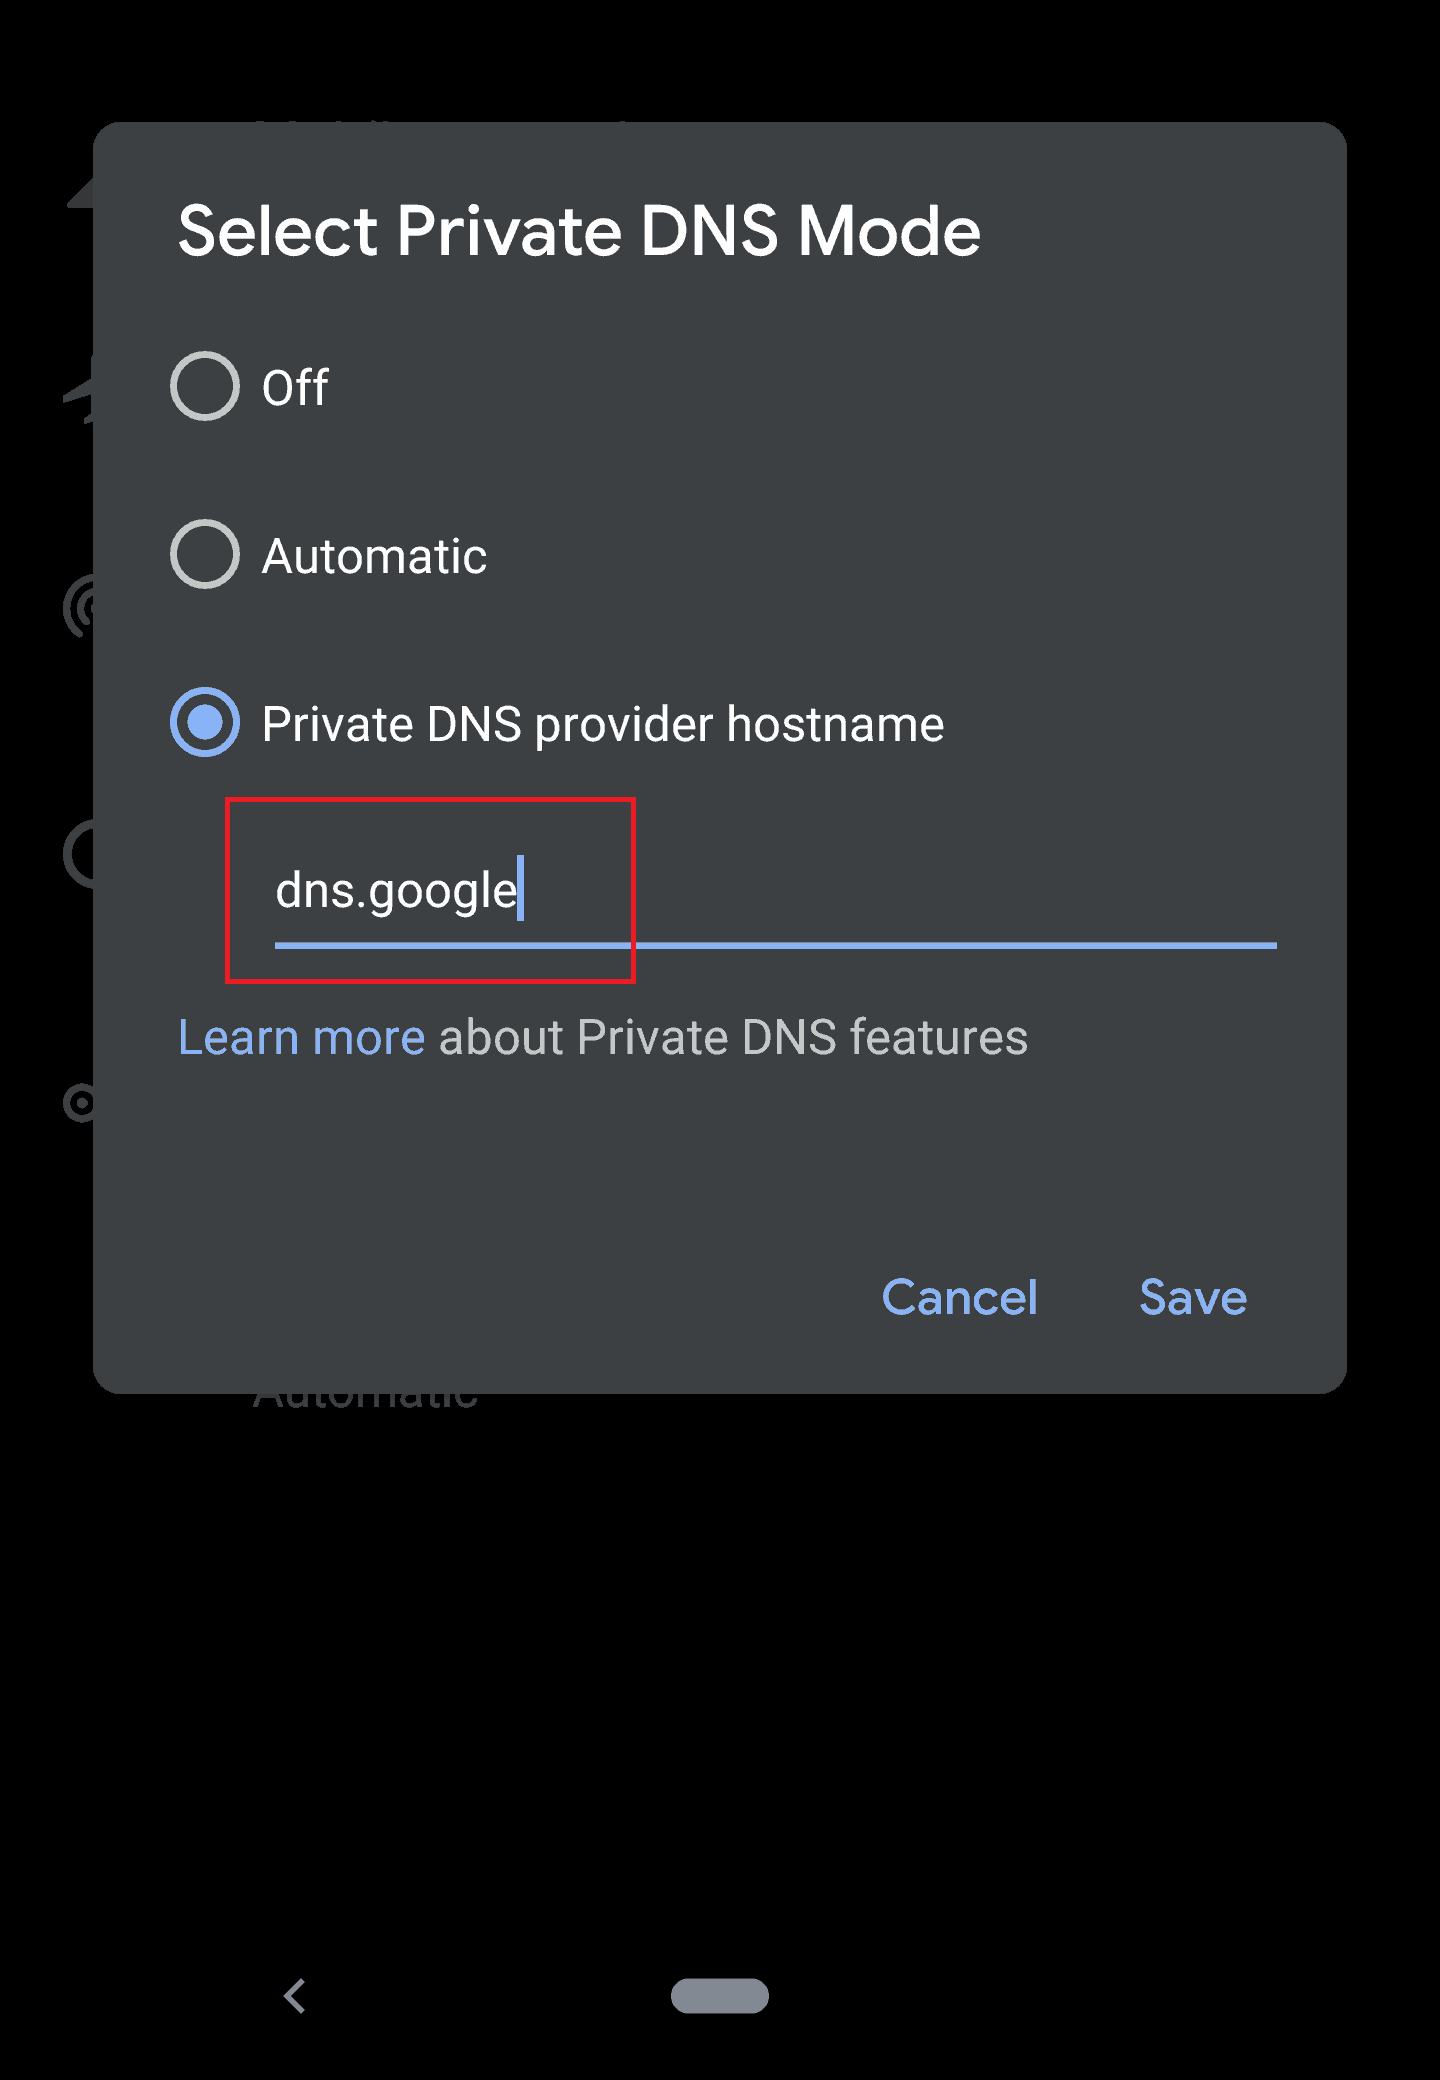
Google’s DNS on Android - And for Cloudflare’s DNS, type in “1dot1dot1dot1.cloudflare-dns.com.“
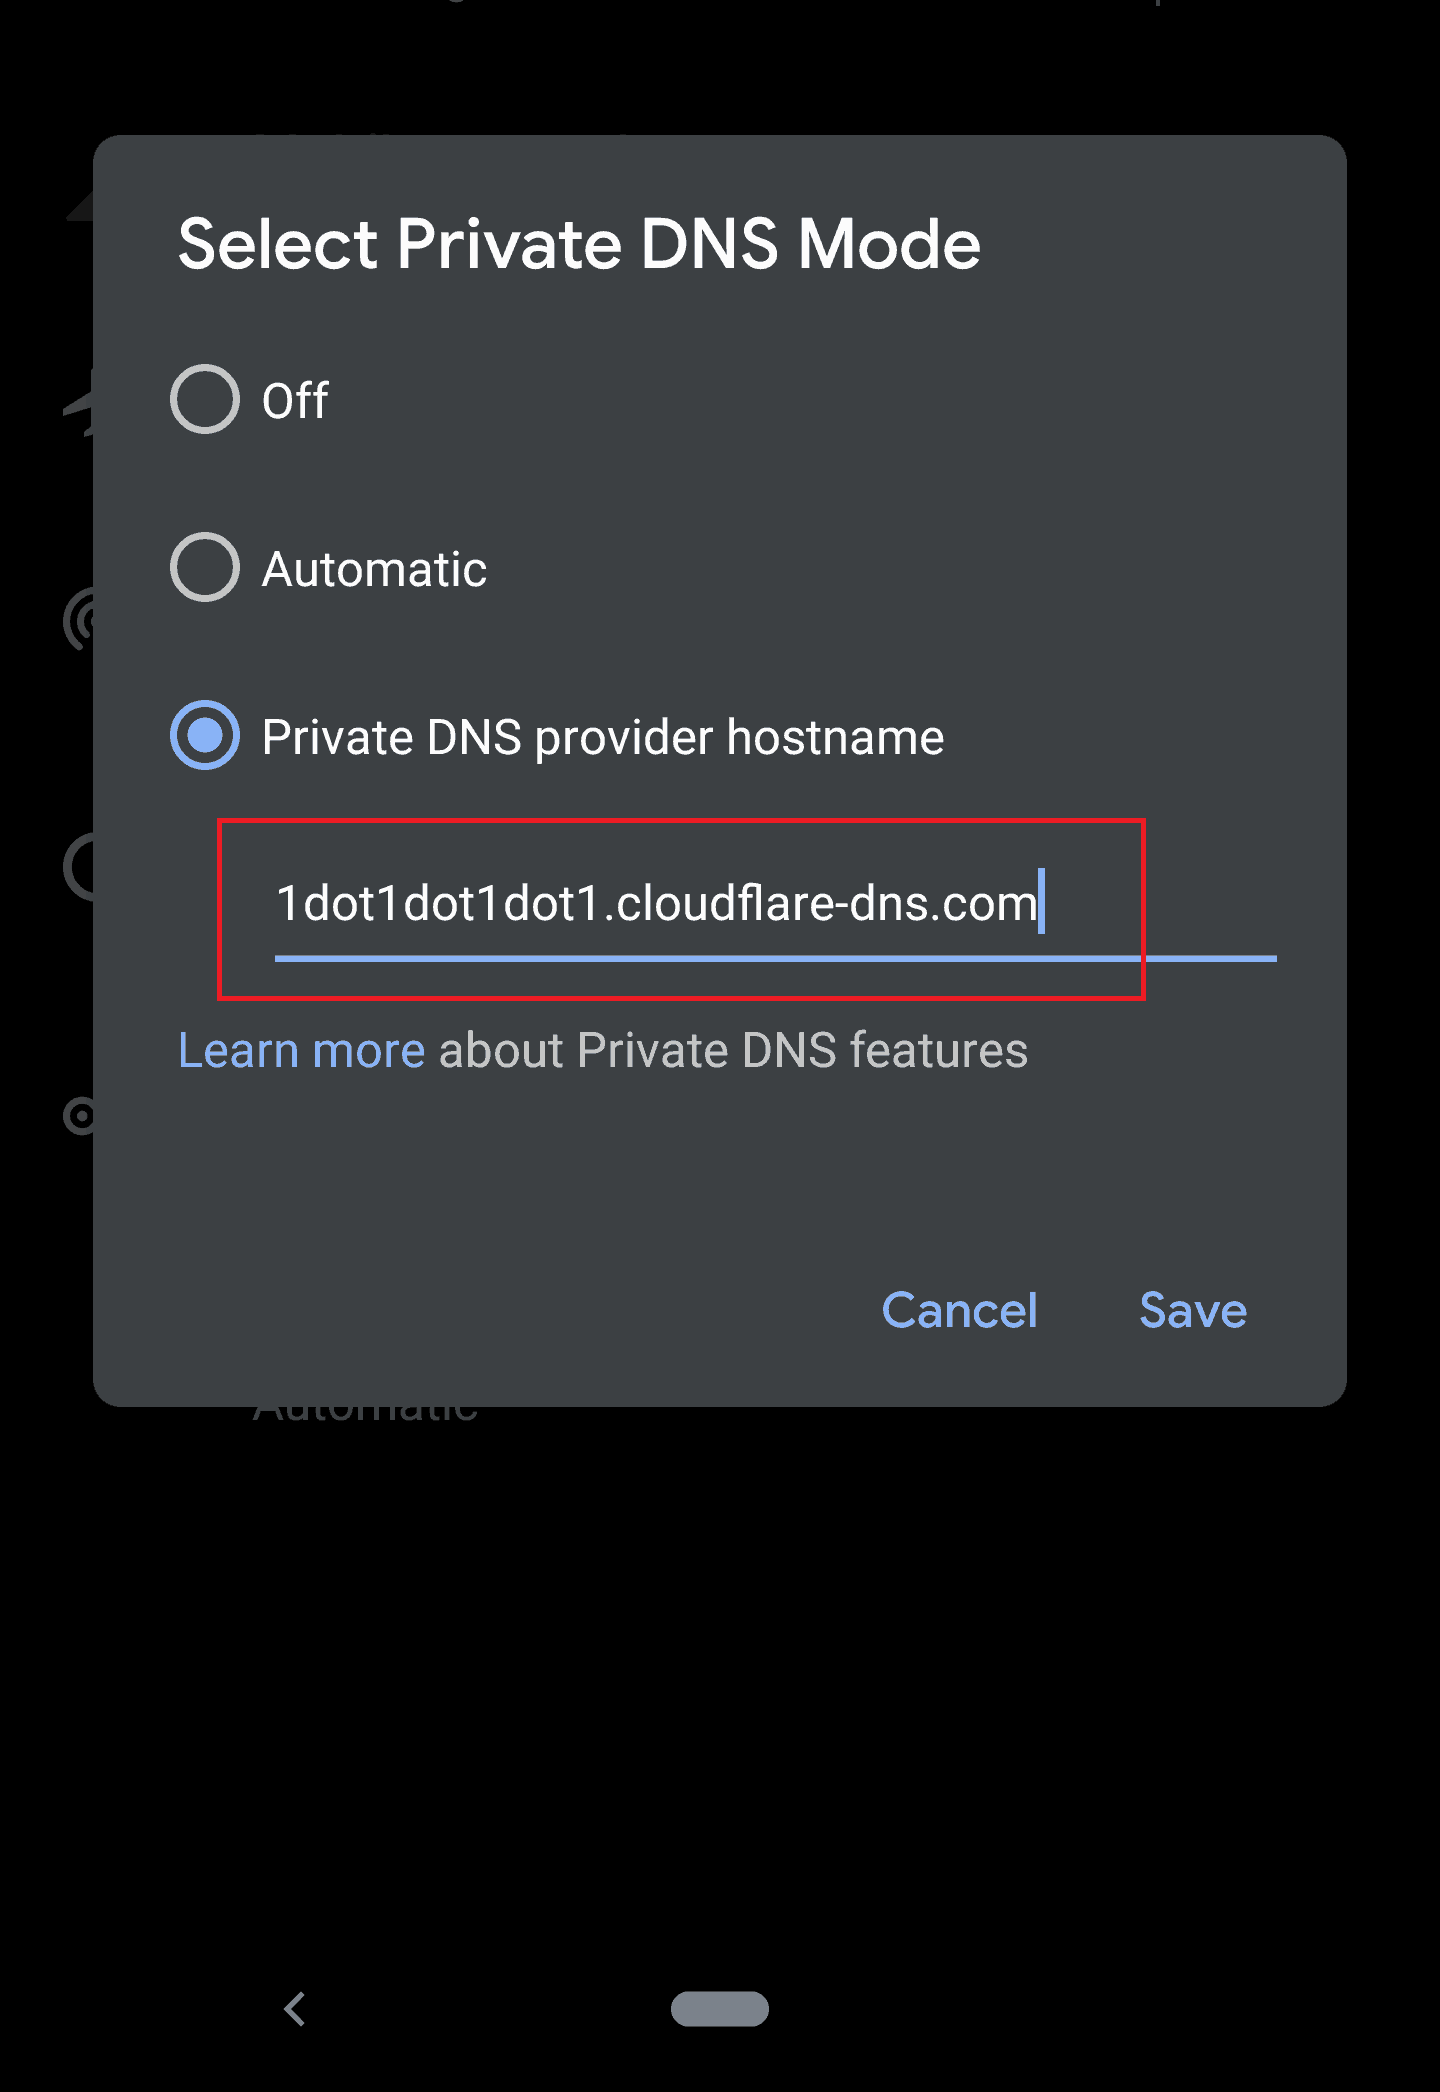
Cloudflare’s DNS on Android - Then click on Save.

If you want to change the DNS in your entire home network, you need to change the DNS in your router. Note that the UI of each model of routers may vary, and yours may be different. For reference, we are using a TP-Link Archer C9.
- Go to your router’s login page and log in.
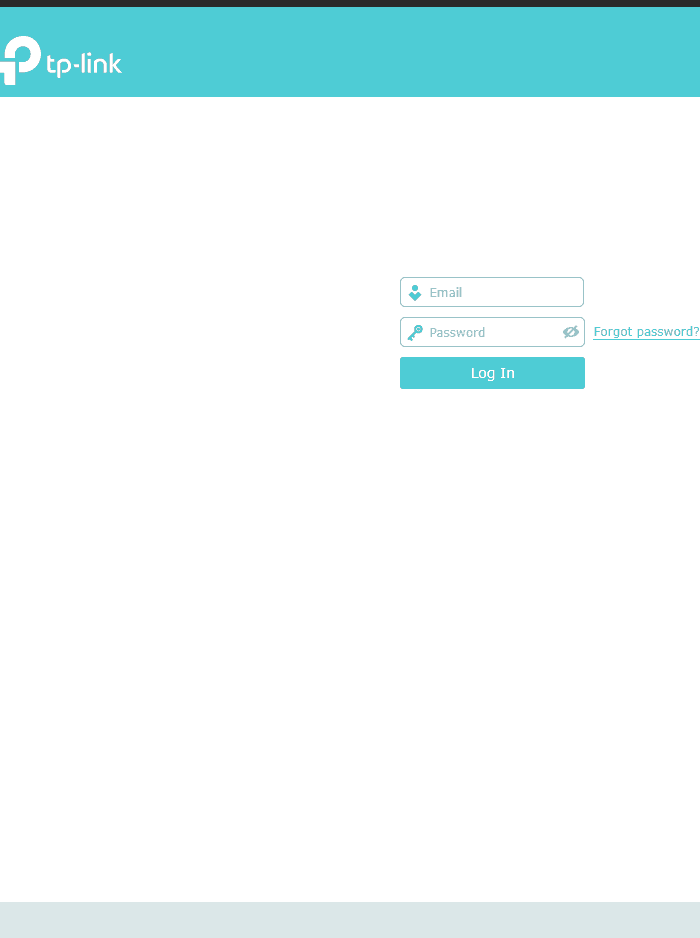
Router’s login page - Then, click on ‘Advanced.’
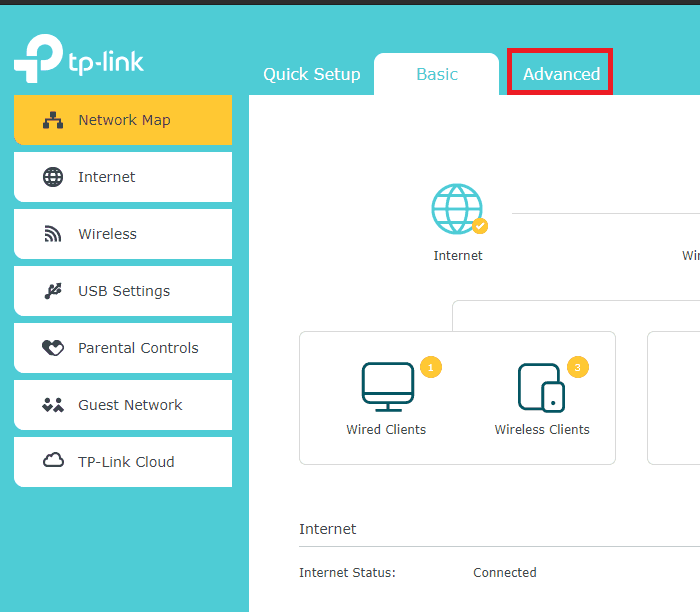
- After that, click on ‘Network.‘
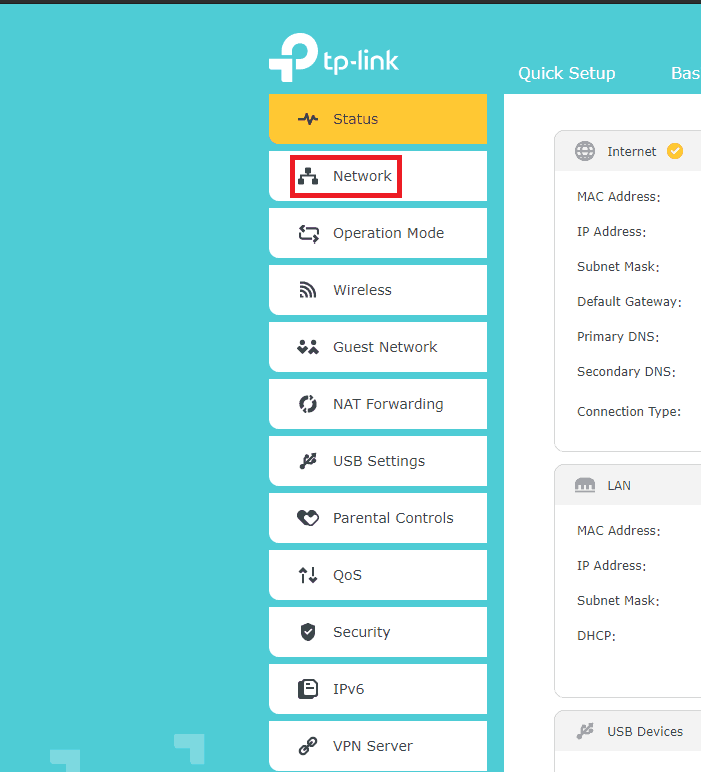
- Now, click on the ‘Internet‘ option.
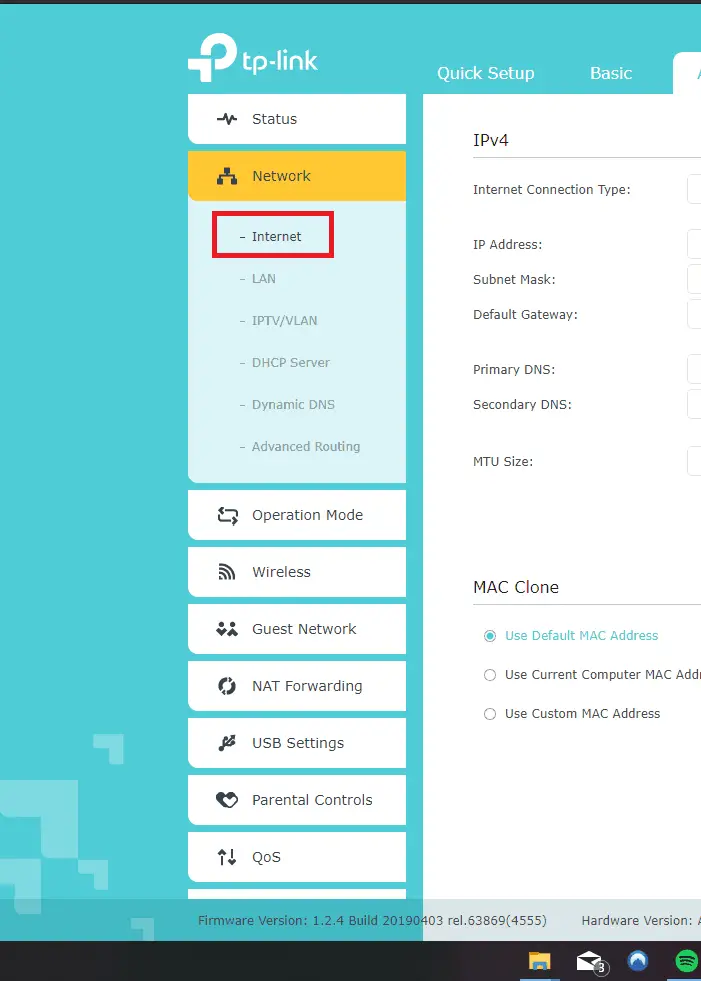
- Set 8.8.8.8 and 8.8.4.4 respectively as “Primary DNS” and “Secondary DNS” if you want to use Google’s DNS.

Google’s DNS on the router - For Cloudflare’s DNS type in 1.1.1.1 and 1.0.0.1, respectively, instead.

Cloudflare’s DNS on the router - Now, click on Save.

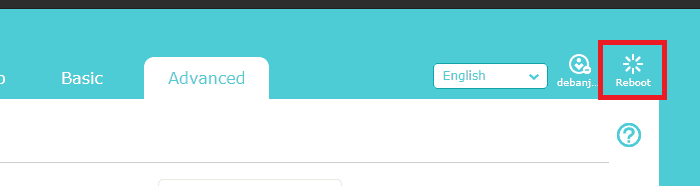
- Then click on Reboot once to restart the router to make sure that your new settings get appropriately applied.
After changing it to Google’s DNS, make sure your new settings work appropriately. On Google Chrome, enter a website URL (For example, http://www.google.com/). Bookmark this page if it loads appropriately, and try accessing the page from the bookmark. For Cloudflare’s DNS, visit 1.1.1.1/help or 1.0.0.1/help to make sure “Using DNS over TLS (DoT)” shows “Yes.”
6. Try Not Using VPN Or Any Proxy Server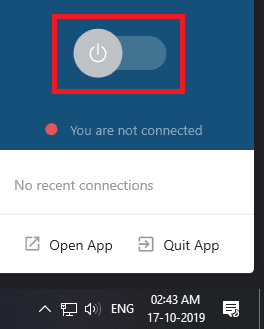
When using a VPN, your connection might become unstable or slow at times. That may be the reason why Twitch is loading just a black screen. Try disconnecting from the VPN or the proxy server. Also, disable the virtual port created by the VPN by right-clicking on it and clicking on Disable. And then try loading Twitch.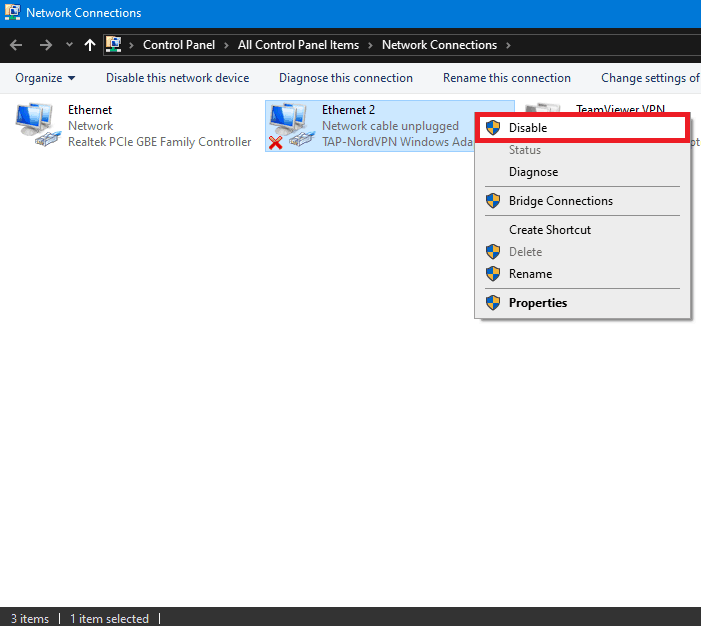
7. Try Using Alternatives
If you do not have a problem watching without chat, try this > http://www.twitch.tv/channelname/popout replace “channelname” with the name of the channel you are trying to view. Or, you can try watching on an external site, for example, Multitwitch, note you do not have to use two channels, http://www.multitwitch.tv/channelname is enough. Again, replace “channelname” with the channel you are trying to watch. But, we do not recommend using Multitwitch too much as it does not have proper security. You can also try using beta.twitch.tv.
8. Disable Extensions
Some ad-blocker, VPN, download manager extensions can be the cause of the Twitch black screen.
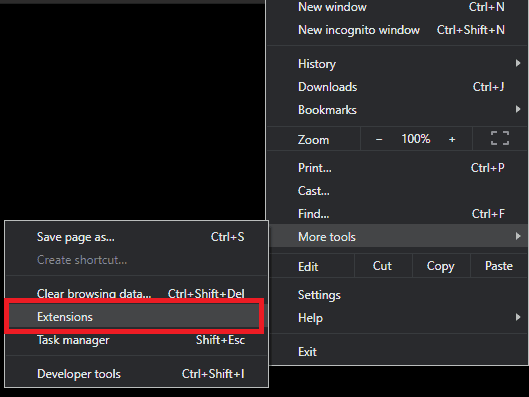
- Click the three-dot menu (?) of Google Chrome, as described above. Then, hover over “More tools.”

More tools - Click on ‘Extensions.’
Extensions - From here, you can toggle all of your extensions off.
- After toggling every extension off, check out if Twitch loads. In case it does load properly without any issue, try toggling your extensions back on one by one and keep checking to figure out which extension is causing the problem.
9. Enable Hardware Acceleration
Hardware acceleration should be enabled by default in the Google Chrome browser. But, if it is not, then we highly recommend you to toggle it back on.
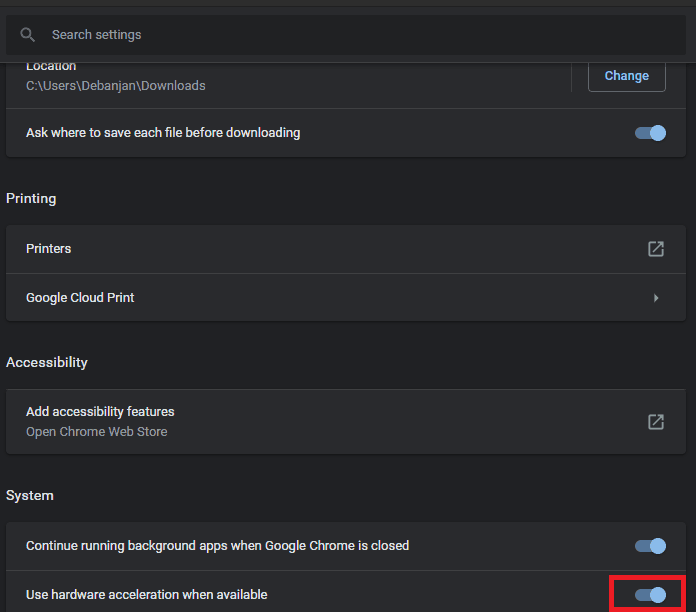
- First of all, go to advanced settings, as described above.
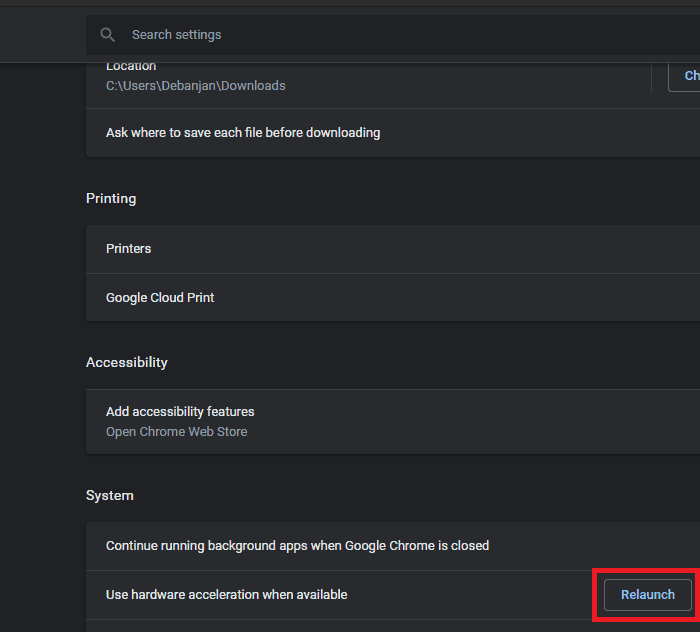
- Find “Use hardware acceleration when available” in the System section and toggle it on.
- Click on Relaunch or close Google Chrome and start it up again.
Relaunch button
10. Try Deleting Your Browsing History, Cookies, And Cache
There is very little chance of this method fixing the Twitch black screen issue. So, if keeping your browsing history and staying logged in on other websites is crucial to you, avoid this method.
- At first, go to advanced settings of the Google Chrome browser as instructed above.
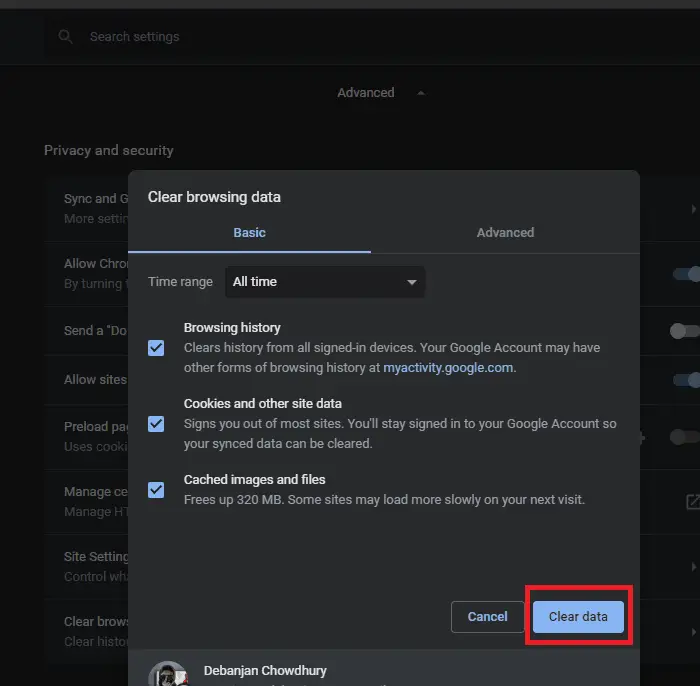
- Go to the “Privacy and security” section. Select “Clear browsing data.”
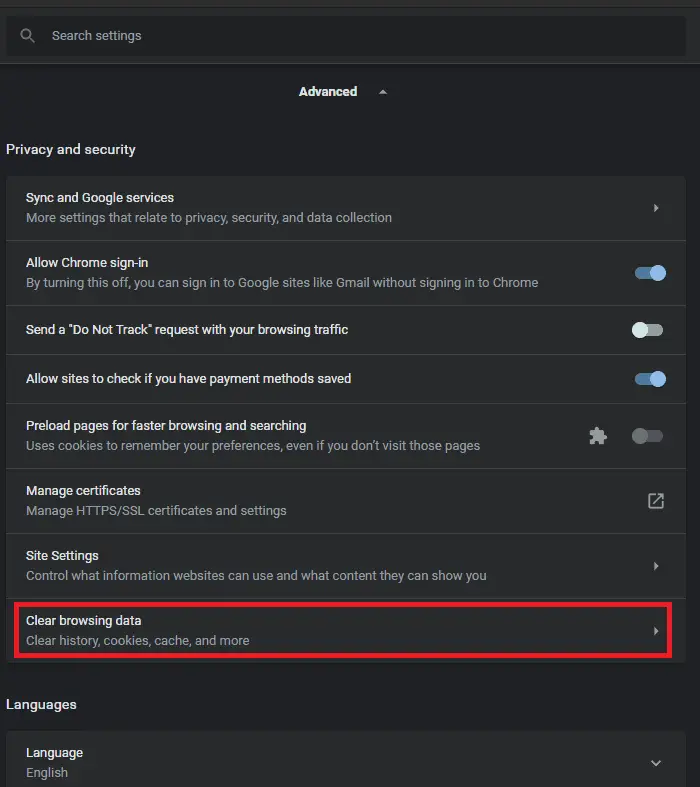
- Check everything and click on “Clear data.”
11. Try Resetting Google Chrome Settings To Default
Again, if you do not want to lose your Google Chrome settings, you should try out the other methods first. But resetting Google Chrome settings might be able to fix Twitch black screen in case you have changed some settings incorrectly and if you do not have account sync enabled. If you do have account sync enabled, once you log back into Google, your previous settings would get synced back.
- Go to Google Chrome’s advanced settings.
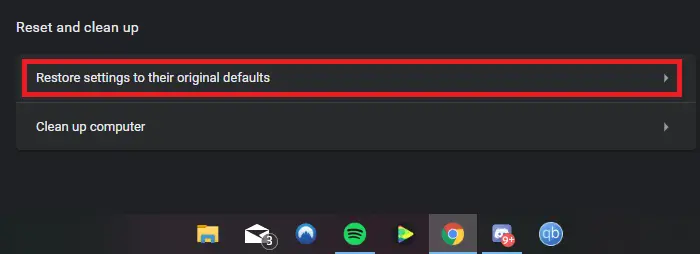
- Go to the “Reset and clean up” section. Click on “Restore settings to their original defaults.”
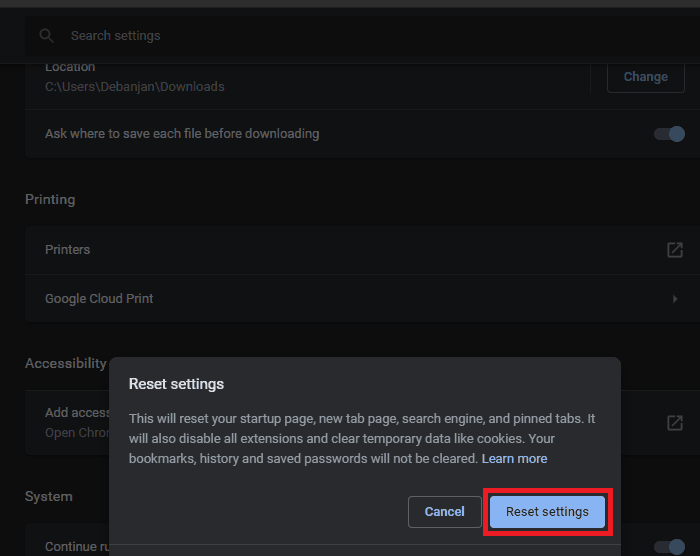
- At last, click on “Reset settings.”
12. Try Uninstalling And Reinstalling Google Chrome
If nothing else works, you have to reinstall Google Chrome. Using the following steps, you should be able to reinstall Chrome on your Windows PC easily.
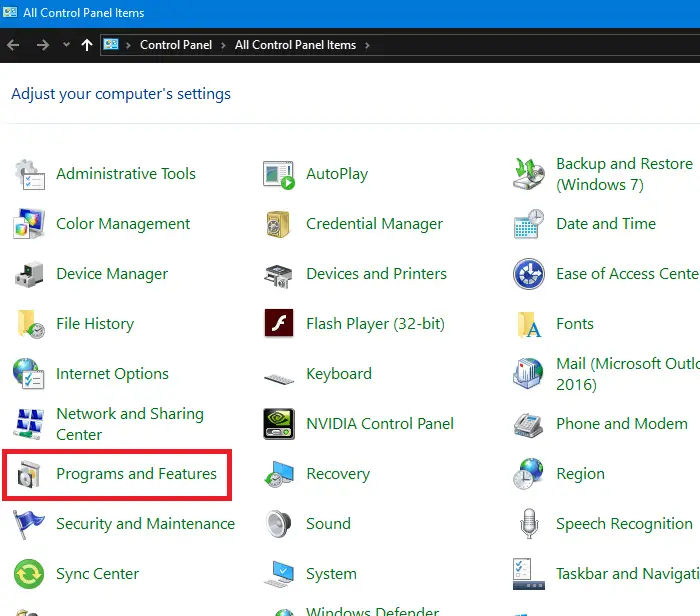
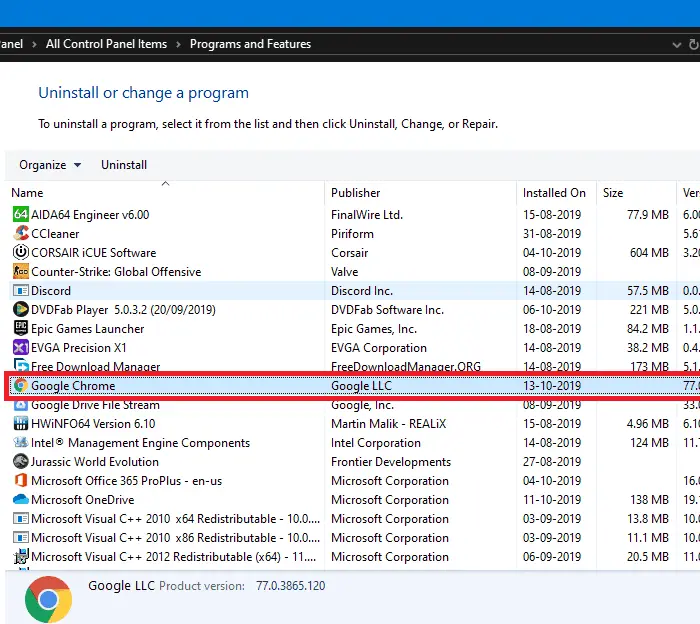
- Open Control Panel. Find “Programs and Features” and click on it.
- Then select Google Chrome.
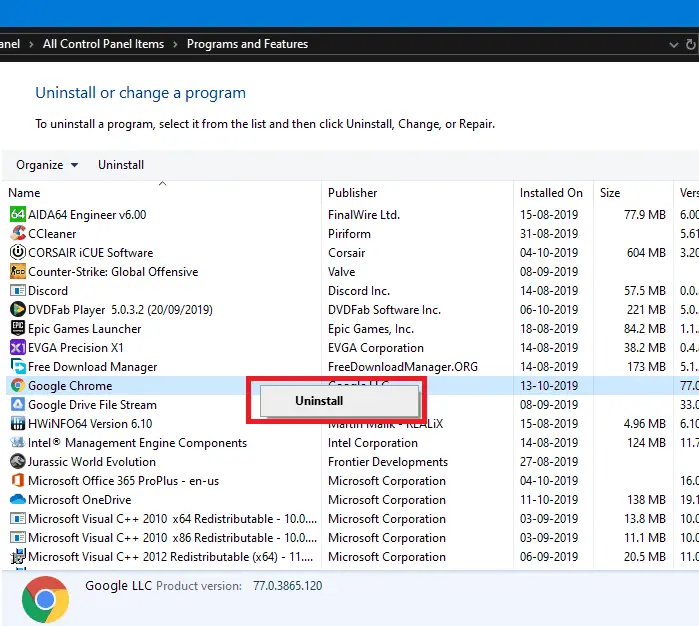
- Right-click on Google Chrome and click on “Uninstall.” After that, go forward with the uninstalling process.
- Once done, download and install the latest variant of Google Chrome using another browser from here.
In this article, we have provided detailed instructions on how to fix the Twitch black screen issue. Now you can finally watch and enjoy your favorite streamers by following the methods mentioned in this article. If you still can’t access Twitch due to the black screen problem, it’s most probably an issue on your ISP’s end.

