
When it comes to the popularity of operating systems, nothing can beat the competency of Windows 10. Along with an exceptional level of security, the OS also includes various unparalleled features that allow you to make the most out of your hardware specifications. That’s the reason why the majority of games are released on Windows PCs. For an immersive gaming experience, Windows includes a preinstalled utility known as DirectX 12, that tweaks the GPU for optimal performance while playing games. However, sometimes it starts malfunctioning and requires you to reinstall DirectX 12.
With that said, you enjoy better game compatibility and smoother performance. As it is a preinstalled utility, DirectX appears to be a core component of the Windows OS, which indicates that it cannot be uninstalled through usual ways. However, there are still some workarounds that allow you to uninstall and reinstall DirectX 12. Keep in mind, it should only be done when you notice abnormality from your GPU or believe that the files are corrupted. Let’s take a look at the steps required.
Table of Contents
How to Reinstall DirectX 12 in Windows 10?
If you’re having problems with your GPU and believe that the issue exists within DirectX, you can consider updating your windows as the closest thing to reinstalling DirectX. This will check for the latest packages, and determine whether you’ve installed the latest version or not.
During the Windows update, DirectX will also be installed, and all the problematic or missing files will be overwritten or replaced. However, there’ll also be various other changes with the update that may hinder your user experience.
Here’s a list of issues that mar require you to reinstall D
DirectX 12 in your PC:
- Game flickering while playing and showing FPS drops
- DirectX showing an unspecified error code
- DirectX not working after updating
- Game crashing again and again
Therefore, if you’re looking for an alternative way that doesn’t require you to update Windows, you’re at the right place. Follow the steps given below to uninstall or reinstall DirectX manually in your Windows 10 OS.
This can be done by deleting the residue files of the utility through the file manager. The old file data may contain files related to the problematic installation, which may also hinder the current installation process. Follow the steps given below:
- Open a preferred file explorer and navigate to the C:\ (or the drive where you have Windows installed). Then navigate to the path “Windows\System32” or “Windows\SysWOW64” to proceed
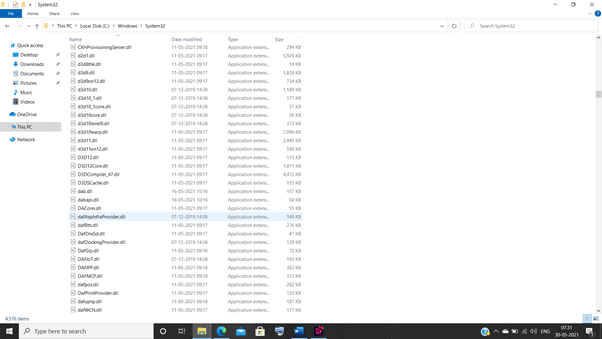
- Once you access the aforementioned directory, you’ll see various files with .DLL extension. Out of all these files, you need to delete some specified ones by right-clicking on them and choosing the delete option as given below:
D3d12.dll
D3dx9_24.dll to 43
D3dx11_42.dll to 43
D3dx10_33.dll to 43
D3DCompiler_33.dll to 47
D3d9.dll, d3d10.dll and d3d11.dll
- After deleting the above-mentioned old files, you have to execute the runtime installer of DirectX. It can be downloaded from the official website of Microsoft. After downloading the file, run it as administrator and wait for the installation process to begin
When you see a new installation Window on your screen, simply proceed to follow the instructions available on-screen and complete the installation process. Once the installation is finished, click on the “Finish Button” to close the new Window.
How To Completely Uninstall DirectX 12 on Windows 10?
As DirectX 12 is a pre-installed feature in Windows 10, it cannot be uninstalled from your computer. If you’re trying to do this because a particular game isn’t running properly, you may likely have an issue with the graphic card, perhaps it isn’t updated.
In this situation, it is suggested to update your graphic card by following the steps given below:
- Press the Windows + X key together, and choose the “Device Manager” option on the popup window
- Expand the section titled “Display Adapters” by clicking on the downward-facing arrow next to it
- Right-click on the installed driver and click on the “Update Driver Software” option
- Lastly, follow the instructions that appear on your screen
Following the above steps will allow you to upgrade your graphic card that’ll solve the problem.
How to Repair DirectX 12?
If you get missing DLL messages from different games, it is evident that there’s some issue with your DirectX 12 installation. Fortunately, there are some troubleshooting tips that you can try without requiring reinstalling your complete operating system.
To fix this issue, you may consider installing the DirectX Runtime, which will update and install all the missing files in your DirectX utility. It can be downloaded from the official website of Microsoft, can be installed by right-clicking on it and choosing the “Launch” option.
- Navigate to the Downloads folder in your file explorer, and right-click on the runtime executable, followed by choosing the “Open” option available in the dropdown menu
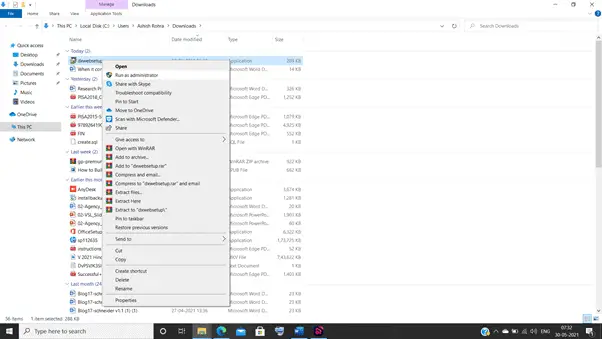
- Once the installation process begins, click on the Next button and choose your preferred installation path
Then, simply follow the on-screen instructions and the installation will be finished in no time. The runtime utility replaces all the corrupt or missing files and fixes the issues related to DirectX to make it work seamlessly.
How to Download DirectX 12 for Windows 10?
For unspecified reasons, Microsoft has redirected the download page of DirectX runtime to the Windows OS download page. The reason can possibly be the fact that the Windows updates are now responsible for the upgradation of preinstalled files and applications in Windows 10.
- Firstly, you have to determine the currently installed version of DirectX in your OS by opening the start menu through your mouse or the Windows key on your keyboard and typing “DXDIAG” in the search box, followed by hitting the enter key on your keyboard
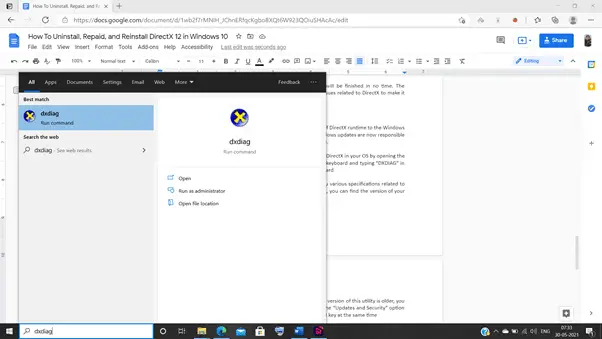
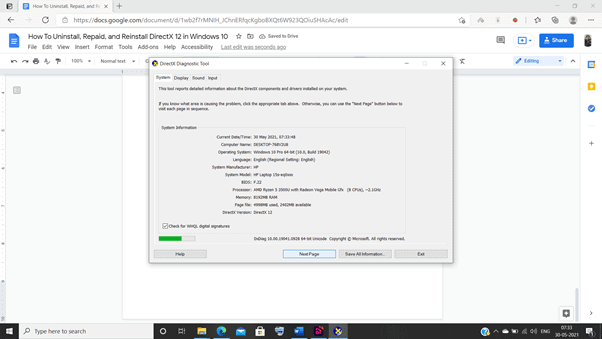
- This will run the DirectX Diagnostics Tool which will show you various specifications related to the version of DirectX installed on your PC. In the systems tab, you can find the version of your DirectX at the bottom-center part of your screen
- As the current version is DirectX 12, if your currently installed version of this utility is older, you can proceed to download the latest version by navigating to the “Updates and Security” option under the Windows Settings by pressing the Windows Key and I key at the same time
Lastly, all you need to do is click on the check for updates button to easily download and install the latest version of DirectX on your PC. The setup process is completely automated and doesn’t require any kind of manual effort at all.
Bottom Line
While the process of installation for DirectX 12 is extremely straightforward and easy to follow, you must make sure to remove earlier versions and old files before overwriting the data with a new installation. With the steps given above, you can easily download, uninstall, and reinstall DirectX 12 on your Windows 10 PC.

