The update system in Windows 10 is quite infamous for constantly causing inconvenience to users, forcing them to spend time searching for the causes of problems and their solution. Many users, after restarting the computer after installing an unknown update, have faced with the fact that the Windows 10 start aka Windows Key/button does not work.
The Start menu is one of those shortcuts without which it is difficult to imagine the Windows operating system. Even Microsoft recognized this fact and returned this button to its rightful place in OS 8.1, after it was removed in version 8.
In this error, The menu does open by clicking on the Start icon but does not respond to the Win key (with the emblem of the window). Sometimes, in addition to this, the “Parameters” menu may not open and other graphical menus may not function. To correct this problem, read the proposed article till the end and follow the instructions given in it.
Table of Contents
How to Fix Windows Key/Button Not Working on Windows 10
Method 1: Restart Windows Explorer
Explorer.exe is a program which is a graphical Windows explorer. Thanks to that, the explorer, entire file management system and the windows menus of the operating system works. During its operation, a malfunction may occur (for example, conflicts with memory addresses). If the start button does not work in Windows 10, first of all, you should restart the “Explorer.exe” process.
To do so, follow this process:
- Call the Task Manager using the keyboard shortcut Ctrl + Shift + Esc or the context menu of the taskbar.
- Go to the “Processes” tab by clicking the “More details” option.
- Find the process “Windows Explorer” or “Windows Explorer”.
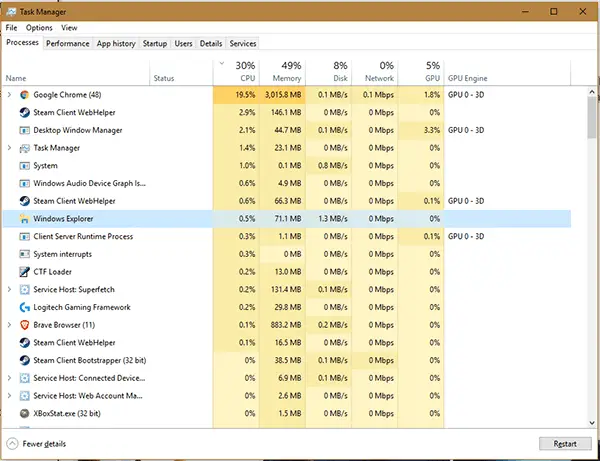
- Then, simply right click on the process and select the “Restart” option.
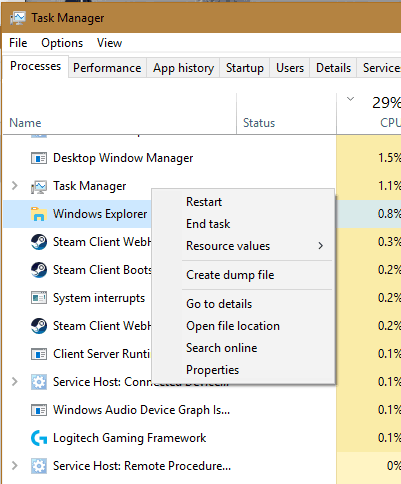
That’s it. The “Explorer.exe” will restart and it should fix the windows button problem.
Guide on How to Disable Windows Key.
Method 2: Change the value of one of the registry keys
If the above method did not work out for you, you can tweak some values in the “registry editor” to fix the problem.
Follow the steps provided below to solve the problem using the registry editor:
- First, type “regedit” in the Windows search bar. Then, simply right click on registry editor and select “Run as administrator”.
- This will open the registry editor with administrative rights.
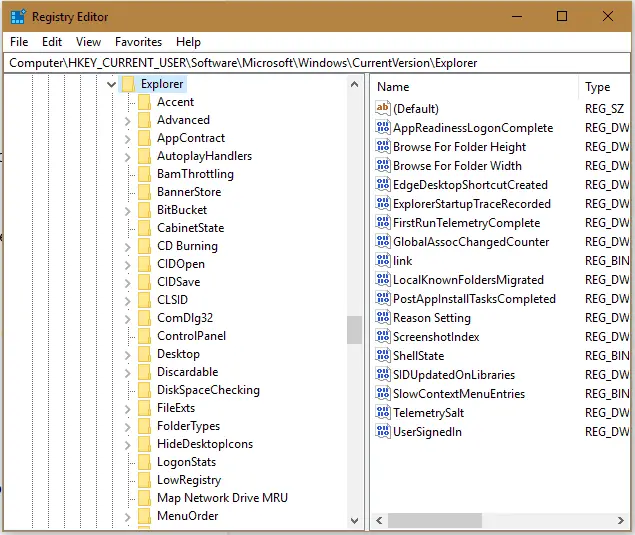
- Go to the section with the parameters of the HKEY_CURRENT_USER
- Now, follow the path Software\Microsoft\Windows\CurrentVersion\Explorer.
- Find the key “EnableXAMLStartMenu” and change its value to “zero”. If there is no parameter, create a DWORD key with the name and value.
We suggest that you restart the explorer.exe by following method 1 for the new configuration to take effect.
Windows 10 Keyboard Shortcut List.
Method 3: By using the Windows Powershell
Before performing this step in this guide, it is recommended to create a system rollback point as an error in Windows PowerShell commands can lead to some serious problems.
To utilize the Windows Powershell to resolve the problem, follow these steps:
- To run the Windows PowerShell, go to the “\System32\WindowsPowerShell\v1.0” directory located in the OS folder, and execute the powershell.exe file as an administrator. Or, you can simply search for Windows PowerShell in Windows 10 search bar and open the PowerShell as an administrator.
- Now, the Windows PowerShell window will appear.
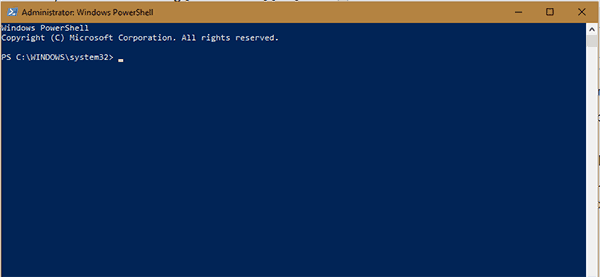
- Now, Insert the following command into the text line of the opened PowerShell window and run it:
*Get-appxpackage -all * shellexperience * -packagetype bundle |% {add-appxpackage -register -disabledevelopmentmode ($ _. Installlocation + “\ appxmetadata \ appxbundlemanifest.xml”)}}*
- This operation will be done in a matter of seconds After that, check whether the Start button opens. If it fails again, move further to the next solution.
Method 4: Use the official utility from Microsoft
This tiny program works on the same principle as the troubleshooting tool, but with respect to graphical elements of Windows 10. In particular, the Start menu and its operation.
To use the Official utility tool, follow these steps:
- Download the utility from this link https://www.majorgeeks.com/files/details/microsofts_start_menu_troubleshooter.html as it is currently unavailable on Microsoft.com.
- Once downloaded, simply open the application and press “Next”.
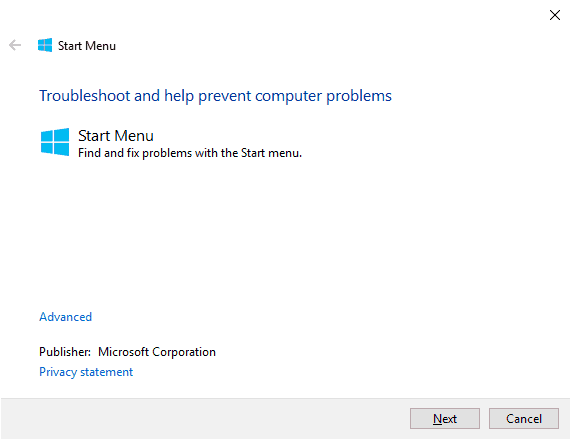
- Now, just follow the on-screen instructions and the application will automatically try to resolve the problem by itself.
- For more details on the operation of the utility, click on the link “View additional information”.
The latest edition of the application performs the following checks:
- Availability and normal operation of ShellExperienceHost and Cartan
- Checks whether the user has the right to access the registry branch, which stores the data necessary for the work of the graphical shell of Windows 10.
- Checks the integrity of the database in which program tiles are stored.
- Scans the application manifest for damage.
Method 5: Use the Automatic Maintenance option
Sometimes, The automatic maintenance of the operating system might help to resolve the problem.
To activate it follow the steps [rovided below:
- Go to the “Properties” of the system.
- On the left side, you will find some options. Click on the link “Security and Maintenance” located at the bottom.
- Now, Expand the “Maintenance” tab and click on the “Start Maintenance” button.
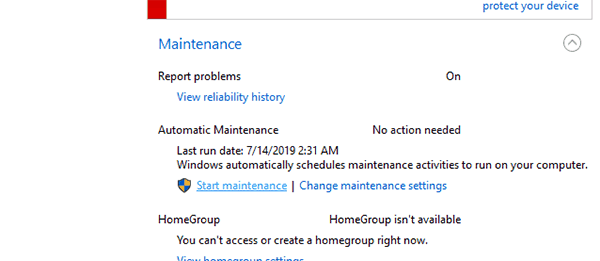
- Now, just sit back and let the maintenance finish. Windows 10 will try to search and fix all the problems on the computer. Although this option helps infrequently, it is worth a try.
Method 6: Check the Keyboard Features
Some keyboards, especially Gaming keyboards, have a special key that blocks the Windows button. If your keyboard has such a key and it is enabled, then this is the reason why the Windows button on the keyboard does not work. Press the lock key once to unlock the Windows button. This might just resolve the problem entirely.
Method 7: Try the keyboard on another computer
If you are using a desktop PC, connect your keyboard to another Computer and check if the Windows button works on it. If the button does not work on another computer, it is likely that it is physically damaged. You may have to replace it with a new button.
Method 8: Update Keyboard Drivers
Also, the problem with the fact that the Windows button on the keyboard does not work may be caused by incorrect keyboard drivers. Usually, you do not need to install keyboard drivers manually, unless you have an expensive gaming keyboard. In this case, you need to go to the official website of the manufacturer and download the drivers.
Users who use conventional keyboards should do the following:
If you are using a PC, then just unplug the keyboard and plug it in again. Windows operating system will automatically install keyboard drivers.
If you are using a laptop, follow these steps to update the drivers through the device manager.
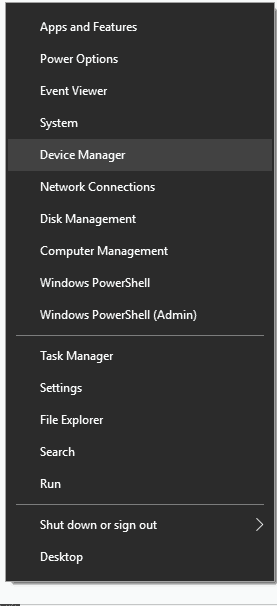
- Right-click on “ Start ” and select “ Device Manager ”.
- Expand the “Keyboards” category, and right-click on the keyboard device, then select “Update Drivers”.

- Select Search automatically. Now, Windows will automatically search and install the new drivers.
- Once the process is finished, Reboot the computer.
- This updated driver might resolve the functionality problem of the Windows key.
Even in the case when none of the solutions of this article helped to return the Start button, you should not despair. Most users have activated the function of creating checkpoints in Windows 10, which makes it possible to roll back the system to an earlier state. These same points are necessarily created before updating the OS, which becomes the main cause of Startup inoperability. In extreme case, you should simply roll back your operating system to a previously saved system restore point.

