Are you looking to extract the emails from the OST file in Outlook? Well, in that case converting the OST files to PST gives you the best option. Have a look at this article below. Here we are offering you a complete guide on how to convert OST to PST on Windows.
Microsoft Outlook stores your mailbox data in two different file formats PST and OST. You may require to access the OST file to check out your mailbox data if there is an issue with the exchange server. Offline Storage Table or OST allows the users to access the data in offline mode when there is any problem with the user’s internet connectivity or Exchange server unavailability. Basically, the OST files store the local cache of Microsoft Exchange accounts. While accessing the OST files is way more difficult in case of exchange server unavailability, you can surely get hold of the PST files.
Table of Contents
How to Convert OST to PST on Windows?
When it comes to converting your OST file extension data into PST, you may try different options. Either you can do it manually or take the help of an OST to PST file converter. Here we will discuss both the methods so that you can choose the most convenient one whenever you require to convert OST to PST on Windows.
If there is no outage and you are connected to the Exchange server, you can easily convert the OST to PST simply by using the Outlook application on your Windows computer. Here is the particular method you should follow. You can check this link for manual method
If the exchange server is unavailable, you need to use some third-party OST to PST file converter software. There are many third-party applications available that you may use for file conversion from OST to PST on your Windows computer. But as we tried a few of them, we have found out that the Stellar Converter for OST brings the easiest solution.
Method 1: Use Stellar Converter for OST
Download and install the application on your PC and follow the steps below to convert OST to PST on Windows.
Step 1: Launch the Stellar OST converter on your Windows computer
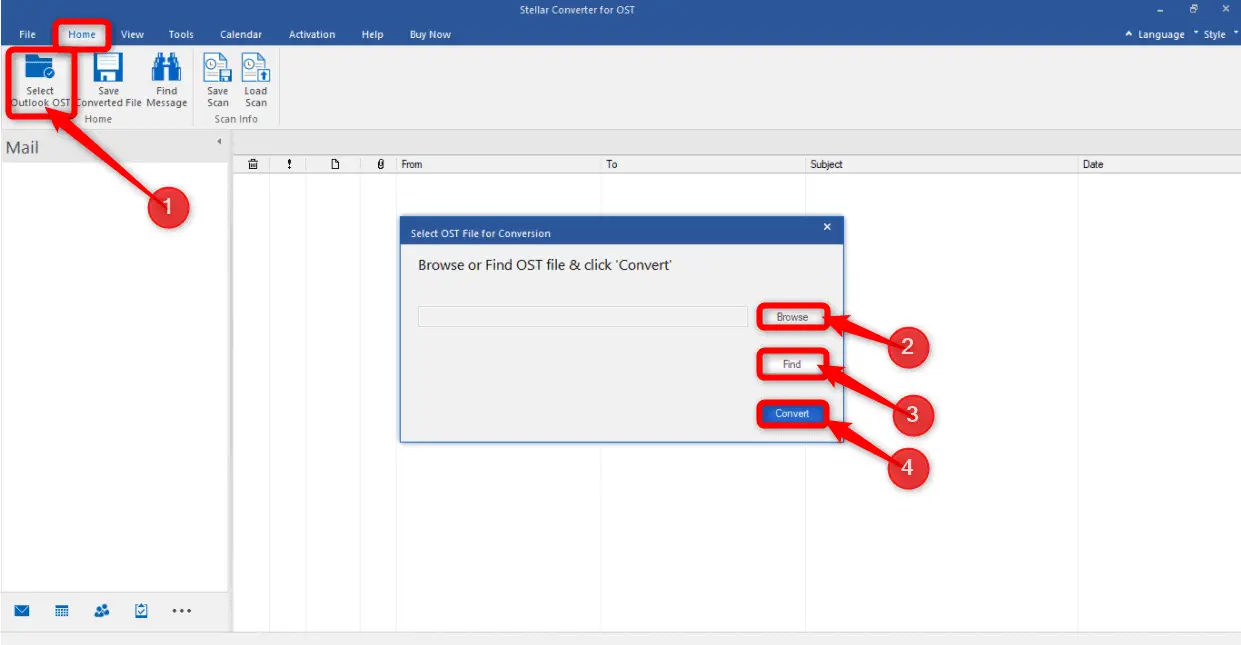
Step 2: Now, under the Home tab, click on the Select Outlook OST option
Step 3: Then, a pop-up window will appear asking you to select the OST file for conversion
Step 4: If you already know the location of the OST files on your computer, you can directly click on the Browse icon and select the file from your hard drive
Step 5: Now, if you don’t know the location, click on the Find option there
Step 6: Once you find out the files, select the Convert button
Step 7: Wait until the basic conversion process completes. Depending upon the size of your OST files, it may take some time. After completion, the Stellar software will provide the preview of the Outlook mailbox folder
Step 8: You can find out the deleted items marked in red from the left pane window. Browse the mailbox items to select individual folders from there
Step 9: After selecting the right file from the folders, click on the option ‘Save converted File Home tab’
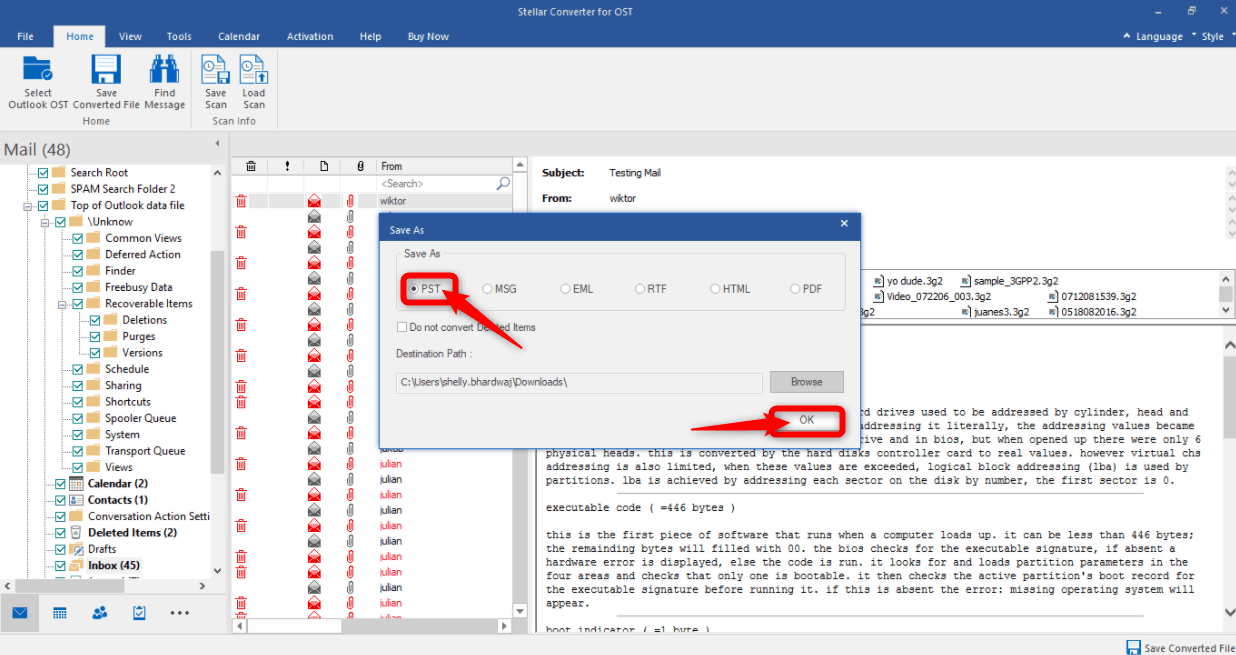
Step 10: As you choose the above option, a new pop-up window will open, which will ask you to choose the file format. Select the .PST option there and click on Browse
Step 11: Now, select OK to finally start the conversion
Step 12: Wait till the progress status bar goes to completion. As soon as the process completes, click OK for one last time to finish the process.
Method 2: Import and then Export Mailbox As PST File
Convert OST files to PST manually by following the steps below,
Step 1: Firstly, open the MS Outlook on your PC
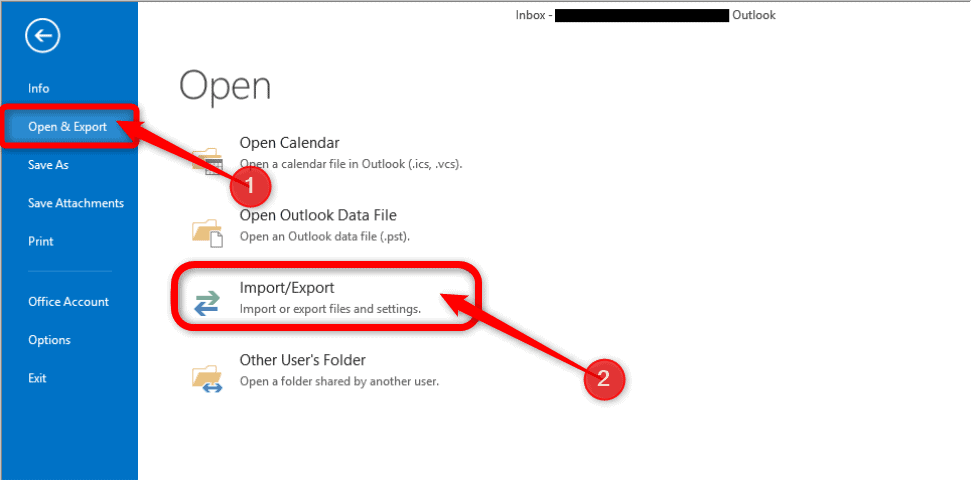
Step 2: Click on the ‘File Menu’ from the top left corner of the Outlook app
Step 3: Then, select the Open and Export option there
Step 4: As the new window opens, click on the Import/Export option from the list of option
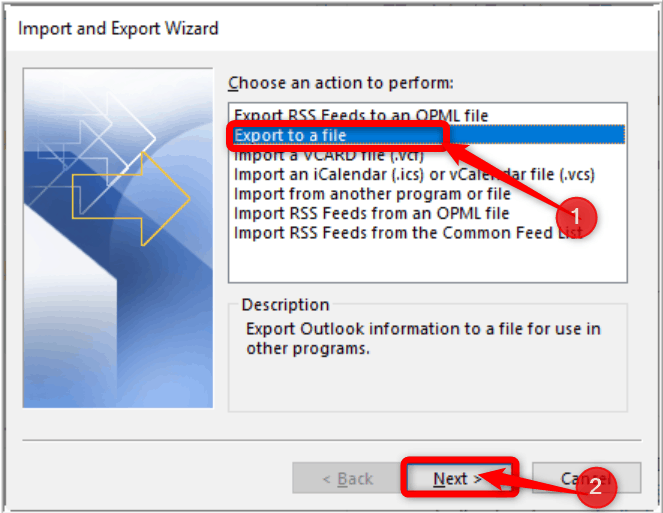
Step 5: After that, the Import and Export Wizard will open and ask you to ‘Choose an action to perform’ from a list of several options
Step 6: Select the ‘Export to a file’ option and click on the Next button below
Step 7: Now, on the Export to a File window, you will have to create a specific type of file. Click on the option Outlook Data File (.pst).
Step 8: Again, click on the Next button there to continue with the process
Step 9: Then select the folder from where you want to export. Simply click on the files inside the folder that you are looking to export.
Step 10: Select the Next button right below the window.
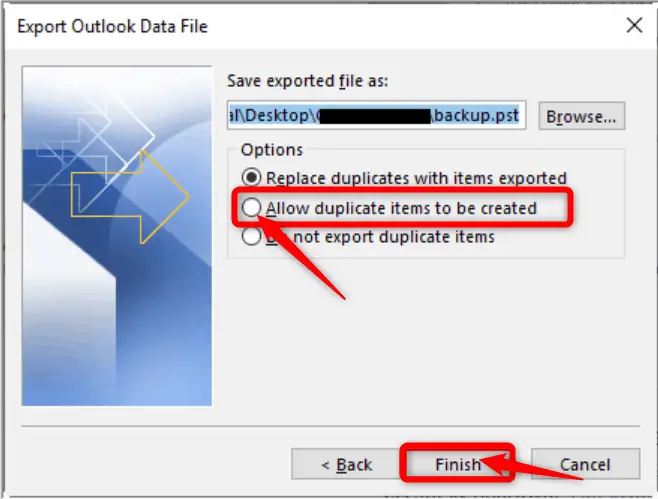
Step 11: Finally, select the Allow duplicate items to be created option and hit the Finish button below
Once the process completes, you can access the files at the location you have saved them.
Conclusion
That’s all, amigos! Hope you have found the article insightful. It’s clear that Stellar Converter for OST is the best way to convert OST to PST on Windows. It’s easy to use, enriched with advanced features, and offers the perfect solution to recover data from an orphaned/inaccessible OST mailbox. I would give it a rating of 4.5/5 and a big thumb’s up!

