We all undergo some Windows 10 based problems every now and then. Many of the problems are basic bugs which have some quick fixes available on the web which can be easily applied. But some problems are quite irritating as their roots are difficult to find. One of such problems is slowing down of your operating system. A slow system is overall underproductive and difficult to handle. There can be a number of reasons for that to happen. The most probable reason behind this is the high CPU usage.
There can be various applications installed on your system which might be causing the high CPU usage. This can be prevented by simply decreasing the priority level of the application or removing the application from the system if not required. But sometimes, the high CPU usage is caused by some built-in system service which is enabled by Windows 10 itself. One of such services is “Moden Setup Host” in Windows 10.
Table of Contents
What Is Modern Setup Host?
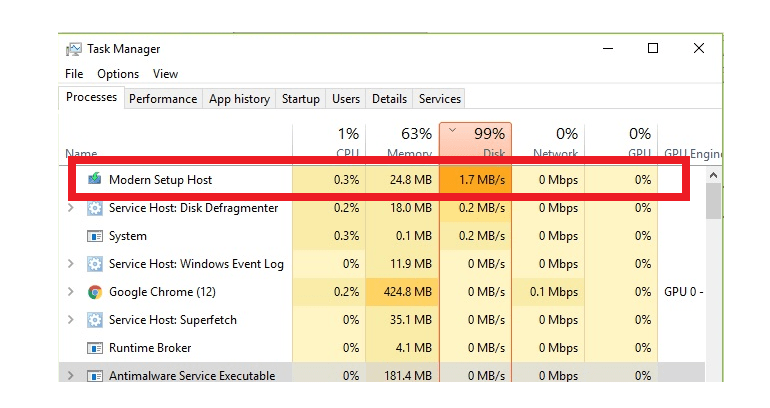
Modern setup host is a service in Windows 10. This service is started by the “setuphost.exe” file which is designed to control the RPC during the download and installation of Windows 10 updates. It is activated automatically during any update and begins to consume system resources intensively. Modern setup host is also needed to run some programs and basic Windows components.
It is clear that if you see the process of “modern setup host” in your task manager, you should be assured knowing that this is not any virus or threat to your system. Ideally, Modern setup host should only consume up to 20 or 30% of your CPU while the installation of Windows updates. But, many users have reported Modern setup host running at all times consuming around 90 to 100% of CPU usage. Thus, causing all other processes in the system to slow down.
Can We stop Modern Setup Host?
Yes, It is possible to stop the process from task manager temporarily but it is not a permanent solution for the problem. The process of utilizing high CPU resource could be an indication that the process is not successfully executed, Hence causing some other issues in the future. Therefore, We will recommend you to try out stopping the process temporarily and let it run again at the time of boot to check if the problem is resolved before taking any further action.
To stop Modern setup host, simply follow these steps:
-
- First, Open “Task Manager” by pressing “Ctrl+Shift+Esc” consecutively.
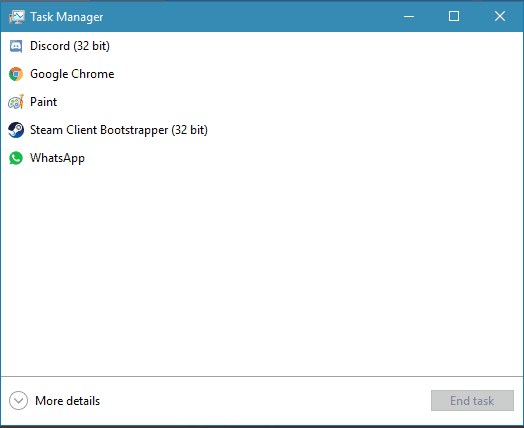
- Now, Click on “More details” option.
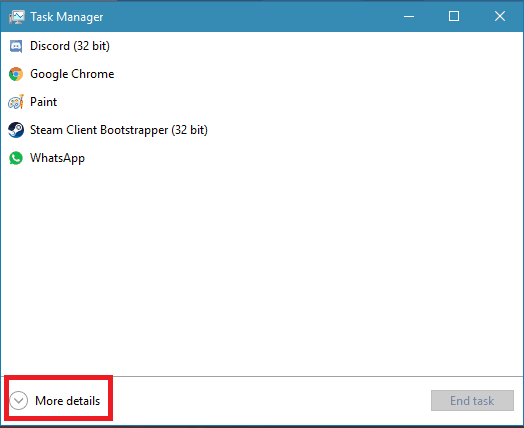
- Now, You will see detailed information about running processes.
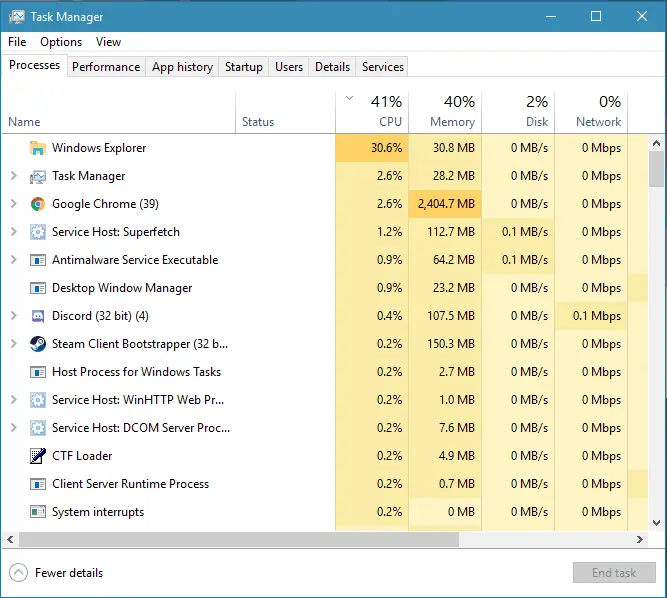
- Now, find “Modern setup host: in the list of running processes. Considering the High CPU usage, it should be the first process in the list.
- Now, select “Modern setup host” and click on “End task” button provided in the lower right corner.
- This will terminate the process.
- Now reboot the system.
- First, Open “Task Manager” by pressing “Ctrl+Shift+Esc” consecutively.
After rebooting, the process will run again. But, if the issue was caused improper execution, it’ll be probably resolved now. Let the process run for some time. If the problem is resolved, it will automatically disappear from the task manager.
Can We Delete Modern Setup Host?
Deleting a system service can cause a lot of troubles in the future. Windows 10 operating system operates in a dependent manner i.e., the services are dependent upon various other smaller services to work properly. If a user happens to delete a system service, it will cause some other services to fail. This will result in the occurrence of some pretty serious problem in the operating system which can be hardly resolved, making the re-installation of the operating system the option.
Still, It is not entirely impossible to delete modern setup host service. This process basically deals with the Windows update. Hence, It will probably be repaired or reinstalled when your operating system receives another system update. To delete the “Modern setup host”, you must locate the source of the service first. The service can be found by following the path “C:\$Windows.~BT\Sources\folder”. Once you have located the service’s executable file (Modernsetuphost.exe), simply delete the file. You might have to end the service first from task manager before deleting it.
Once you have deleted the service, restart the system to check the status of the problem.
How To Fix Modern Setup Host High CPU/High Disk Usage [100% Usage]
There are multiple proven fixes for this problem. All you have to do is follow the step-by-step instructions provided below for each solution, and your problem will be fixed very soon. You just need a little patience and some spare time.
Various methods to Fix Modern setup host high CPU/high disk usage are as follows:
Method 1: Run the Windows Troubleshooter
Microsoft has provided a very significant tool along with Windows 10 called “The troubleshooter”. As the name suggests, the troubleshooter can detect any anomaly in the system and find a solution for that online. The troubleshooter will suggest a proper remedy for the problem and sometimes, it will apply the fix itself. You can use the Windows troubleshooter to fix the Modern setup host high CPU/Disk usage
To use the troubleshooter, follow these steps:
- Press windows key to open the start menu.
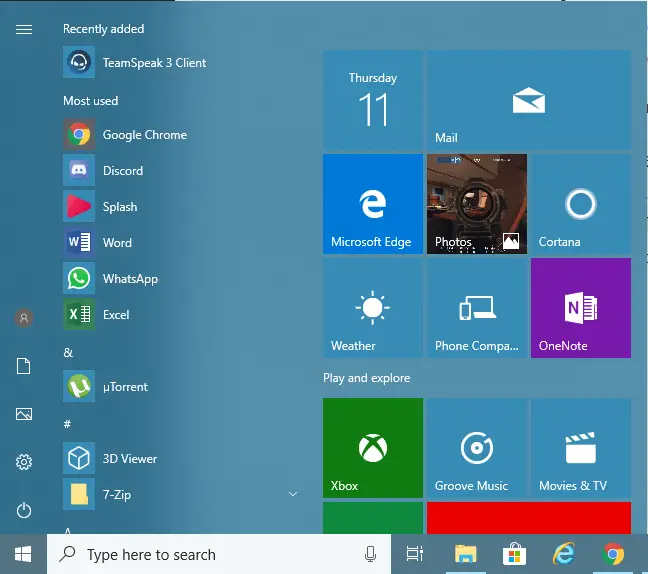
- Now, type “troubleshoot” in the search bar. Click on the first result as shown in the image below.
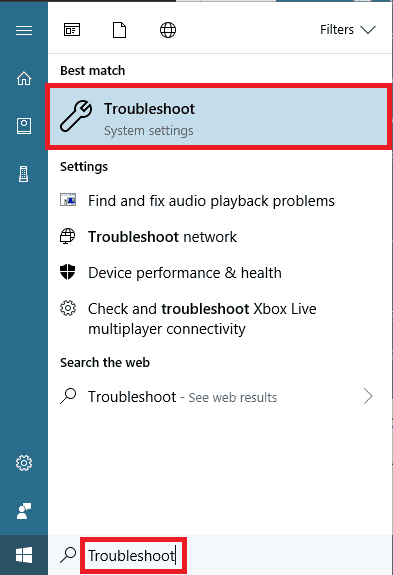
- This will open the Troubleshoot window. Now, click on the “windows update section”. Then select “Run the troubleshooter” option.
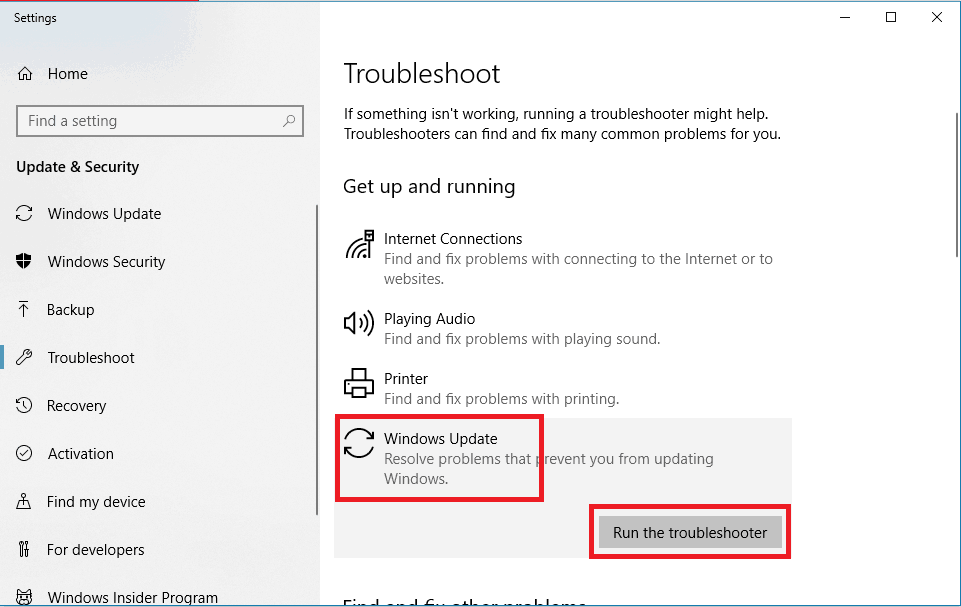
- Now, the troubleshooter will run and detect any possible error in the system.
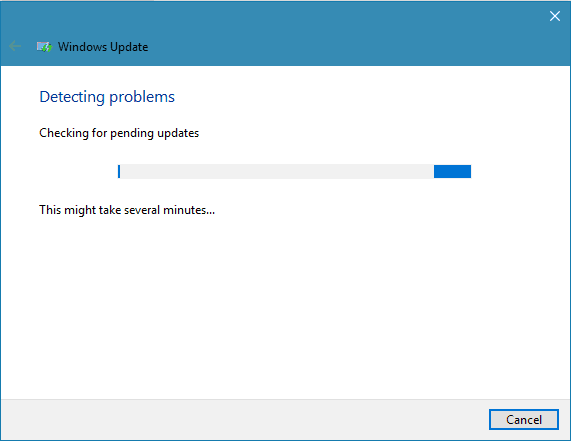
- You must wait patiently while the troubleshooter works. After a few minutes, you will receive the notification from the troubleshooter about the possible fixes.
- Simply follow the on-screen instructions to fix the problem.
Method 2: Performing a DISM scan on the system
You can also resolve this error by simply executing a DISM scan by executing some commands in the command prompt. DISM is built in tool to scan and repair corrupted or missing system files. To solve the problem using the DISM scan, follow the steps provided below:
- Press “Windows Key” and type “Cmd”. You will see the command prompt pop up at the top of the list. Right click on the “Command prompt” and select “Run as administrator” to run the command prompt with administrator privileges.
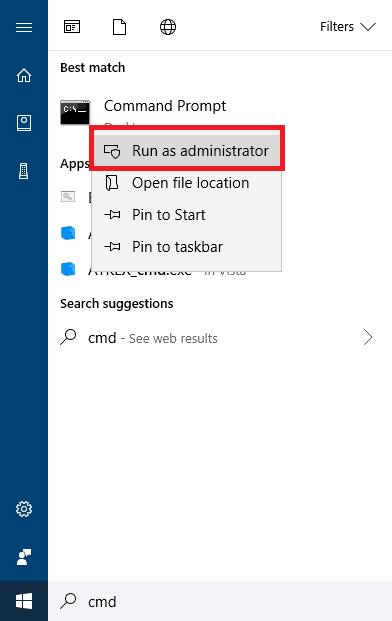
- Once you have done this, the command prompt will open.
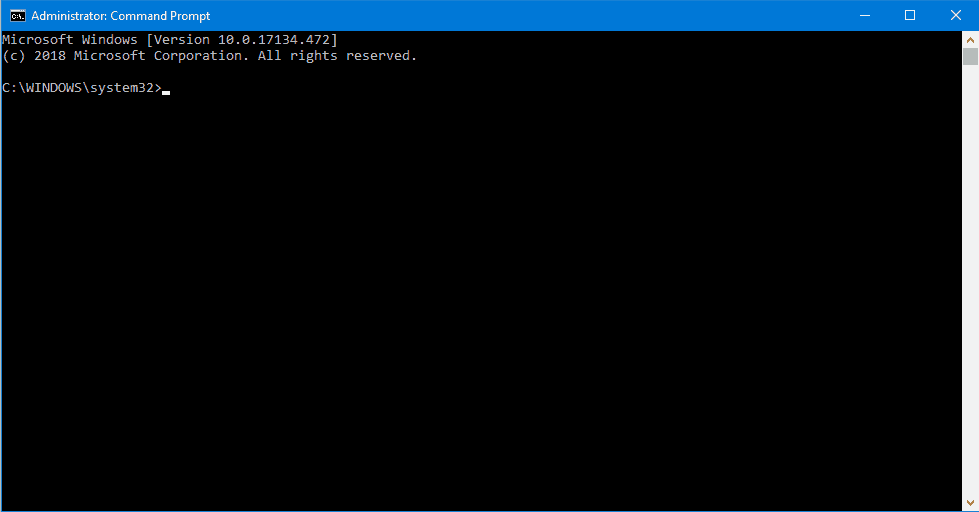
- Once the command prompt is opened, enter following command and press enter key.
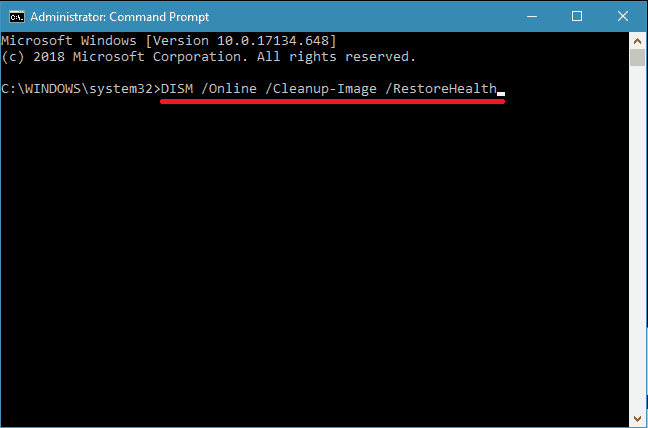
Command – *DISM /Online /Cleanup-Image /RestoreHealth* - This will initiate the DISM scan. This scan will examine all the system files for errors and will resolve them automatically. This process generally takes around 20 minutes.
- Once the scan is finished, check the status of the error, If the error still appears kindly proceed with the later solution.
Method 3: Performing a Clean Boot
A clean boot will certainly help you in such situation. There is a chance that some or multiple third-party programs are interfering with the modern setup host service, causing it to stick in a loop. This can be prevented by performing a clean boot. A clean boot will eliminate all the unnecessary applications and it will boot the system with only windows services and programs. So that, Modern setup host can easily update the programs.
To perform a clean boot, simply follow these steps:
- Press “windows key + R” to open the run window. Type “msconfig” in the empty space and hit enter.
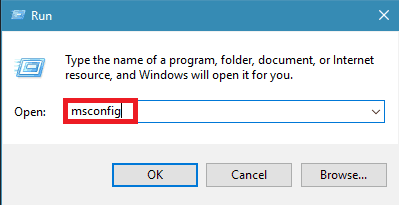
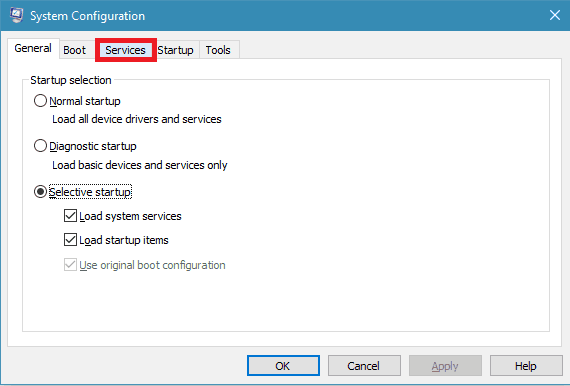
- This will open the system configuration window. Now, once the window is opened, click on the “services” tab
- Now, make sure you have selected “Hide all Microsoft services” option. After that, click on “Disable all” option.
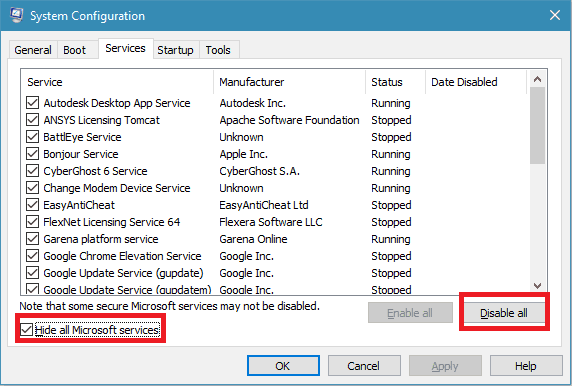
- This will disable all the unnecessary services.
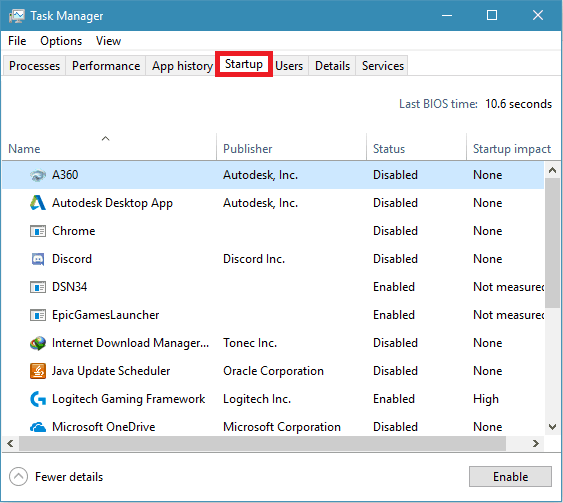
- Disable unnecessary services from task manager “startup” as well.
- Now reboot the system.
- Once the system is rebooted, let the process run for a while to check whether the issue is resolved or not.
Method 4: Setting up the default system language
In many cases, windows update fails to install properly due to the default language problem. If the default language is not one of the languages installed on your system, the update process will fail to complete. To resolve the problem, you must simply check and reset the default language of your system.
To check your system’s default language, follow these steps:
- Press “Windows Key” and type “Cmd”. Right click on the “Command prompt” and select “Run as administrator” to run the command prompt with administrator privileges.

- Now, once the command prompt is opened, you have to enter the command – *dism /online /get-intl* and hit enter. Once the command is executed, you will see your system’s default language.
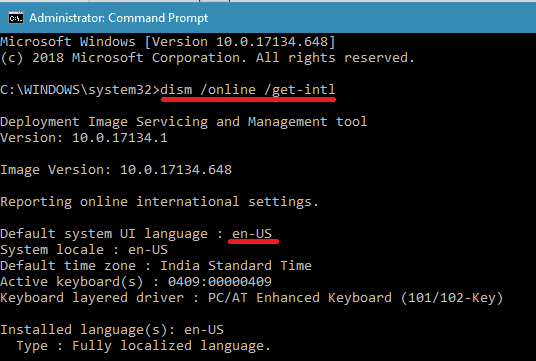
Now, to reset your system’s default language, follow these steps:
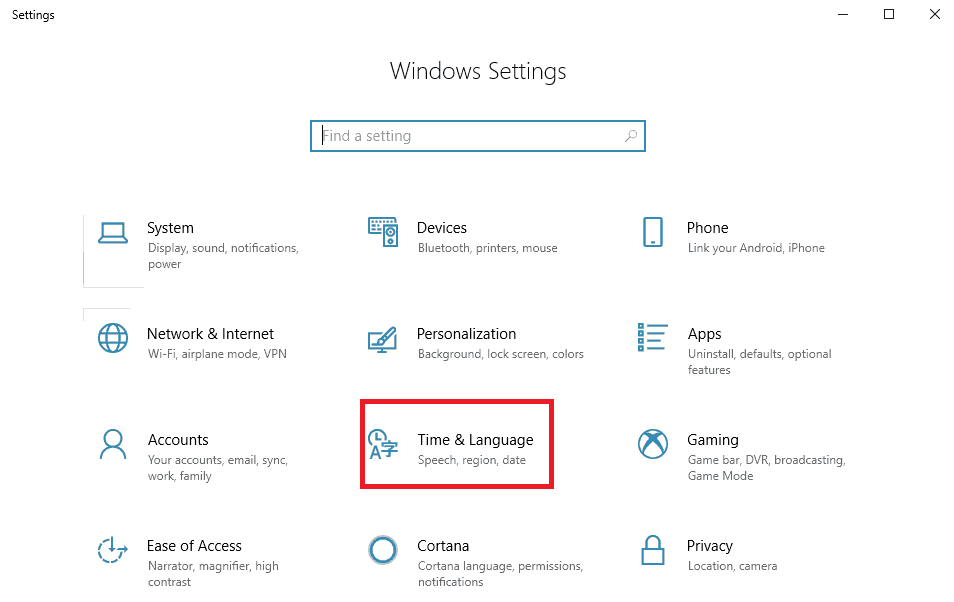
- Open windows setting by pressing “Windows key+I”. Select “Time and Language” category.
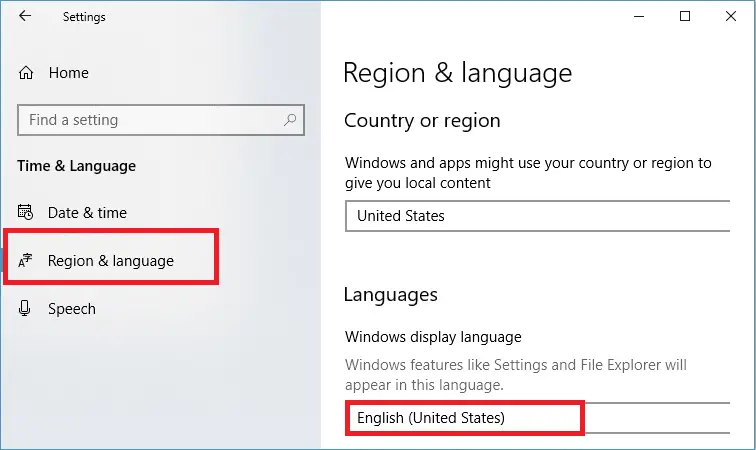
- Now, select “Region and language” option. In the next window, make sure that displayed language is the same as the default system language.
- Once the language has been reset, restart the system for changes to take effect.
- If the origin of the problem was the default language of the system, it will be fixed after the reboot.
- To make sure the problem does not appear again, keep the display language same as the system default language.
Checkout how to fix dismhost.exe high cpu and disk usage.

