Programs on Windows 10 run on the basis of how the CPU is set to function. Sometimes your Windows 10 computer might slow down for programs like your browser and more and this happens when the processor is not able to decide which programs to prefer in terms of performance. Many background processes take up a lot of CPU resources which means foreground apps will face slowdowns.
In this post, we will show you how to set CPU functionality to prefer foreground apps on Windows 10. This can be done easily using two different methods. One method includes editing your Registry and the other one is through Control Panel. Windows 10 provides us with seven priority levels – Real-time, High, Above Normal, Normal, Below Normal, and Low.
Let’s get started with the tutorial and see how to change the CPU priority levels to prefer foreground apps. We have two main routes to do this.
- By Changing Settings Through Control Panel
- By Editing Registry
- Manually Setting Priority Using Task Manager
Optionally, we can choose to set priority for specific programs using the Task Manager which we have covered in the tutorial as well.
Set CPU Priority using Control Panel
We will be using Control Panel to set the CPU priority. As mentioned above, this will help you get a better performance on your Windows 10 computer where you want foreground apps to be more responsive. All you need to do is follow the steps given below.
- Open the Start Menu and type Control Panel.
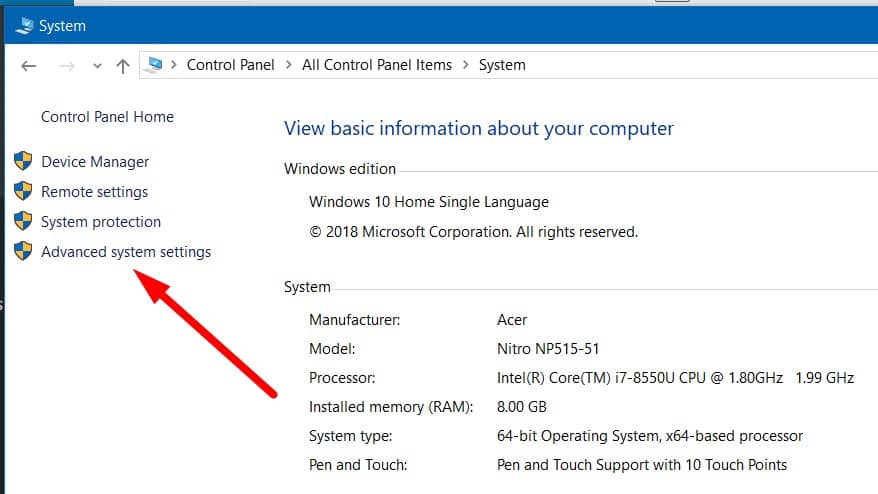
- After you have opened the Control Panel, just look for an option named System.

- Clicking on the System icon will open up a new window showing you information about your computer.
- Go ahead and find an option named Advanced System Settings on the left side of the window.
- A new window will open up where you will be able to modify a bunch of system settings.
- In the Advanced tab, look for the first option that says Performance and then click on Settings.
- Another Window will open up where you will be able to see new set of options to change the way Windows 10 works on your computer.
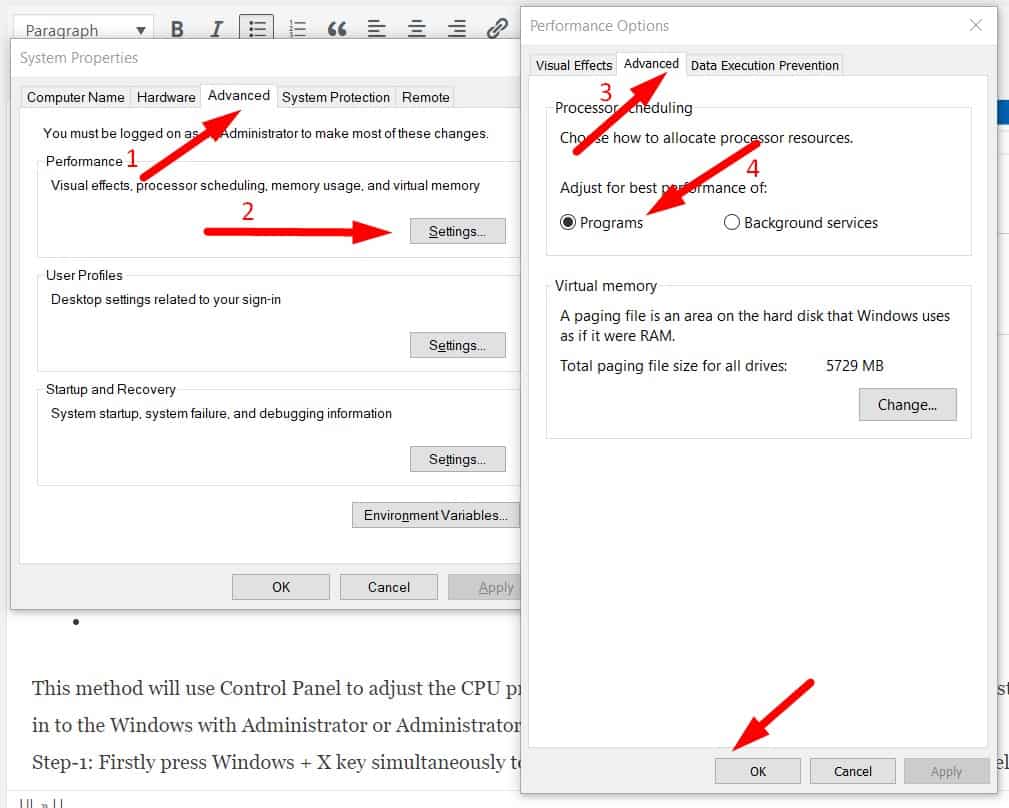
- Switch to the Advanced tab in the new window and then click on the Programs options.
After you have selected the Programs option, click on the Apply button and then click on OK. This is all you need to set the CPU priority for foreground apps. Restart your computer and start using your computer normally.
Now that we have taken a look at the Control Panel route, we can move on to the method that requires editing the Registry.
Set CPU Priority using Registry
Registry on Windows OS keeps track of all the configuration data for apps on your computer. A lot of third-party programs and Windows programs save their configuration in Registry and keep in mind that only use this method if you know what you’re doing. It is always better to take a backup of your registry in case something goes wrong and you need to restore it.
Follow the steps listed below to take a backup of your Registry.
- On your keyboard, press the Windows key + R simultaneously.
- You will see that the Run dialogue will open up and in this box, you need to type “regedit” without the quotes.
- Press ENTER and then click on Yes when a prompt comes up.
- Registry Editor will now open up.
- The next step is to click on the File option and then click on Export.
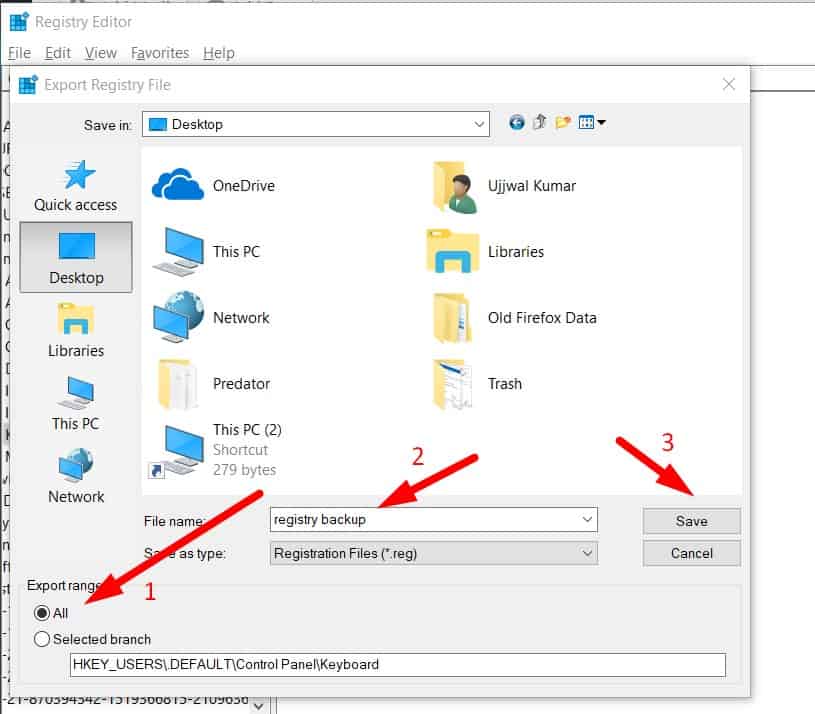
- In this new Export window, you need to click on All in the Export range and this will make sure that all the registry entries are backed up.
- Give a name to your backup and then click on the Save button.
This will make sure that you have a backup of your current registry in case you need to restore it later. Now that we have backed up the registry, let’s move on to the main list of steps you need to take in order to set CPU priority on Windows 10 for foreground apps using Registry.
- Open the Registry Editor if you don’t already have it opened. Use the Windows key + R key combination in order to open Run dialogue.
- Type in “regedit” without the quotes and then press ENTER.
- Click on Yes on the prompt that comes up and the Registry Editor will open up.
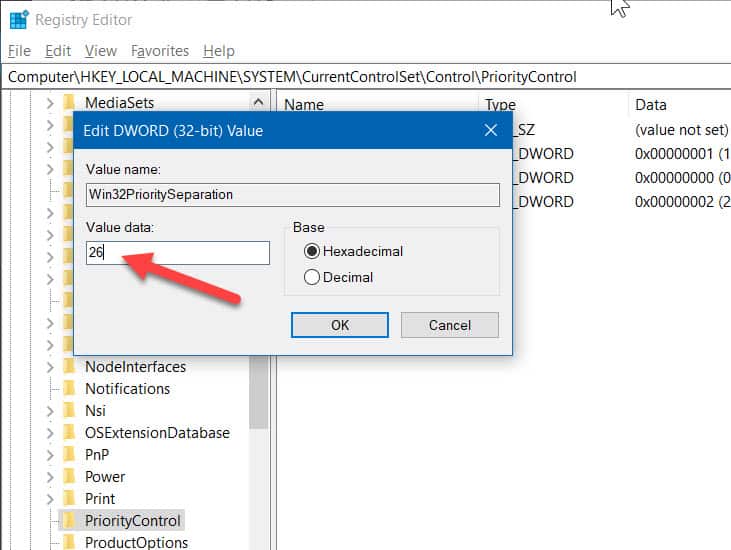
- Now browse to the following path where we will change values.
HKEY_LOCAL_MACHINE\SYSTEM\CurrentControlSet\Control\PriorityControl

- When you browse to the mentioned path, find the option name that reads Win32PrioritySeparation and then double click it.
- A new window will open up where you will be able to modify the value for that option.
- Now keep in mind that there are a specified set of values that define the priority. The default value is 2.
- To change the value in order to set CPU priority on Windows 10 for foreground apps, change the value to 26 and then click OK.
After you have changed the value, just restart your computer and your foreground apps will have the priority when it comes to CPU resources. One thing that you might want to know is that changing the value to 18 will result in background apps being prioritized for CPU resources. So, if you want to do the same for background apps, then change the value to 18.
Manually setting priority using Task Manager
When you set the CPU priority to foreground apps, the apps running in the front, for example, Google Chrome will be prioritized by your CPU when it comes to CPU utilization. Now, this will improve the performance by a slight margin but it also has the chance to destabilize the system and make it function in a glitchy manner. You can avoid this by manually setting the priority for the app using Task Manager.
- Open the Task Manager by pressing the Ctrl + SHIFT + ESC key combination.
- Move to the Details tab and look for the app that you want to prioritize.
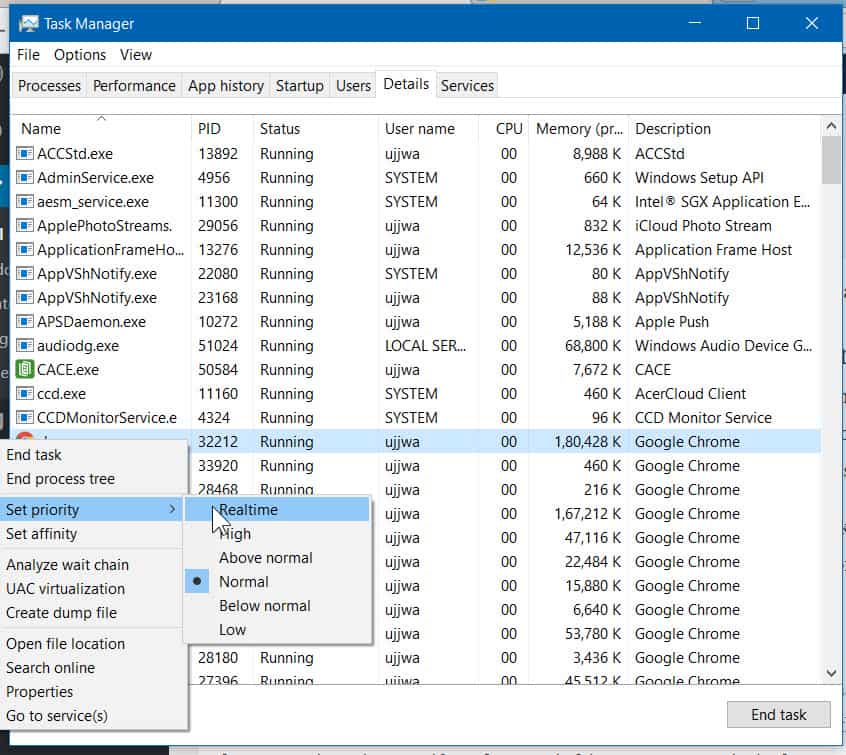
- Right click on the app and then move to Set priority > Realtime/High.
- You can choose between High and Realtime depending on your needs.
This is one way of manually setting the priority of chosen apps. But as mentioned above, changing the priority might make your system a little destabilized but now that you know how to change it, you can change it back to default when you want.

