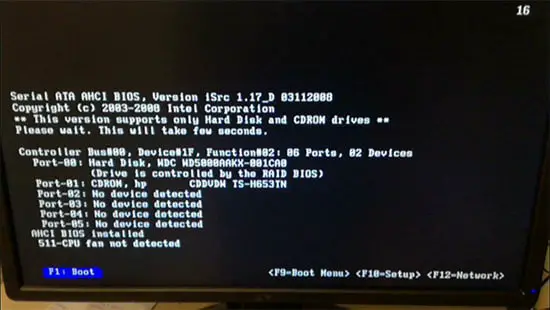
Occasionally, HP Windows laptop users face an issue that depicts that their internal CPU fans are undetected or malfunctioning. After restart, the boot menu depicts ‘511-CPU fan not detected’ and ‘F1. Boot’. For efficient heat dissipation and CPU health, a CPU fan is quite significant. Hence, it is recommended not to use your PC or laptop without an internal fan operating smoothly. Hardware issues pertaining to the CPU fan lead to this error. But few system settings can also arouse this error during the boot process.
Table of Contents
What Causes 511 CPU Fan Not Detected Error
Let’s first know the causes for this error and then jump to the solutions.
1. Dust and Dirt in Fans
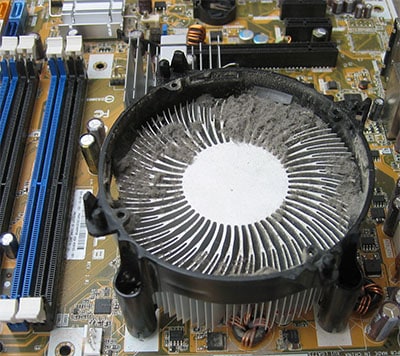
Usually, fans are the most susceptible components to performance degradation due to dirt or dust. With the accumulation of dirt or dust within the fans, it becomes harder to spin them. Also, this accumulation prevents heat from escaping because of the clogged airways between the rotors.
The CPU fans must be cleaned if you notice an accumulation of dirt and dust. This risk can be fully avoided by regularly cleaning with using compressed air. If the CPU fans are extremely dirty or dusty to clean appropriately or the accumulation led to other damages then consider replacing them.
2. Physical Damage
In certain cases, the culprit can be the visible damage in CPU fan, heatsink, fan rotors, motherboard, or any connectors. It may be harder to perceive but these physical damages can prove to be a major cause for this error. If you encompass the CPU and its fans in a case then they are less prone to physical damage. Electric surges can happen due to physical damage. In such cases, you need to substitute the faulty components.
3. BIOS Settings
BIOS regulates the fan speeds on the motherboard of most contemporary computers. The corresponding settings can be adapted to set custom fan speeds. So, you can adjust the speed of the CPU fan. The issue occurs when you tweak the settings without knowing. So, it is vital to check that your BIOS settings are not preventing the CPU fan from running.
4. Insecure or Loose Connection of Internal CPU fans
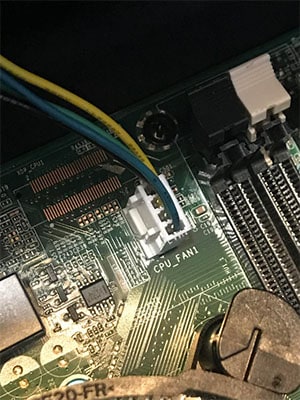
To make sure your CPU fan works properly, it must be securely connected to the CPU and motherboard. Occasionally, the cables are improperly connected right from the beginning. This can lead to‘511-CPU fan not detected’ message appearing immediately after you boot the computer.
In certain cases, a few external forces may lead to cables getting disconnected. For example, your CPU tower gets knocked over or bumped. Whatever the case is, the cable should be functional and fully connected to supply power and proper direction to the CPU fan.
5. Poor Power Supply or Faulty SMPS
Because the motherboard delivers power to all the peripherals and fans of the system, it requires sufficient stable power from a PSU. This is to ascertain that everything works efficiently. But if the motherboard is not receiving adequate power, it cannot power your CPU fan. This problem can be avoided by using a high-quality motherboard that boasts powerful battery performance. In short, the battery must be powerful enough to deliver efficient charge output.
Solutions to Fix ‘511-CPU fan not detected’ Error
1. Fix Dusty or Dirt Internal CPU Fans
The accumulation of dust and dirt can pose a serious threat to the functioning of PC components. It can significantly weaken performance and also deteriorate the components’ lifespan. A huge accumulation of dust near the heatsink and CPU fans’ motors can jam them as well as negatively influence heat dissipation. Try the below fixes.
1. Use a can of blower or compressed air to spray on the dusty regions of the CPU. Doing this will fully eliminate dust around the heatsink and CPU fan’s rotors.
2. Now connect the system and boot it without locking the side panel.
3. Check whether the CPU fan is moving or not.
4. If the issue persists, try other fixes discussed below.
Notes.
- When cleaning the CPU fans, ascertain that they are not spinning otherwise they can damage the fans and other components.
- Only use compressed air because other chemicals or liquid can damage CPU fans and in some cases CPU itself.
2. Inspect For Physical Damages
1. Open the PC case and analyze the components around the CPU fan.
2. Find out which components are damaged without discarding any components.
3. If the damage is insignificant like a light scratch then it would not case the‘511-CPU fan not detected’ error.
4. If there is damage to the motherboard or fan rotors or heatsink, you have to substitute the components.
5. For components’ replacement, check if the product is still under warranty or not, and then contact your manufacturer.
6. After you get the replacements, install the new components and restart the computer.
7. If the physical damage is the culprit, the error message will disappear.
3. Reset BIOS Settings to Default
During startup, BIOS settings in your PC carry out the test on computer hardware consisting of CPU fans. This test is carried out to ensure that everything is working correctly. The custom settings can lead to a situation where the internal CPU fan cannot be detected. Thus, resuming the BIOS setting to default can solve this error.
The simplest and safest approach to resume your BIOS settings to default is to change it from the boot menu. Here are the steps to reset your BIOS settings.
1. Press the Win + I key to open the Settings app.
2. Select ‘Updates & Security and then click on ‘Advanced Options’.
3. In ‘Additional Options’, click on ‘Recovery’.
4. Now click on ‘Restart Now’ from the ‘Advanced Startup’ section.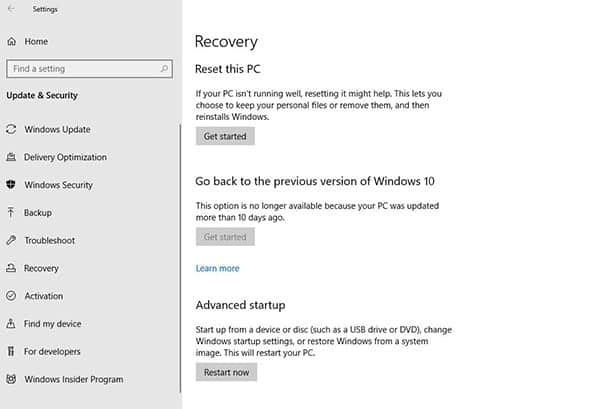
5. Now when the PC restarts, a blue screen will be displayed as below. It has multiple options, click on ‘Troubleshoot’.
6. Now select ‘Reset’ in the ‘UEFI Firmware settings’ from the Advanced Options tab.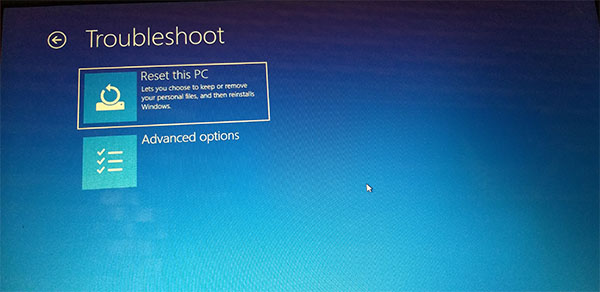
Now your PC will reboot with its default settings. If the ‘511-CPU fan not detected’ error is due to BIOS settings then the error message will disappear.
Note. BIOS screen may be different based on the PC you use, so you need to find the ‘Reset to default’ option. Once you choose that option, reboot the PC to check whether the error is solved or not.
Alternate Method to Open BIOS Settings
This method provides you access to BIOS settings during boot. Based on the manufacturer, you might have to press a different key when the startup occurs, to access BIOS settings. Most commonly, it is F2 or F12. Now find the ‘Reset to default’ option in the BIOS settings and then reboot your device and check if the error is solved or not.
4. Fix Weak or Lose CPU fan connections.
If any cables of the CPU fan are connected to an inappropriate socket of your computer or it is loosely connected then you cannot detect the CPU fan. In that case, the ‘511-CPU fan not detected’ error will be shown.
Weak connections can lead to several other issues too. Hence, make sure the cables are completely flush with the motherboard. If the cables are properly connected yet they are not working then they may be faulty.
Follow these steps to fix insecure or weak CPU fan connections.
1. Turn off the PC and unplug it.
2. Now reconnect the cables after making sure they are secure.
3. Restart the PC and monitor the CPU fan to check whether the error is resolved or not.
5. Ensure the Motherboard Battery is Charged.
To ensure the good health of the motherboard battery, make sure it has a charge. Keep in mind that every motherboard does that differently. Hence, you need to contact your manufacturer to verify the same. If it is low on charge or not at all charging then you need to replace it.
If none of the discussed methods worked, contact the support for your relevant OEM. Instead, you can order and set up a replacement CPU fan temporarily.

