In the task manager of Windows 11 or 10 OS, you can observe that the WaasMedic Agent Exe procedure loads the hard disk drive to 100% usage. This is because you are using a hard drive with outdated technology. To eliminate this issue, you can replace your hard drive with an SSD and it will offer a performance boost. But if this is not feasible then the following article familiarizes you with how to resolve the high disk usage caused by WaasMedicAgent.exe. Before diving deep into the solution, let’s first understand what Waasmedic Agent Exe is:
Table of Contents
What is WaasMedic Agent Exe?
WaasMedic Agent Exe (also known as WaasMedic.exe) is an essential Update component operating as a background service on Windows 10/11. Initially, it was incorporated in Windows 10 to manage the installation of the updates. Moreover, it ensures that all components related to update stay healthy and secure. The key idea behind the inception of this service is to make sure Windows Update runs without errors. If you have manually disabled the Windows Update service then WaasMedicAgent.exe begins working automatically.
Unfortunately, few users complained that the operation of WaasMedic.exe leads to high usage of system resources i.e. up to 100%. This process may clash with external hard drives or USB drives when they are connected to the PC. In some cases, third-party or anti-malware software forces WaasMedic.exe to create compatibility issues. Irrespective of the cause, the issue will not fix itself. Moreover, WaasMedic Agent Exemakes your system sluggish due to excessive usage of memory, disk, and CPU.
Now let’s get into the details of various solutions to this issue:
How to Fix WaasMedic Agent Exe 100% Disk Usage?
Solution 1: Pause updates
If you encounter errors during the installation of updates in the update center, it is recommended to pause them to make sure the WaasMedic Agent Exe process doesn’t work every time. You can fix the WaasMedic Agent Exe issue by pausing Windows update settings.
Follow these steps to pause Windows updates for 365 days:
Step-1: From the Windows Start menu, open Settings and then open Update & Security.
Step-2: In the window shown, navigate down to the right panel till you get the ‘Advanced options’.
Step-3: Open the ‘Pause Updates’ section and click on ‘Select Date’.
Step-4: After the drop-down list is shown, choose a particular date to delay the automatic updates.
Note: You can disable Windows 10 update maximum for 365 days. Keep in mind that when this setting approaches its expiry date, your PC needs to receive the latest update before it could be paused again.
Solution 2: Disable Windows Update Medic service
This solution is a temporary one because WaasMedic Agent Exe is a significant system process accountable for the functioning of update services. It is not advisable to disable it for a long period if you want Windows updates. If disabled manually, an error message showing ‘access denied’ will be shown.
Follow these steps to temporarily disable the Windows Update Medic service:
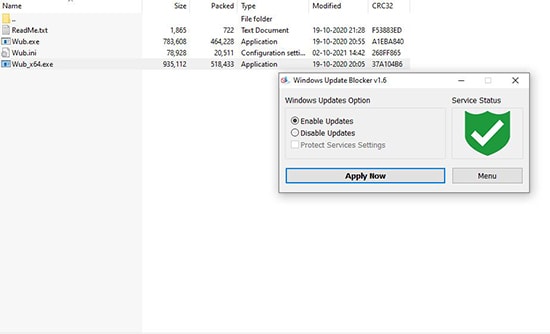
Step-1: Firstly, download Windows Update Blocker from the below link: https://www.sordum.org/files/download/windows-update-blocker/Wub.zip
Step-2: Unzip the downloaded file at a desktop or any convenient location.
Step-3: Now find the Wub_x64.exe file within the folder and run it.
Step-4: Set ‘Disable updates’ and then uncheck ‘Protect service settings’.
-From the services, you will see that the windows update medic service is disabled. If you want, you can enable it anytime.

Solution 3: Disk Cleanup
Nearly all Windows versions come with the Disk Cleanup feature. It simplifies the process of deleting redundant files and saves space.
Follow these steps to perform Disk Cleanup:
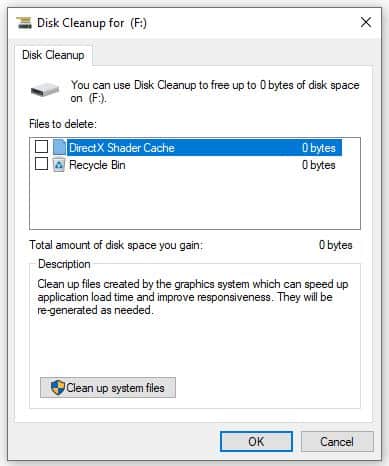
Step-1: Open search by pressing the ‘Windows + S’ keys. Type ‘Disk Cleanup ’and choose the first option.
Step-2: Choose the drive on which Windows has been already installed and then click on ‘OK’ to continue.
Step-3: Now click ‘Clean up system files’ option and then click ‘OK’ to begin the disk cleanup process.
The above steps delete broken registry items, so after following these steps, check if the WaasMedicAgent.exe issue is resolved or not.

Solution 4: Unplug external devices and update the drivers
If any external device like a USB drive or hard drive is connected to your PC, first remove them. Now check whether the resource consumption has changed or not. These types of compatibility problems might have arisen due to obsolete or missing drivers. Therefore, it is vital to ensure all devices installed on the PC are equipped with new drivers. For proper configuration, drivers are vital. They offer a steady connection between your OS and hardware. Updating drivers can be either done manually or through a utility tool for a quick solution.
Follow these steps:
Step-1: Firstly, right-click on the Start Menu button and then choose ‘Device Manager’.
Step-2: You must update all available devices. If anything is marked with a yellow triangle, you must update.
Step-3: Right-click on the driver and then choose ‘Update’.
Step-4: Now follow the on-screen instructions to allow Windows to look for new drivers and download them.

If you prefer to update drivers through a utility tool then one of the best driver update utilities is Driver Booster from IObit.
You can download it from the following link: https://www.iobit.com/en/recommend/dbfree.php
Solution 5: Deactivate or delete third-party software:
Third-party software such as antivirus can cause compatibility issues. Typically, it takes place because of firewall settings that supervise all processes throughout your system and occasionally blacklist legal ones. Therefore, it is better to disable antivirus and check whether the WaasMedic issue still persists or not. If the antivirus is the culprit then you must add the WaasMedic.exe service to the white list in your antivirus settings. Alternatively, you can install some alternatives to your existing antivirus.
You can scan the PC for redundant or malicious software that may cause this issue. It is good to use anti-malware software by Malwarebytes because it is efficient at detecting and discarding potentially harmful programs. You can download Malwarebytes from the below link: https://www.malwarebytes.com/lp/sem/en?AFFILIATE=70192&__c=1
Note: Any third-party software which you installed from the web Internet can cause conflict in Update settings. Remember what you have recently downloaded from the web and try deleting it.
Solution 6: Disable WaasMedic.exe from the Registry Editor
If any of the above solutions didn’t work, the last solution you can adopt is disabling WaasMedic.exe through the Registry Editor. It is completely safe if you disable the WaasMedic.exe service. It is useless to delete the WaasMedic.exe because it is a native Windows service so your Windows system can reinstall it anytime. Follow these steps to disable it:
Step-1: Open the Run dialog box by pressing ‘Windows key+R’. Now type ‘regedit’ in the search box and open it.
Step-2: If prompted, click Yes in the ‘User Account Control’ window.
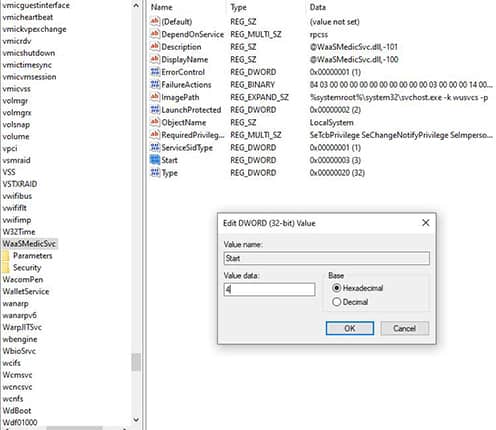
Step-3: From the left side of ‘Registry Editor’, you need to navigate to the below path:HKEY_LOCAL_MACHINE\SYSTEM\CurrentControlSet\Services\WaaSMedicSvc.
Step-4: Click on ‘WaaSMedicSvc’ to view a list of entries across the right pane.
Step-5: Right-click on ‘Start’, select ‘Modify’, and type ‘4’ in ‘Value’ data.
Step-6: Click on ‘OK’, shut down the window, and finally restart your PC.


