When you buy a new computer, you must move your old files to the new system. Copying folder by folder, file by file is tedious. Fortunately, you can use Clonezilla to clone your entire drive to a new drive. Cloning disks with Clonezilla is fast, easy and, most importantly, completely free. In this article, We will tell you how you clone your Windows 10 drive using Clonezilla and a USB drive.
Table of Contents
What is Clonezilla?

Clonezilla is a free, open-source program for cloning disk images. You can use Clonezilla to back up your system, create clones of disks, and more. In addition, it supports a huge range of file systems, as well as multiple downloaders, encryption, etc.
Note that in order to clone a Windows 10 drive, your second drive must have the same or greater capacity compared to your current storage. For example, if you want to clone a drive that uses 60 GB of memory, the destination drive must also have at least 60 GB for full cloning.
How to Download Clonezilla For Windows 10?
First things first, you need to download Clonezilla software on your PC. To download Clonezilla, Follow these steps:
- Go to the Clonezilla download page. Switch “Select File Type” to ISO

- Click the “Download” button.
- Install the program just like any other program.
How to Clone Windows 10 Using Clonezilla
1. Create A Bootable USB Drive With Clonezilla
To create a bootable Clonezilla USB stick, you need a 4 GB USB stick (Preferably more). You will also need the handy, small Rufus bootable USB drive.
(Please note that creating a Clonezilla bootable flash drive will completely erase all existing data on your USB, so proceed carefully.)
Here is what you need to do:
- Go to the Rufus homepage via the link given below
https://rufus.ie/

- Download and install the latest version of Roofus.
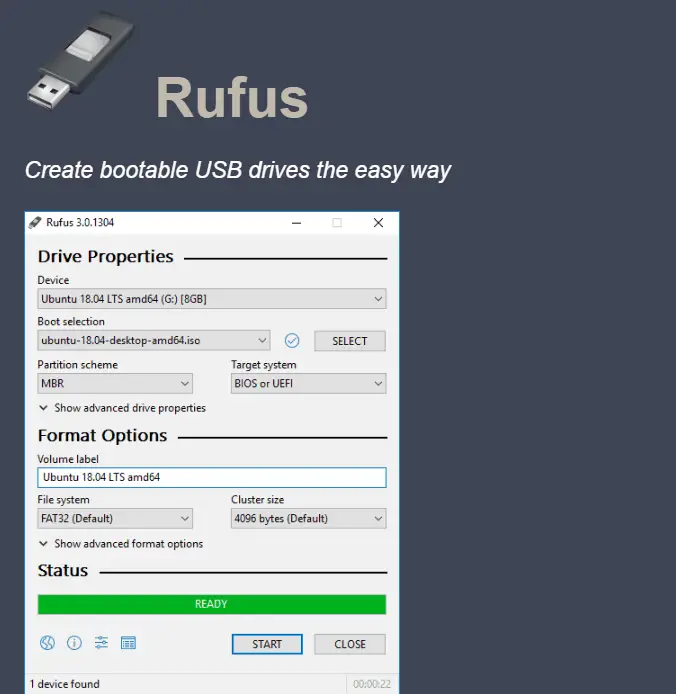
- After installation, open Rufus. Be sure to insert a USB flash drive beforehand.
- Select the USB drive in the “Device” section.
- In the Boot selection section, press SELECT.
- Go to the Clonezilla ISO download folder and click “Open.”
- Rufus will automatically enter the correct parameters to create a bootable flash drive. Change the volume label to something more memorable if you want.
- When ready, press START.
- This process usually takes around 5 to 10 minutes. Be patient and do not open any other program while this program is running.
- After Roofus is done, you should connect a second hard drive to your system and make sure that it works with your system.
2. Reboot Your System Into Boot Selection Mode

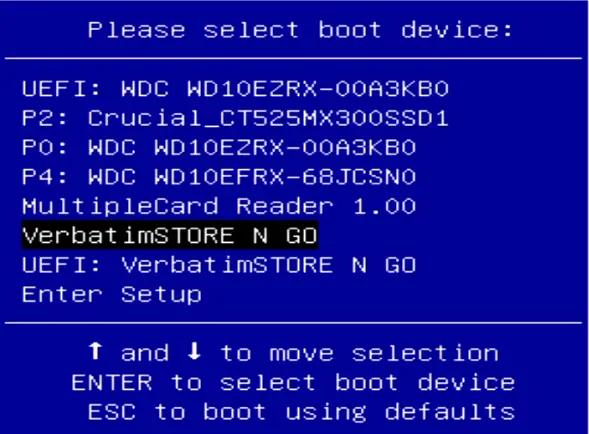
Now you need to reboot the system in boot selection mode. The easiest way to do this is to reboot the system, and then press the boot menu select button. (F10 in most cases.)
If you are not sure which button to press, You can find the boot menu key for your brand of Motherboard.
Once you are in the Boot Menu, Select the Bootable USB drive that we have created earlier.
In some systems, you cannot access the boot menu that easily. Instead, you have to access the boot selection menu from the UEFI firmware menu.
To do that, press and hold the “Shift key” and click Restart from the Start menu. This combination opens the Advanced Launch Menu. From here, you can select Troubleshooting>Advanced Settings>UEFI Firmware Settings. When the UEFI firmware menu opens, you need to find the “Boot options”.
3. Setting Up Clonezilla
After downloading Clonezilla, you have several options. Select Clonezilla Live (Default Settings, VGA 800 × 600). Now, wait while the Clonezilla user interfaces loads. You will have to choose the keyboard language and layout. When you get to the Clonezilla screen, select “Launch Clonezilla”.
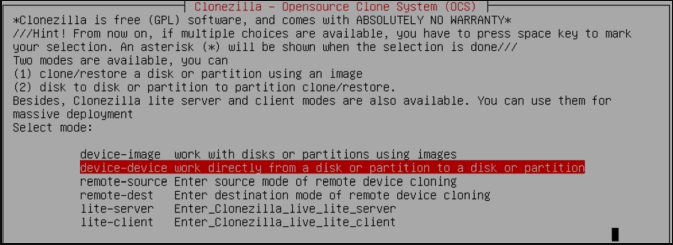
You now have the Clonezilla settings screen. At the moment you need to know only two of the six options:

- device-image: make a copy of the device (for example, your hard disk) onto the disk image.
- device-device: work directly with your device (for example, a hard disk) to make a copy directly to another form of storage.
The first option helps you create a disk image of the storage device of the device you are currently working with. The second option helps you make a clone of the device’s storage that you are currently working with by copying it directly to another form of storage. Since we are cloning the drive, select the second option, device-device. And then the Beginner mode. Other parameters allow you to define additional parameters. You do not need these options at this time.
Now you have two more options to choose from:
- disk to local disk: Clone the current disk to another local disk (for example, a second hard disk).
- part to local part: clone a disk partition to another local disk partition (a process that also uses your second hard drive).
4. Clone your disk to a local disk
Now you enter which drives Clonezilla should clone. Clonezilla is a utility for Linux, so drives use the Linux naming convention. This means that your main partition, which is your main repository, will use the name “sda” and your second drive will be defined as as “sdb” and so on. You can also cross-reference discs using their size.

On the second screen, select the storage to which you want to copy. Remember that the local disk from where you are copying must be smaller than the second disk.
Now choose what you want Clonezilla to do after the cloning process is complete. You have three options:
- choose: Keep Clonezilla operational after the process is complete.
- reboot: restart Clonezilla after the process is complete.
- poweroff: turn off Clonezilla as soon as the process is complete.
The final step is to copy the local disk bootloader. If you are making a copy of the Windows 10 drive and want it to boot, type Y and press Enter.
That’s it. Now you can clone a Windows 10 drive using Clonezilla. You can also restore this clone of the disk using the same process. The beauty of using Clonezilla is that you take a clone of the entire drive without leaving anything. As long as you have enough disk space, Clonezilla will always do the job.

