What is Hamachi?

A lot of users require VPN service for various purposes. It can be any of the following such as viewing country-restricted content or Securing the privacy of connection. There are hundreds of different VPN services that can provide you the private and secure connection you require. Hamachi is one of such services.
LogMeIn Hamachi is a VPN service which lets you tunnel your entire system by simply masking your LAN connection. This service is helpful for multiple purposes like Gaming, Web browsing, Downloading Etc. There are a bunch of fancy features that Hamachi provides such as On_Demand Networking, Management of networks, Centralised software deployment, Unattended Access, Etc. Hamachi service is not entirely free of cost service. It is a paid VPN service which can be used for free for a limited period of time. The basic plan starts at $49/Year ranging up to $299/Year depending on the network requirement.
Check out – Best VPN for Torrenting.
Table of Contents
Hamachi Service Stoped?
Even though it is a paid service, it runs through a Windows client which is not entirely perfect. Many users reported the error “Hamachi Service Stopped” popping which renders the VPN service useless. There are some cases where the error would go away after a simple reboot of service but would appear again out of the blue. Mostly, the error occurs while the service is being used, Making it one of the most annoying problems of a regular Netizen. As a user who has paid for a certain service, not being able to use the service can get quite frustrating.
In this article, We have collected all the possible reasons behind the error and proven solution to repair the problem. Make sure to read the article until the very last to completely resolve “Hamachi Service Stopped” error.
Read : Fix Internet Explorer has stopped working.
Reasons Behind Hamachi Service Stopped
There can be multiple reasons which might be causing the error. Some of the common reasons are listed below:
- Lack of Administrative Privileges: As it is a VPN service, it deals with Windows Network System which requires Administrative privileges. It is possible that Hamachi does not have Administrative privileges in your system which is stopping the service from working properly.
- Improper Configuration of the service: This issue is the most common issue amongst various VPN services. The VPN service requires proper network configuration at the time of the first launch. Any mistake in the primary setup can render the service useless.
- The Windows Management Service: All the services running on Windows 10 are dependant on a parent service known as “Windows Management Service”. Hence, This service must always be running to prevent any mismanagement amongst other services.
- Third-Party Antivirus services: There are some third party antivirus services which have very strict policies against VPN services. As some VPN services can potentially harm your system, Antivirus Softwares tend to interfere with their operation in order to protect the system.
How to Fix Hamachi Service Stopped error?
There are a handful of solutions which have proven to fix the “Hamachi Service Stopped” problem. The solutions are mentioned below. Make sure you go through the solutions carefully and step-by-step. We hope that you will be able to use the Hamachi service once again once you have finished reading this article.
1. Run Hamachi service as Administrator
This might look like a pretty small change, but it can definitely resolve the issue. Before moving towards any of the complicated solutions provided below, we will insist you run the application as administrator first and check the status of the error.
To run the application as Administrator, simply right click over the “Hamachi” icon on the desktop or Start menu and select “Run as Administrator” option. If you have password protection enabled on your system, you might have to put the password to grant the permission.
To ensure that the service runs with Administrative benefits even after the reboot, simply right click on LogMeIn Hamachi.exe and open the properties. There, you can see various tabs, click on the Compatibility Tab to view the launch options. The is checkbox called “Run this program as an administrator”. Make sure the checkbox is ticked and click on Apply. Now, the service will always boot up as system administrator service, possibly fixing the problem.
Solution to Fix Display driver stopped responding and has recovered.
2. Enable the Windows Management Service
As mentioned above, Windows Management Instrumentation (WMI) must be kept ON at all times to ensure proper execution of other services. To enable the Windows Management Instrumentation service, follow the steps provided below:
- Open the Run window by pressing “Windows key + R”.
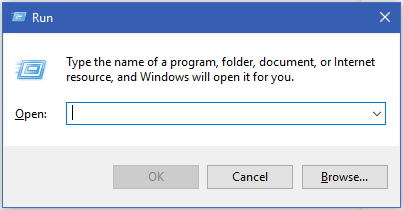
- Type “Services.msc” in the Run window and press enter.

- This will open the Services window. Here, you can see all the services installed in your system whether they are enabled or disabled.
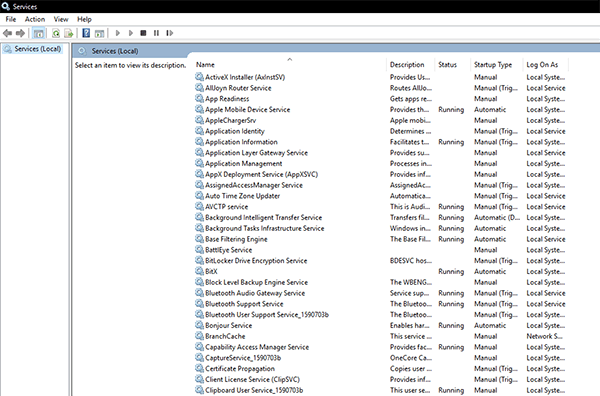
- Now, look for the “Windows Management Instrumentation” service in the list of services.
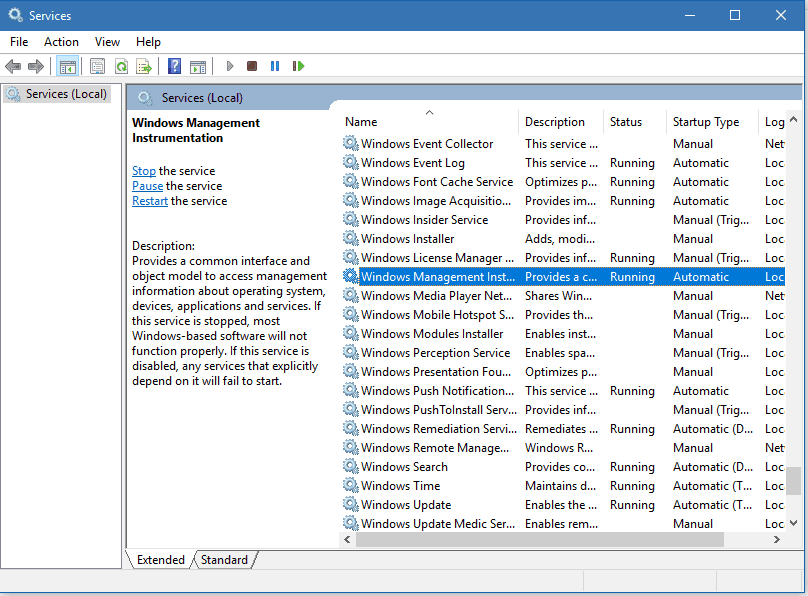
- Once you have found the service, simply right click on the service and click on properties.
- In the properties window, the startup type must be selected as “Automatic” and the Service status must show ” Running”.
- If the above messages are not displayed, simply click on the drop-down menu alongside “Startup type”. Select “Automatic” from the list.
- Now, if the service is stopped, click on “Start” and wait for a few seconds until the service starts.
- Once the service status has changed, simply click on “Apply” to save the modifications.
3. Tweak Windows Management Instrumentation Service settings
This problem can also occur if the Windows Management Instrumentation is configured incorrectly. In such cases, the Windows Management Instrumentation settings must be reset to default.
To do so, follow the simple steps provided below:
- Search CMD in WIndows 10 search bar.
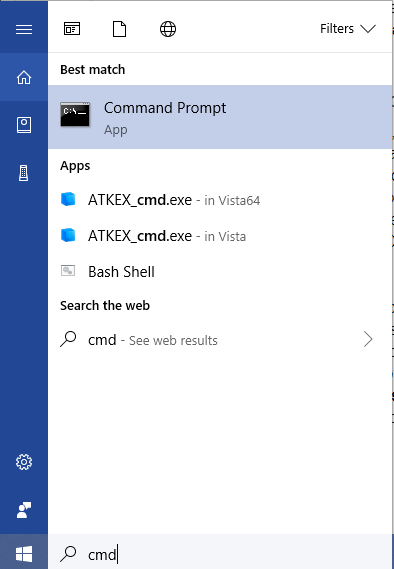
- Right-click on the Command prompt result and select “Run as Administrator”
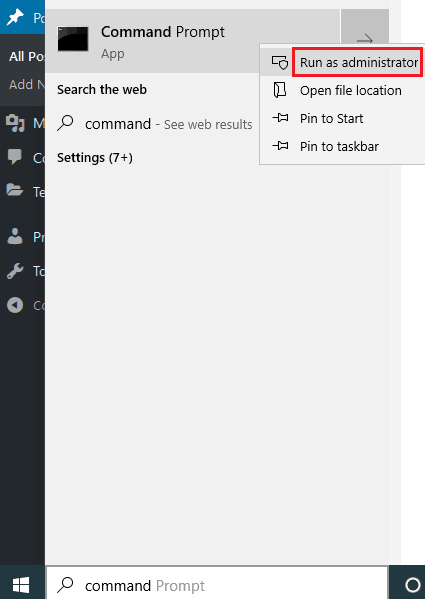
- Select “Yes” in the UAC (User Account Control) Window.
- Now, the command prompt window will open.
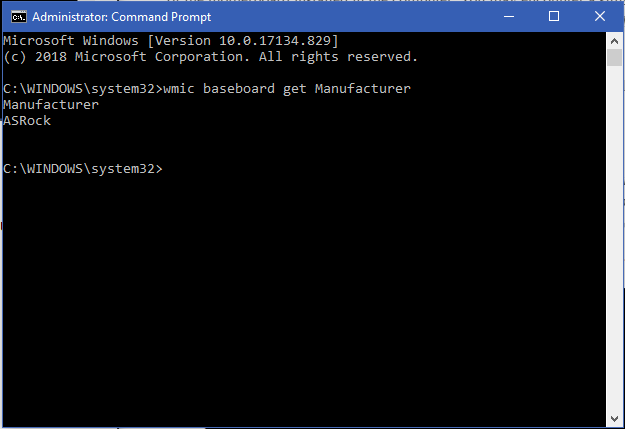
- After that, simply put this command in the command prompt and press enter.
*sc config Hamachi2Svc depend= Winmgmt/LanmanWorkstation* - Restart the system once the command is executed.
4. Reset LogMeIn Hamachi Service
The possibility of some error in LogMeIn Hamachi service itself cannot be neglected. These kinds of errors can only be resolved by resetting the service status to default. So, to reset the Hamachi settings to default, follow the steps provided below:
- Open the services window by executing “Services.msc” command in Run window.

- Once the services window is opened, look for the “LogMeIn Hamachi” service.
- Once you find the service, simply right click on the service and open “properties”.
- In the properties, first of all, make sure the startup type is set as “Automatic” and the current service status is “Running”.
- Once these parameters are checked, click on “Log On” tab.
- There, you can see an option on top called “Local system account”.
- Make sure that the option is selected and “Allow services to interact with desktop” option is checked.
- This will allow the Hamachi service to log is as local system account at the time of boot, which in turn, will resolve the problem.
5. Check Hamachi Permission Management
There is certain permission which must be granted to ensure proper operation of certain network services. This permission is “Read & Execute” permission. As the name suggests, this will allow the application to read the data and execute the required operation. Obviously, if this permission is not granted, the application cannot function properly.
To fix the permission problem, simply follow these steps:
- Head over to the default installation directory of “Hamachi” VPN service.
- Generally, it is “C:\Program Files (x86)\LogMeIn Hamachi” unless you have made changes to install directory while installing the services.
- Once you have found the installation directory, right-click on “hamachi-2-ui.exe” and select properties.
- Now, in the properties window, open “security” tab to view permission management options.
- Here, select “Users” option provided under “Group or user names” window.
- Now, once you acknowledge that “Read & Execute” permission is granted. If it is not, simply click the “Edit” option to change it.
- After making the changes, click on “Apply” to save the changes.
- Now, reboot the “Hamachi” service to check whether the service works properly or not.
6. Disable Third-Party Antivirus Software
As mentioned in the reasons. there are many Antivirus software that has strict policies against VPN programs. If you are certain that the Antivirus program installed on your system is one of those, you can try to add “LogMeIn Hamachi” as an exclusion. This will prevent the software from scanning the installation folder of Hamachi service, thus solving the problem.
If this fails, you can simply disable the antivirus program while switching on the VPS. Or you can also replace the antivirus with the default Windows antivirus called “Windows Defender”. Windows defender is quite powerful and almost similar in UI to any other Antivirus program available in the market.
How to Remove Adaware Secure Search.
7. Making automated Hamachi Launch task
One of the main reason that is causing the Hamachi service to stop can be the system terminating the service for power saving or some other reason. To fix this, you can simply create a task in Windows “Task Scheduler” which will automatically start the service when it is not running, or at the time of boot.
To do so, follow the steps provided below:
- First of all, you need to make a file which will contain the commands required to start the service. For that, simply open the Notepad as an administrator.
- In the notepad, just copy and paste the following data as it is.
net stop Hamachi2Svc
net start Hamachi2Svc
start “X:\Filepath\LogMeIn Hamachi\hamachi-2-ui.exe”
exit
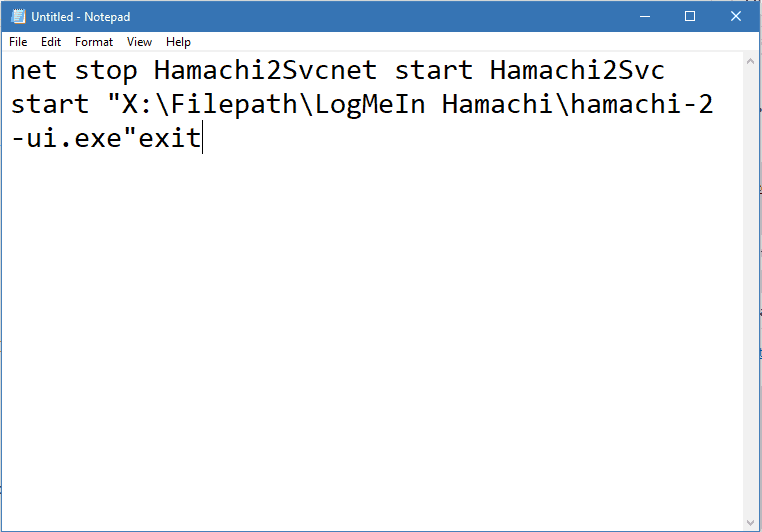
- Change the “X:\Filepath\LogMeIn Hamachi\hamachi-2-ui.exe” part of above data with your Hamachi installation directory/path.
- Once the data is pasted in Notepad, press “Ctrl+S” to save the file.
- In the “Save As” window, you must make some changes.
- First, set the file name as “HamachiStart.cmd”.
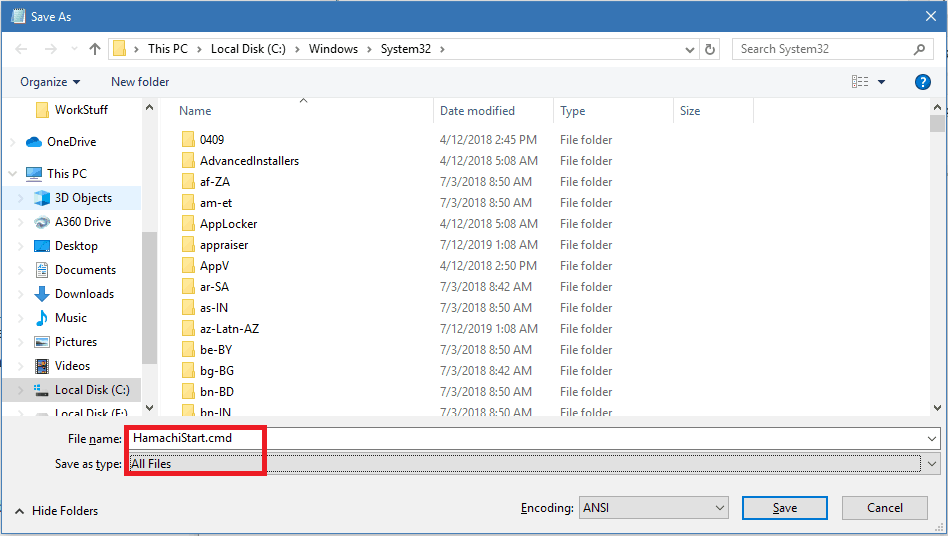
- Next, select the file type or save as type as “All Files (*.*)”
- You can save this file anywhere, but you just have to remember the path as it will be needed further ahead.
- Now, open the “Run Window” and type “taskschd.msc”.
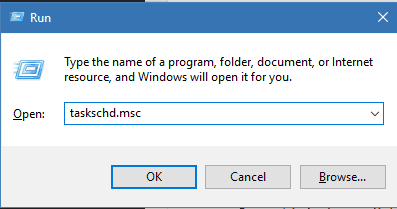
- Press enter to open the task scheduler. This is a Windows tool which allows you to create custom tasks in the system which are triggered to run at the time of boot.
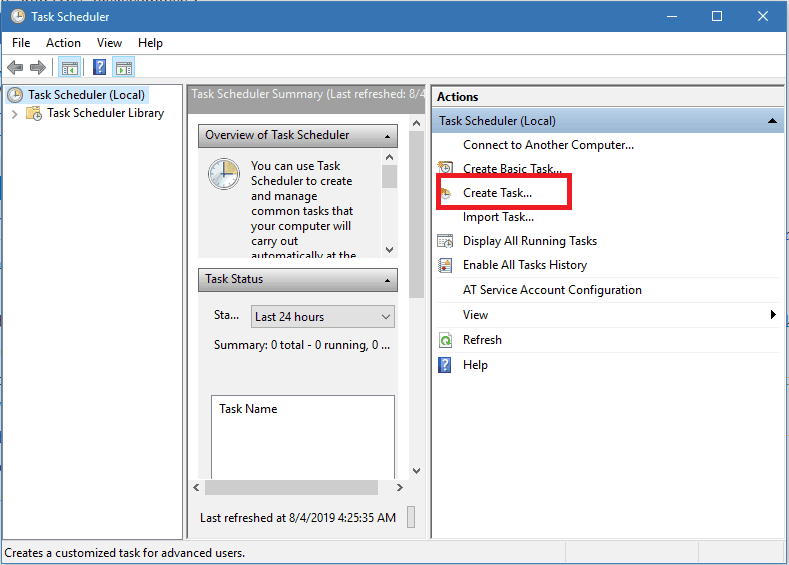
- In the “Task Scheduler” window, click on “Create Task” to register a new task.
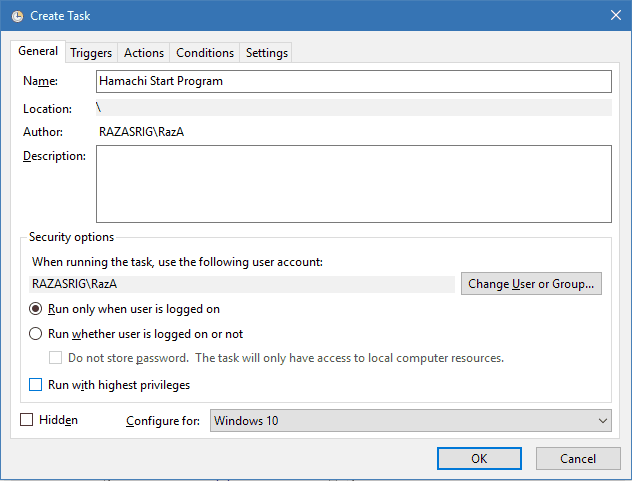
- Now, the “Create task” window will open. Here, you can set various aspects of the task according to your requirement to modify the said task.
- First of all, set the task name. For that, simply put “Hamachi Start Program” in the empty space provided in front of “Name”.
- Next, make sure that “Run only when the user is logged on” option is selected. This option is provided to prevent the application from running in the guest accounts.
- Then click on the “Triggers” tab to move on to the next phase.
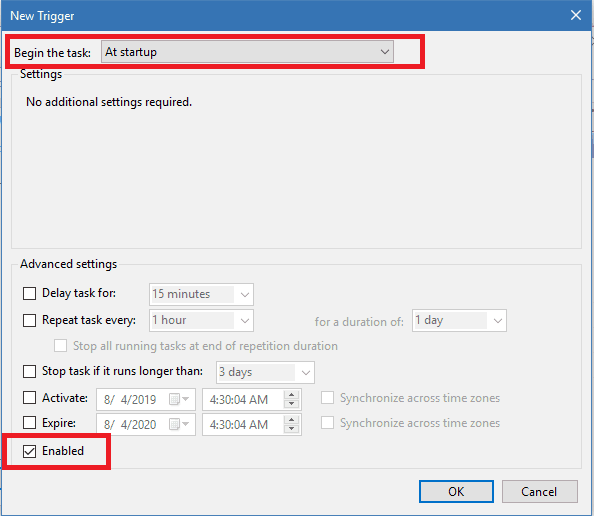
- Here, you can select when the task will be triggered/started. As we want the service to run at startup, simply select “At startup” option from the “Begin the task” drop-down menu.
- Now, in the advanced section of this page, make sure “Enabled” box is checked.
- After that, click on the “Actions” tab to move onto the next phase.
- Here, you will find a button called “New”. Simply click on that button to add a new action.
- In the New Action window, set the action as “Start a program” from the options.
- Now, you have to put down the path of the file we created earlier in the empty space provided below “Program Script”.
- Once this is done, click “ok” to close the “New Action” window.
- For the last step, click on the “Conditions” tab to set the bounding conditions of the task.
- As we do not require any specific conditions, just uncheck all the boxes and press “OK”.
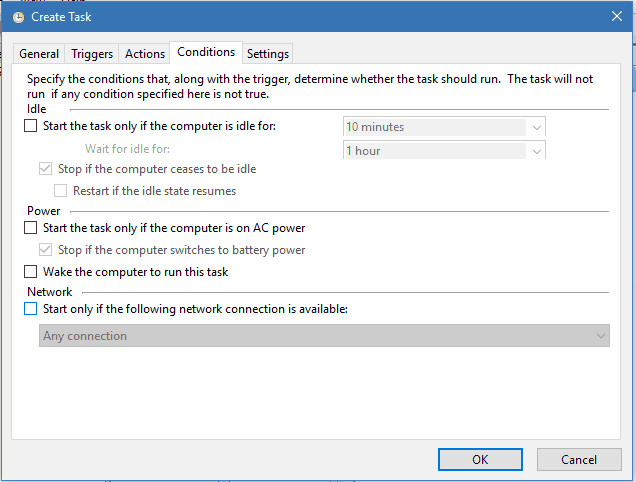
- This is it. Now, the task to automatically run the “Hamachi” service has been created and it will be triggered at the time of boot.
This is it. These are all the solutions you will need to solve the “Hamachi Service Stopped” problem. If you failed to solve the problem, make sure that you go through each step carefully and execute every command as mentioned.

