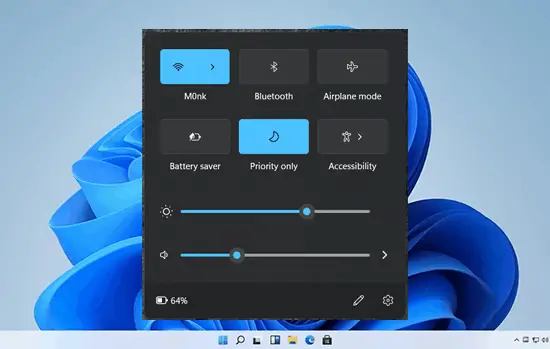
Windows 11 features Quick Setting Tiles located in the “Action Center” of the operating system that allows you to access several settings preferences instantly. It allows you to save plenty of time by making changes through the Action Center.
If you would have accessed these settings alternatively, you’d have to navigate through a lot of system settings. Microsoft has completely revamped the design of the Action Center in Windows 11. There are several major changes added to Windows 11’s quick settings tiles.
Table of Contents
While the earlier iterations allowed you to access both the Action Center and notifications at a single system tray, Windows 11 has both of these options placed separately. To access the Action Center in Windows 11, you have to click on the space where Wi-Fi, Sound, and Battery Status are located.
Windows 11’s Action Center panel is more accessible and enhanced in many ways. There are even some significant changes in the animations as well as the interface of Quick Settings tiles, which appear to be more user-friendly.
This article will help you add or remove the Quick Settings Panel in Windows 11 as per your requirements in an intuitive step-by-step manner. Therefore, make sure you keep reading to personalize your user experience in Windows 11.
How To Add New Option to Quick Settings Panel in Windows 11?
Here are the required steps that you need to follow to add the Quick Settings Panel in Windows 11:
- Access Quick Settings using the Win + A keyboard shortcut
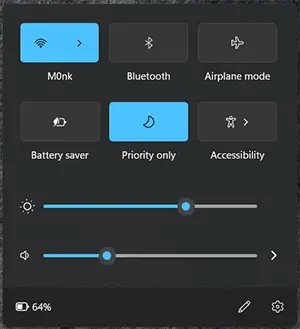
- Click on the pencil’s icon located at the bottom-right corner of the Quick Settings interface
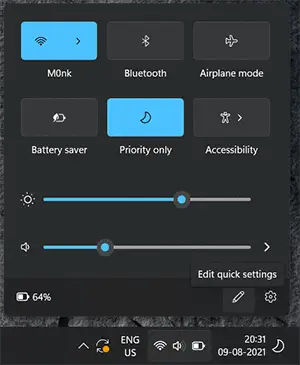
- Click on the “Add” button on the dropdown menu that appears and choose the settings that you want to add to the Quick Settings Panel
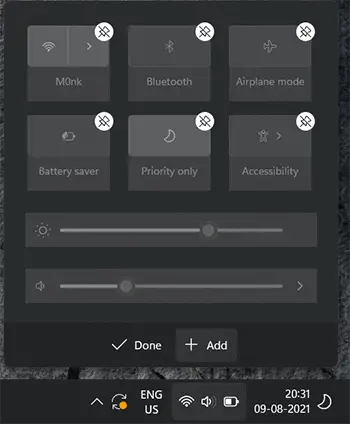
- Repeat the aforementioned steps for all the settings that you want to access through this panel
- Once you’ve added all the required options, use drag and drop actions to arrange them in your preferred order
- After you’ve completed making all the arrangements, click on the “Done” button to finish the process
And you’ve successfully added Quick Settings Tiles to your Windows 11. Now you can easily access your required settings without having to go through the hassle of navigating to particular settings individually.
How To Remove Option From Quick Settings Panel in Windows 11?
In a similar manner, you can also remove any unwanted shortcuts on the Quick Settings Panel and replace them with something of your use instead. Follow the steps given below to remove the Quick Settings panel in Windows 11:
- Open the Quick Settings Panel by pressing the Win + A keys together
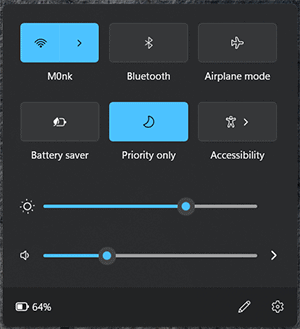
- Then, click on the pencil icon at the bottom-right corner to edit the Quick Settings panel
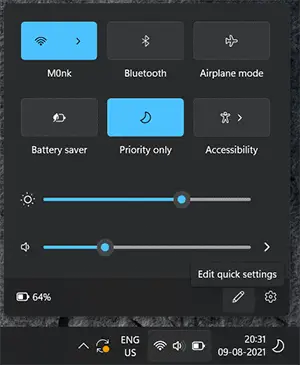
- Afterward, click on the “Unpin” button located on the top-right part of the individual tiles that you want to remove from the interface
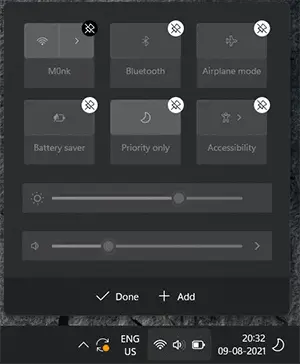
- You can also choose to rearrange the tiles as per your preferences by dragging and dropping them within the Quick Settings panel
- Once you’ve made the required changes, click on the “Done” button to proceed
It’s pretty straightforward and easy to customize the Quick Settings panel in Windows 11 as you saw above. With the aforementioned steps, you can easily remove any settings from the Quick Settings Panel in your Windows 11.
How To Fix Errors Related to the Action Center?
Sometimes, you may face issues accessing the Action Center and it may stop responding when you try launching it. In case you’re also experiencing the same error, the Quick Settings panel will also be accessible. However, you can easily solve this issue without any technical help. Here are some timeless solutions to fix errors related to Action Center and regain access to the Quick Settings panel:
1. Restart Your Computer
The first thing that you should consider trying in case you’re facing errors with the Action Center is to restart your computer. Doing this will eliminate any processes that might be causing issues with the Action Center and allow it to work again properly.
Therefore, restart your system right away and check whether the issue has been resolved or not. If the issue still persists, consider using other methods listed below.
2. Restart Windows Explorer
The Action Center is technically a part of Windows Explorer. As a result, any issue with Windows Explorer will also affect the Action Center and Quick Settings panel. By restarting Windows Explorer, the taskbar will relaunch and the issue will be likely fixed.
To reset Windows Explorer, you simply have to press the Win key and search for “Task Manager” in the input field and then launch the app. Afterward, you have to locate the “Windows Explorer” option in the “Processes” tab of Task Manager, followed by right-clicking and choosing the “End Task” option on it.
The taskbar may disappear for a while when you end the process. Next, you have to click on the “File” option on the taskbar and click on the “Run new task” option, and enter “Explorer.exe” in the input field, followed by clicking on the “Ok” button to proceed.
3. Run Disk Cleanup
Running low on storage space can also cause issues with the Action Center and prevent it from working properly. If you’re running out of storage space, you should consider running disk cleanup to get rid of unnecessary clutter in your storage drives.
To execute a disk cleanup, click on the Start menu and search for “Disk cleanup” in the input field. Then, launch the application through the search results. Now, select the partition that you want to clean and click on the ok button to proceed.
Bottom Line
With the quick settings panel, you can access all your desired settings instantly and save a lot of time. You should definitely add the utilities that you use on a daily basis on the quick settings panel to streamline your work processes. Make sure you follow the aforementioned steps properly to ensure that you can add or remove Quick Settings tiles without any issues.

