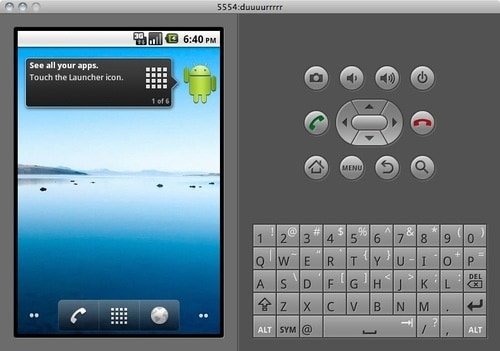
Like the iPhone OS and most other mobile operating systems, developers can typically access an emulator in order to test out apps on their computer before on an actual device. This is made possible via the SDK (Software Development Kit), which is also where devs access the tools and resources necessary to build apps. Unlike the iPhone OS SDK and Microsoft’s SDK, thankfully the Android SDK is available for both Windows and Mac.
Here’s what you will need to do to access the Android 2.2 Froyo Emulator:
1. First download the Android SDK for either Mac or Windows
2. Once you have downloaded the SDK, extract it. This will give you a list of files and folders as shown in the image below.

3. Next you will have to start the SDK manager app by opening an app or script called “Android” from within the Tools folder.
4. Now the Android SDK and AVD Manager window will appear. In the left column of this window, click the Available Packages button. Now you will be able to download the repository, which will provide you with more download options.
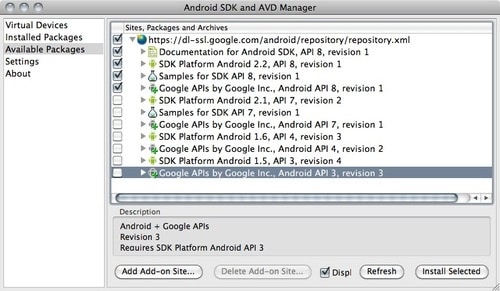
5. Once the new download list appears, you will want to select the items shown in the image below, which include some necessary resources and tools as well as the OS itself.
 6. Now you will have to navigate to the “Virtual Devices” window from within the left column of the Android SDK and AVD Manager. Once you’re there, select New on the right side of the window.
7. Now you are within the “Create new Android Virtual Device (AVD)” window, which is where you will configure your Android emulator or virtual environment. You can fill out these settings to your preferences. Keep in mind that you will want to make sure Android 2.2 – API Level 8 is selected under Target. You will also want to select a screen resolution that works best for your display.
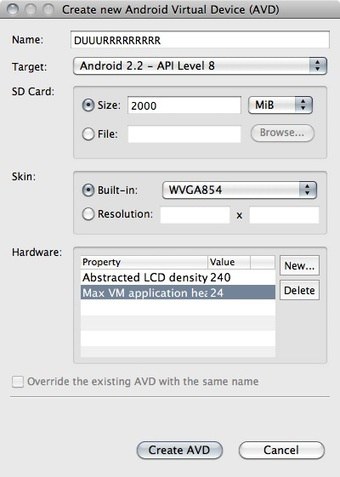
8. Once you have configured the emulator to your liking, click Create AVD and wait for the process to complete.
9. Now, from within the Android SDK and AVD Manager window you will see the emulator or AVD you have just created in Virtual Devices in the left column of the manager window. Now you can simply select the AVD you have created and click Start.
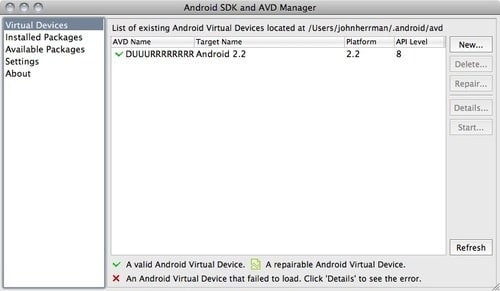
The emulator should open automatically and you will be able to try out Android Froyo!
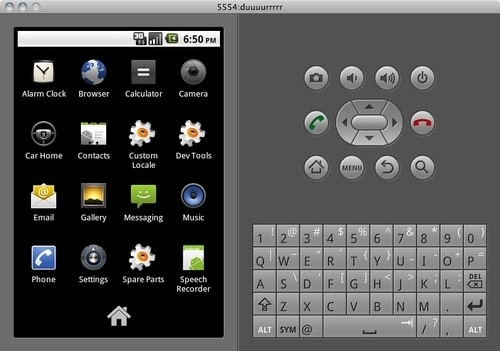
Note: This is of course an extremely early build of Android Froyo and is missing many of the components you may expect. You will not be able to run Google Maps for instance. You will also not be able to try out Flash in the emulator. However, Gizmdo notes that Google offers the following instructions for downloading Android apps being distributed independently.
1. Download a development tool called Eclipse (you want the IDE for Java Developers at this link)
2. Install the Android Development Toolkit in Eclipse
http://developer.android.com/sdk/eclipse-adt.html
3. Point the ADK to the directly where you’re keeping your Android SDK files (the same place where you extracted the SDK earlier, unless you moved it)
4. Import and run Android apps. (You’ll have to search the internet for Android apps you want to try. The file format is .apk, and many sites host them independently of the Android market.)
[via Gizmodo]


30 thoughts on “Android 2.2 Froyo SDK Emulator for PC and Mac OS X”
Everythink’s done and clear, except for the following:
“4. Import and run Android apps.”
How to import .apk Apps in Eclipse?
Thanks
ive gone through the steps, when i try to create the AVD it says error failed to create the SD card, anyone able to help me?
not interesting
Yeah, these steps are grueling. Now you can just download YouWave Android software from youwave.com site. The software let you easily run Android apps on your Windows-based PC. And it run very fast. Highly recommended.
AWESOMEEEEEEEEE
I’d love to know how to do that too.
I have the AVD started. I have .apk files available on my disk.
How do I get the AVD to load these apps so I can run them on the emulator?
Now 2.3 Gingerbread is out i am going to see if it still works and it should…
thank you! Im about to make my own virtual nexus s!
How i can zoom in?
thx 4 sharing
you don’t have enough space on your hdd (local disc c:) you should have like 3 gb free to create a virtual device
Hi, i have written a C++ MFC application which facilitates user to launch two avds and then user can browse an .apk file through my application and my app load that .apk file to both emulators…
Now my objective is that when user test that android application (.apk file) on one avd then its replica should be viewable to user in the second avd (which my application would do…)
Ofcourse i need to connect two avds…Any ideas?
only one problem it’s 2 slow how can i make it faster
Yeah, this part bugged me too. If you have a Dropbox.com account, you can drag the APK file you want to install into a Dropbox folder, then when you’re inside the Android homescreen, use it’s web browser to navigate to your Dropbox account, then you can down the APK from there, then install it like you do on your phone
Thanks for your reply. I figured out I had only 4mb free on the disk form strange reasons I wasn’t expecting this, that helped ;-)
Missing key steps in linking eclipse to adk… an update would be helpful! :) Dark
thx dude
Youwave is much much easier
and it runs Android 2.2 fine
Uninstall Oracle VirtualBox
before using youwave
ff
all i wanted was to put a hacked inotia 3 app on my phone not this is that to much to ask
The left column must have disappeared on my computer… :-s . I’m stuck at step 6, help please?
i don’t have that bar on the left
android is gr8
don’t download it, if u try to empty your trash can, u can’t because they use ADB letters in the fial.
me too! still working on it… trying to figure out how to have that bar…
Same problem here. How to solve it?
look at the tools menu the other screens can be accessed from there
I follo already finished everything but there are no apps appeared on the screen.
Failed to create Context 0x3005
emulator: WARNING: Could not initialize OpenglES emulation, using software renderer.
Failed to allocate memory: 8
This application has requested the Runtime to terminate it in an unusual way.
Please contact the application’s support team for more information.
when i start a AVD its only saying Android.. and does nothing.. what now?