 I suppose you all are aware of availability of Windows 7 Release Candidate For Public Download but there is no need to rush for download as Microsoft is allowing Windows 7 RC download till June 2009. The expiry date of Windows 7 RC is June 1, 2010. Meaning you can use Windows 7 RC for Free for one year with all updates from Microsoft.
This time situation is slightly different as compared to Windows Vista Release. Windows 7 has gained lot of popularity due to Customer Preview program and many Windows Xp users are in favor of Windows 7. So a big chunk of Windows XP users will be expecting to upgrade to Windows 7 unfortunately there is no direct upgrade option is available from Windows XP to Windows 7.
You need to perform clean installation of Windows 7 by formatting your Windows XP or install on different hard drive partition keeping XP and Windows 7 in dual boot mode. Well don’t get disappointed you can do this, first perform Widows XP to Vista upgrade then Windows Vista to Windows 7 upgrade. Does this seems lengthy process?? if yes then here is one more way to upgrade Windows XP to Windows 7. Continue reading step by step guide to upgrade from Windows XP to Windows 7.
Before proceeding for guide make arrangement for either external hard disk or USB flash drive or you can use another computer of your network.
How to Upgrade Windows XP to Windows 7
1. Download Windows 7 RC 32-bit or 64-bit
2. Burn Windows 7 RC ISO on DVD or mount ISO as drive using ISO mounting tool
3. Use Windows Explorer and Browse to the DVD drive on your computer and click migsetup.exe in the Support\Migwiz directory.

4. The Windows Easy Transfer window opens.
5. Click next and Select An external hard disk or USB flash drive.
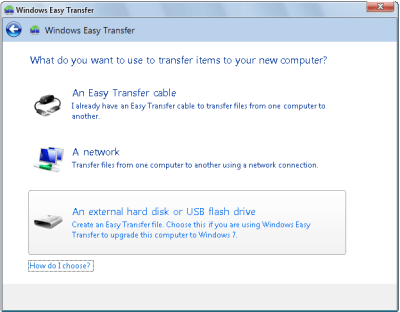
6. Click This is my old computer. Windows Easy Transfer scans the computer.
7. Once Scanning is completed customize your profile and share items to add and remove folders and files you want to include.
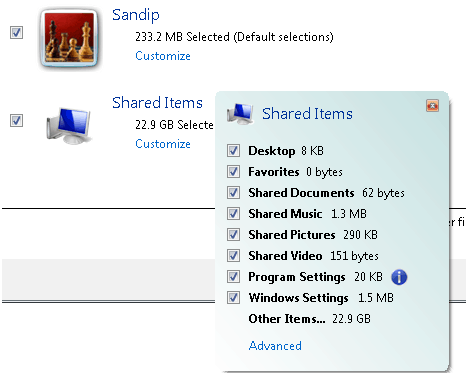
8. Click next and enter password
9. Click on Save and locate USB drive or Network location for saving Windows Easy Transfer files.
10. Start Windows 7 Setup by browsing to the root folder of the DVD in Windows Explorer, and then double clicking setup.exe.
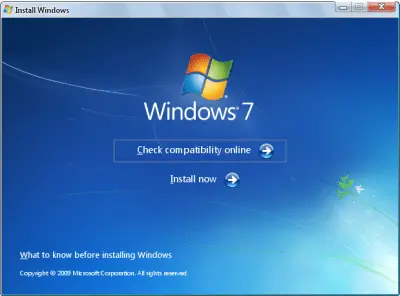
11. Click Custom to perform an upgrade to your existing Windows installation.
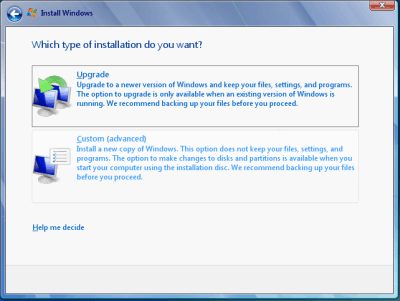
(When you perform a custom installation of Windows 7, files that were used in the earlier version of Windows are stored in a Windows.old folder. This folder can be removed once instillation is complete to recover space)
12. Select partition of Windows XP and click on Next and proceed without further interaction.
13. Once your Windows 7 Installation is complete. Boot into your Windows 7.
14. Click Start, click All Programs, click Accessories, click System Tools, and then click Windows Easy Transfer.
15. The Windows Easy Transfer window opens.
16. Click An external hard disk or USB flash drive.
17. Click This is my new computer.
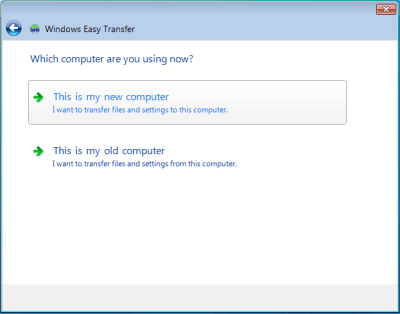
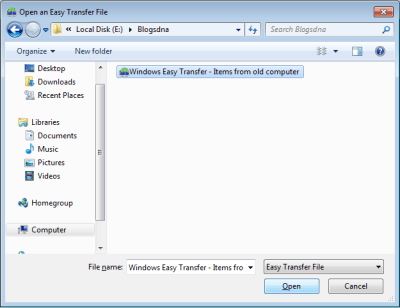
18. Click Yes, open the file. Browse to the location where the Easy Transfer file was saved. Click the file name, and then click Open
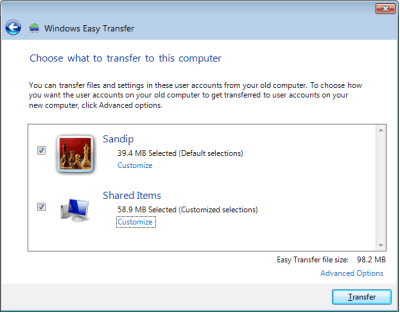
19. Click Transfer to transfer all files and settings. You can also determine which files should be migrated by selecting only the user profiles you want to transfer, or by clicking Customize.
20. Click Close after Windows Easy Transfer has completed moving your files.
That’s it We have successfully upgraded Windows XP to Windows 7
Few Points to Note:
1. Above guide will only help you in keeping Windows XP Profiles and Settings however you will need to reinstall all your programs in Windows 7
2. You can clean up all files of previous Windows installations using Disk cleanup


15 thoughts on “Step By Step Guide to Upgrade Windows XP To Windows 7”
Thank you so much. It works. Deleted my old files using disk clean up, got all my settings/bookmarks etc and win7 works like a dream now.
I am not sure how business will upgrade from XP to Windows 7 unless they do fresh install. Here are some of my thoughts about business related problems.
http://www.mwd.com/2009/07/upgrading-from-windows-xp-os-to-windows-7-is-not-possible-yet/
You can NOT call this “Upgrade Windows XP To Windows 7”
You just cannot!
Unless you preserve EVERYTHING like is the way with upgrade from Vista, this is basically fresh install of the OS with restore of data backup. Big deal, NOT!
I think i agree Joe’s comment.
There is no way in this world of IT that you call an installation derscribed above as UPGRADE. ULTIMATE TABBOO.
Refer to upgrade from windows 2000 to windows Xp for example. As long as you choose upgrade as the option to install, it stays an upgrade, on the choice of Custom installation, you are installing freshly which you can have the option of installing on another partition to preserve your old operating system.
What you did was a fresh installation and data restoration
I think the folks who complain about an “upgrade” skipped over the line where the article mentions: unfortunately there is no direct upgrade option is available from Windows XP to Windows 7.
It is no longer difficult in the business IT world to reload applications if they have a good repository in the first place.
All I care about is restoring all my data, why do I care about re-using an application when all it takes is to reinstall it? How many applications in the office do YOU use? I have a handful that I really care about and they all can be reinstalled within 30 minutes.
The point about Windows 7 is that it is compatible with older applications while it improves upon performance (this means faster performance!). It did not require for me to install any special OEM drivers on my laptop as it had all necessary drivers. Even my built-in fingerprint reader worked out great.
If you’re not “upgrading your laptop” (how about that?) from Windows XP to Windows 7, then you are really missing out on new features. Between Windows XP and Windows 7, I believe tests show that the performance was about the same but technology features differ widely.
I have been using Windows 7 for several weeks and have to say it is extremely stable, therefore, highly recommended.
I have to agree the above comments.
We have a huge installed base of Windows XP customers.
Our situation aside, Large Corporate Customers WILL NOT roll out Windows 7 without an automated, scriptable way of upgrading from XP. “Upgrade” means KEEPING user settings and Applications that are installed – A bonus would be to KEEP the configured setting on those applications as well.
The currently described upgrade, while possible on a single computer, is a total nightmare when thousands of computers are involved.
I would think we’ll be holding off recommending an upgrade to Windows 7 until a smooth, automated, path has been provided by Microsoft.
Actually, it is possible – well nearly. I followed the info here http://www.help2go.com/forum/contributors/103383-xp-win7-upgrade.html#post431517 and it worked brilliantly.
If someone could put that into a one shot disk it would be fantastic.
hi, i just tried installing win7 ultimate late nite but after the final installation reboot, the post blinked for a few seconds and went to the bootmgr is compress pres ctrl alt del..and so how do i fix that problem..i had the same problem when the last time i tried to install vista, but i dnt care about vista anymore…i just want to know how to fix this win7 problem.
ive also tried doing that cmd prompt string to fix the bootmgr but that didnt work.
please need help
I thought the term for an upgrade without a clean install was “in-place upgrade.”
In any case, I would certainly consider either option to be an upgrade. After all, there are many things that require complete replacement to be an upgrade, like if you were upgrading your CPU or video card. For an OS, you just need a more specific term for the type of upgrade you want to do.
Will this work for Windows 2000 to Windows 7?
do you mean that can removing the Keyboards ?! I have a dell window 7.
There is no need to do a clean install, I used Zinstall XP7 (http://www.zinstall.com) and it transferred not only all my files but also the programs and I didn’t have to re install anything.
I think it’s a much better solution.
You may consider to use PickMeApp instead of WETC (windows easy transfer companion ).
* WECT may transfer your XP programs and settings to Vista and supports about 100 programs
* PickMeApp may transfer programs and settings to and from XP and Vista (xp2xp,xp2vist, xp2win7, etc). They claim to support unlimited number of programs. PickMeApp may solve transferring programs from one HDD to another on the same PC.
try this is verry simple http://www.useful4you.blogspot.com
Thanks….