Wasting time and energy clicking, again and again! Doing the same task bores you out? The Chromebook has many automatic features to help you out with your tasks.
Here is complete guide about Chromebook free auto clicker. Learn how to download and install auto clicker on Chromebook.
Table of Contents
Auto clicker for Chromebook is one of them. It helps you give your fingers rest and do the necessary clicks on your behalf. It is helpful for gaming non-gaming tasks which require repeated clicks or count clicks per second (CPS). When you perform a job that requires you to click the mouse keyboard keys in quick succession, and the pressing speed is of great importance, an auto-clicker for Chromebook will make life much easier for you.
Installing an auto clicker on Chromebook can dramatically increase your CPS rate and enhance the clicking speed to an unmatched level. It is much better to use with better targeting abilities than clicking manually, which may cause errors due to human boundations. It has simple functionality and starts when you pause scrolling or clicking manually. It takes over the job and starts clicking with the delay set in settings, and does your job with ease and efficiency.
Here is What You Will Learn About Auto Clicker Chromebook
1. Users can learn to start Auto Clicker in Chromebook
2. Manage settings of Auto Clicker
3. Learn how to Install Auto clicker on Google Chrome Browser
4. Settings > Advanced > Accessibility > Manage Accessibility features > Mouse & Touchpad > Automatically.
How to Start the Auto Clicker on Chromebook
Enable the In-Built Auto Clicker for Chromebook
Step 1: From the bottom right corner, select time and hold
Or, you can select Alt+Shift+S from your keyboard
Step 2: Open ‘Settings’ & and then click on ‘Advanced’
Step 3: From the ‘Accessibility’ option
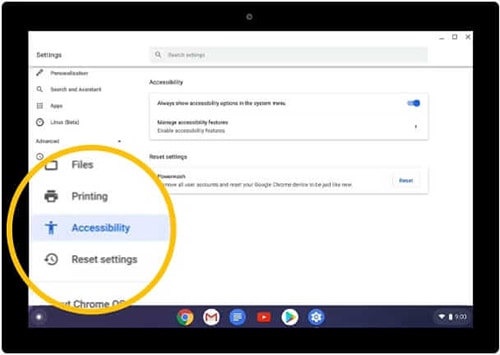
Step 4: Choose ‘Manage Accessibility features’
Step 5: Now go to Mouse & Touchpad
Step 6: Select Automatically click when the cursor stops.
Once you get started, you can easily customize your automatic click settings if required. There are various settings under the Auto clicker setting, which helps you take full advantage of the tool.
Different Settings of Auto Clicker
1. Delay before click
This option decides how long the auto clicker waits before the cursor stops. To customize the options, click on the delay before click option and choose the duration as per your requirement. The time duration lies between 0.6 to 4 seconds.
2. Stabilize Click Location
The option helps you stabilize the movement of the cursor. It won’t move unless you want to move it.
3. Movement Threshold
With this feature, you can control the range at which your cursor will work. You can select a range on your screen until the auto clicker can scroll and not move out of the defined area.
4. Always go back to Left Click
Go back to left-click automatically after any action, like right-click or left-click
How to Use Different Types of Clicks?
There are different types of clicks available on Auto click. Choose from the bottom suitable space.
- Left-Click
- Right-Click
- Double-Click
- Click and Drag
- Scroll
- Toggle menu position
You can choose what actions you want the cursor to perform.
How to Use Auto clicker on Google Chrome Browser
You can get it by installing the CTG Plugin extension on your browser.
Step 1: Install CTG extension
For installing the extension –
- Click at the three dots on the extreme top left corner of your browser
- Go to settings
- Search for “Add Accessibility Features.” It will redirect you to the extension web store
- Search for the “CTG plugin.”
- Click on “Add to chrome.”
Step 2: Click on the extension icon, select CTG Plugin
Step 3: A dialogue box will appear with the settings, click on Options, and now simply Enable or Disable according to your requirements but make sure to enable auto clicker in these options.
The auto clicker in the Google Chrome browser works when you work on the browser and not otherwise on your laptop or computer.
If you don’t move the cursor for a long time, it will automatically do it on your behalf.
The Main Functions & Benefits of Auto Clicker:
There are multiple functions of an auto clicker depending on which software you install and can have multipurpose benefits as jotted down below –
1. Auto Click
Auto click is the auto-clicker’s primary function, which has a lot of benefits. It works as an excellent tool for gamers, be it building blocks in Minecraft or shooting continuously on World of Warcraft. There are many other uses for the auto clicker, like, if you want to click fast on a flash deal in a shopping site, or just want to keep the screen awake, or automatically refresh a web page like your email, if you are eagerly waiting for an email.
2. Targeted clicks
You can target the areas where you want the auto clicker to run. It can benefit software testing, where a few random clicks can help determine the reaction of software or a website.
3. Auto-Scroll
Set a scroll speed and let the tool scroll through a website on its own. It can be a products page where you want to go through the products but don’t want to scroll manually or a pdf. Just set the scroll speed according to your reading ability, sit back, relax and read hassle-free.
4. Click Delay
You can set a delay for the first click after inactivity. This feature is helpful if you just want the screen to be awake but are not around. It can be beneficial to employees who need to be constantly online.
Apart from these features, many tools and extensions provide additional features like password generator, page refresh, autofocus, etc.
Wrapping up :
In conclusion, Auto Clicker makes your life easier and helps you finish tasks on time. It speeds up the whole process. It continues to function even when you are not in front of a laptop or desktop. Its utility is spread extensively in a lot of small and large-scale businesses.

