Ad-hoc network in Windows is an option to share your internet connection with other devices. The only limitation on the Ad-hoc network is, you can share the connection only to Windows computers. You cannot connect your Smartphone or any other device using that. If you want to connect other devices, you have to install a third party app to use your Windows machine as a modem. This was the procedure till Windows 7, but Windows 8 and 8.1 has a default feature to share a WiFi connection without using any third party apps. Just a little tweak on command prompt will make your Windows machine work as a WiFi Hotspot.
All you need is a working internet connection on your Windows machine. Either wired, USB or wireless connection can be used. Make sure you’ve a WiFi adapter on your device, especially desktop users. Since, most of the desktops only use ethernet connectivity, they won’t have WiFi adapter. So, if you don’t have WiFi connectivity on your machine, you cannot share WiFi with other devices. Lets have a look at the steps to convert your Windows machine into a WiFi hotspot.
Step 1: First you need to open “Command Prompt”. There will be two modes, one is normal mode and another one is Administrator mode. For this process, you need to open the Command Prompt in “Administrator Mode”.
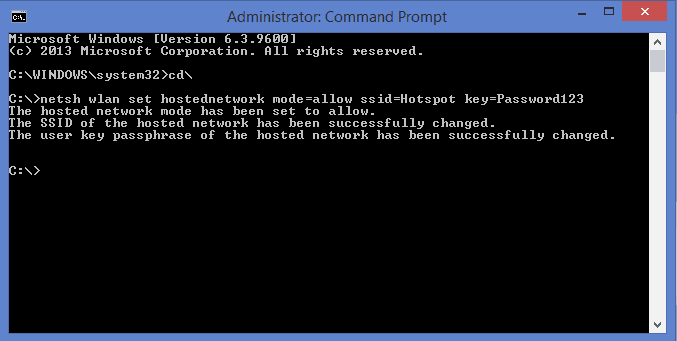
Step 2: After you open the Window, type the following command in your Command Prompt. The “ssid” represents your “WiFi Hot Spot’s name” and the “Key” represents your “WiFi Password”. You can change them, incase you need.
netsh wlan set hostednetwork mode=allow ssid=Hotspot key=Password123
Step 3: Next, enter the following command and press enter to start your virtual WiFi hotspot. It should show a message that “The hosted network started”.
netsh wlan start hostednetwork

Step 4: Now, go to Control Panel -> Network and Sharing Center -> Network Connections. There you will see the newly listed “Virtual Local Area Connection”.
Step 5: Get back to the “Network and Sharing Center” and click the “Ethernet” or whatever shows in the “Connections” section. A new window will pop-up, in that select “Properties” and go to “Sharing” tab on the top.
Step 6: Enable “Allow other users to connect through this computer’s Internet Connection” option on the top. In the drop down list below, select the newly listed “Virtual Local Area Connection”. Click “Ok” and you are good to go.
Now your Windows machine will act as a virtual router, to connect all your devices. This option will be very helpful when you have an ethernet connection or a USB Connection, you can easily share WiFi and connect your other devices using this method. Try this on your Windows 8 machine and share your experience with us in the comments. Thanks for reading, do share this post with your friends.
Via 7Tutorials

