Microsoft’s Windows 10 offers number of security features such as Bitlocker, Windows defender, Microsoft SmartScreen, User Account Control. Most of these features are visible changes and every Windows 10 user encounters them every now and then. However there are number of security features which are hidden and rarely users ever gets to know more about it. One such feature is Driver Signature Enforcement. If you are wondering what is drive signature enforcement and how can you enable or disable on Windows 10, then continue reading.
What is Driver Signature Enforcement in Windows 10?
Device drivers play a very important role in the proper functioning of your Windows and connected hardware. They essentially provide a bridge between the hardware and software applications installed on your computer. Without proper drivers installed, most hardware devices will fail to function properly. Since the device drivers are provided by hardware manufacturers and often users aren’t aware of legit sources for downloading drivers. You may sometime end up downloading untrusted drivers which can cause security breach like malware or virus being installed silently on your Windows 10 PC.
To overcome this issue, Windows has a feature called Driver Signature Enforcement. Due to this, whenever you install a driver in your computer, Windows 10 will check whether that driver is signed or not. By default Windows only allows the installation of those drivers which are signed by Microsoft. A signed driver not only prevents you from security issues but also makes sure the driver in question is fully compatible with your System.
How to Disable Driver Signature Enforcement on Windows 10?
While the Driver Signature Enforcement is great for security, it can cause problems sometimes. If you are using a hardware device whose driver is not signed, then it can cause issues (check here how to find unsigned drivers installed on Windows 10). Drivers from smaller developers are usually not signed which means that you cannot install them if Driver Signature Enforcement is enabled. Therefore, there can be many cases where the user might want to disable this feature either temporarily or permanently. Thankfully, Windows 10 has multiple possible methods for both of the later options. So, if you want to successfully disable driver signature enforcement in your computer, make sure to go through the following methods one by one:
Disable Integrity Checks via Command Prompt
In Windows, you can disable integrity checks which also disables the driver signature enforcement feature. This method will disable signature verification permanently. Although, you can turn it back on manually via Command Prompt. You can disable integrity checks using Command Prompt in Windows as shown here:
- First, make sure that the Secure Boot feature is disabled on your computer. You can do that by going into the BIOS of your PC. Once that is done, boot into Windows.
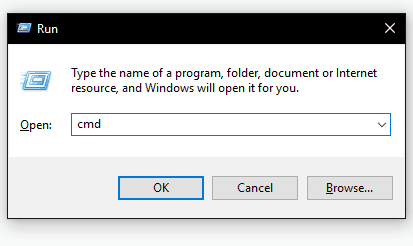
- Now in Windows press Windows Key + R on your keyboard which will open Run. In here type CMD and press enter which will open Command Prompt on your computer.
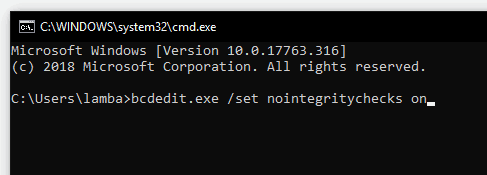
- Inside the Command Prompt window type exe /set nointegritychecks on and press enter. Running this command in your PC will disable integrity checks.
- Finally, reboot your computer after which the Driver Signature Enforcement will be disabled in your PC.
Use Startup Option to Disable Driver Signature Enforcement
If you want to disable the driver verification feature temporarily, then you can use the Startup Options in Windows to do so. As the name suggests, Startup Options allow you to disable or enable feature right on Windows Startup. These options also include disabling driver signature enforcement in your computer. And whenever you reboot your computer, it will re-enable driver signature enforcement. You can use the Windows Startup Options method by following the given instructions:
- First, press Windows Key and I on your keyboard at the same time which will open Windows Settings.
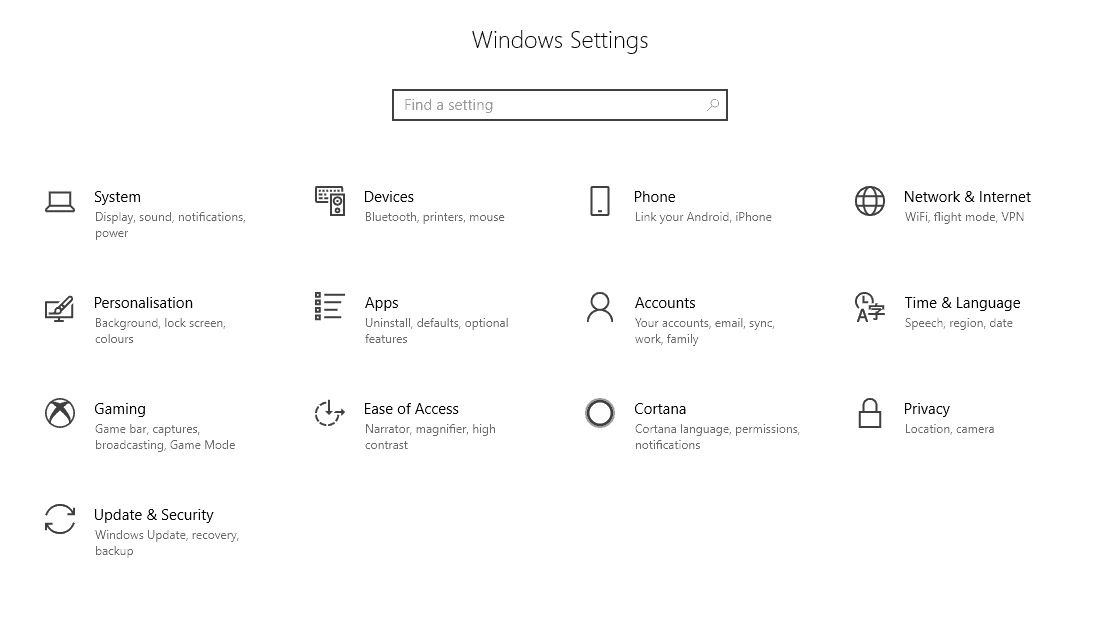
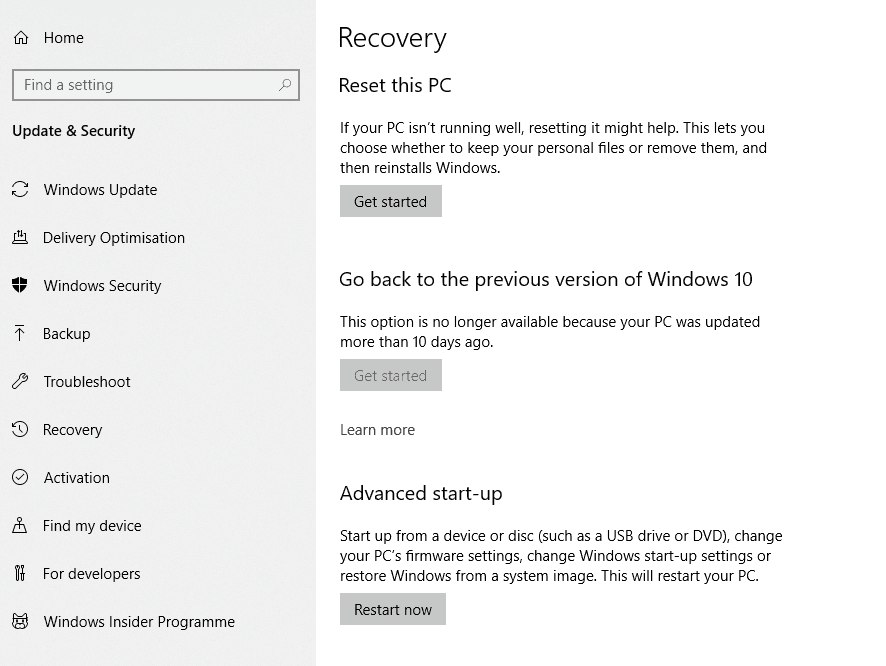
- In here, go to the Update & Security menu and open the recovery tab after that. Now, click on Restart Now under the Advanced Start-up
- Doing so will reboot your computer and you will be inside the Windows Advanced Startup menu.
- After this, go into Troubleshoot and proceed to Advanced options for opening Startup Settings.
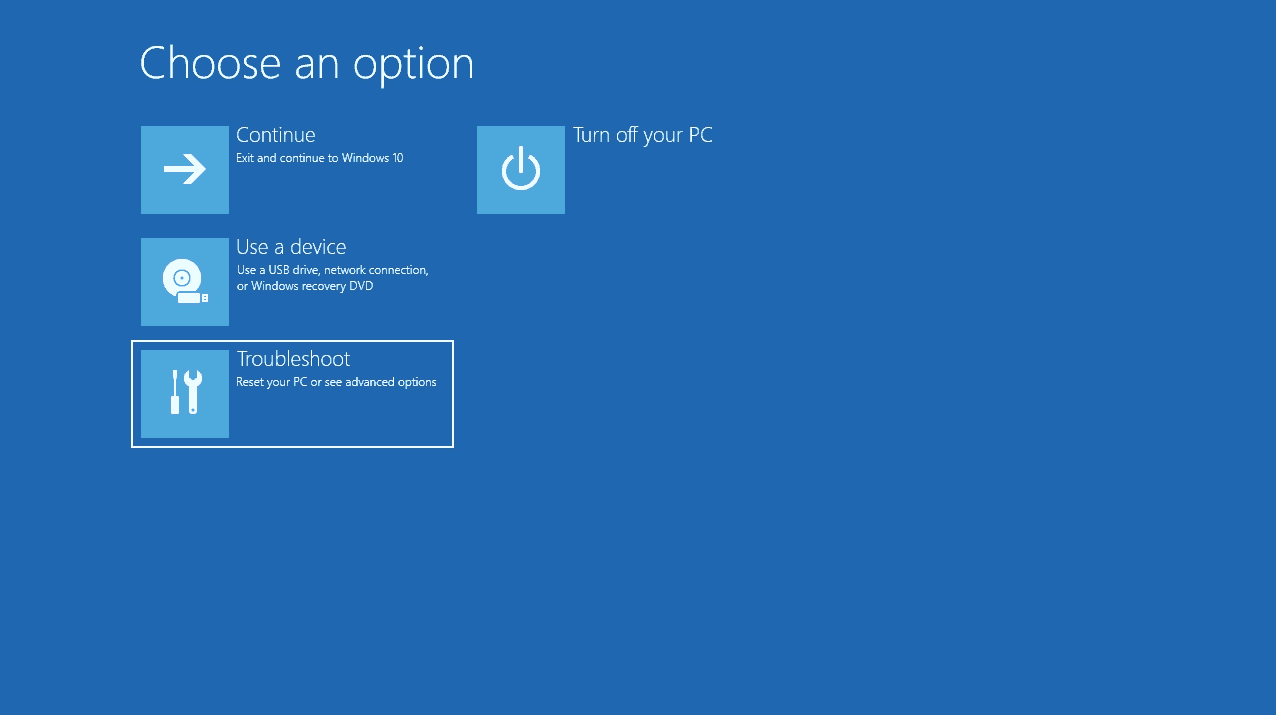
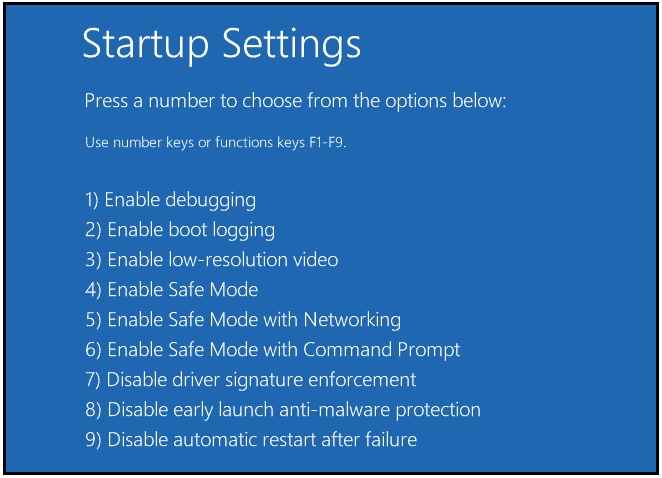
- Once you have done this, you will see multiple options for the startup settings in your computer. Now click on Restart which will take you on a new screen where you have to press 7 on your keyboard to disable driver signature enforcement.
- Now, your computer will boot into Windows 10 automatically with the driver signature feature disabled until the next reboot.
How to Enable Driver Signature Enforcement on Windows 10
If you used the Integrity Check method or the Test Signing Mode method, then driver signature enforcement is permanently disabled on your computer. This means that your PC is currently vulnerable to cyber attacks via untrusted drivers. Therefore, it is highly recommended that you should re-enable driver signature enforcement on your computer. This is to be done via Command Prompt as shown in these steps:
- Press Windows Key + R on your keyboard and type CMD in here and press enter which will open Command Prompt.
- In here, depending on the method you used, enter one of the following commands and press enter. You should use the first command if you used the Integrity Check method, and the second command if you used the Test Signing Mode method.
- exe /set nointegritychecks off
- bcdedit /set testsigning off
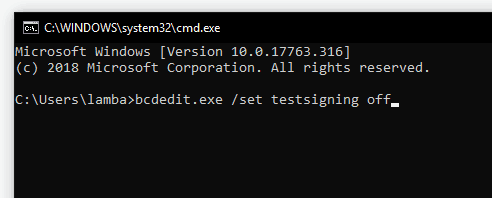
- At last, reboot your computer once you have entered one of these commands which will re-enable driver signature enforcement in Windows 10.
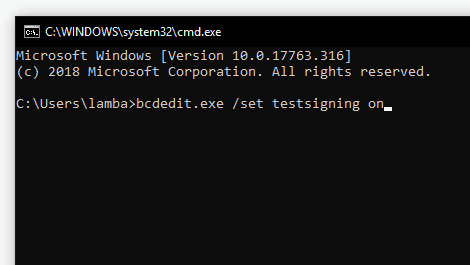
Enable Test Signing Mode using Command Prompt
Another method for disabling driver signature enforcement permanently is to enable test signing mode. It basically allows you to test drivers on your computer that are not signed. This feature is highly useful for developers since they can easily try out different drivers. And you can easily turn on the test signing mode via command prompt. You can do this to permanently driver signature enforcement on your computer as shown here:
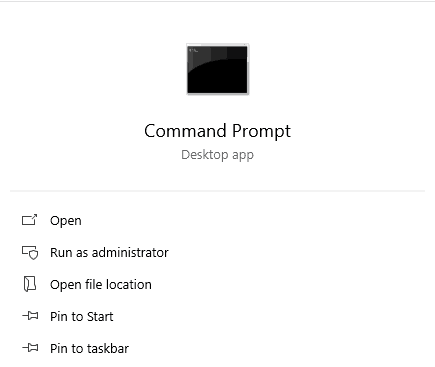
- Open Windows Search and open Command Prompt as an Administrator using it.
- Once you are inside the Command Prompt on your computer, type bcdedit /set testsigning on and press enter on your keyboard to successfully enable test signing mode.
- Do remember that this command will only work if you have disabled secure boot from the BIOS of your computer.
- After entering this command, simply restart your computer which will successfully disable driver signature enforcement in your Windows 10 PC.

